What's new
Photoshop Gurus Forum

Welcome to Photoshop Gurus forum. Register a free account today to become a member! It's completely free. Once signed in, you'll enjoy an ad-free experience and be able to participate on this site by adding your own topics and posts, as well as connect with other members through your own private inbox!

Remove haziness


WarrenG

Well-Known Member
Messages
46
Likes
15
There appears to be a thin layer of haziness & dust on this 1948 photo of my grandmother, aunt and cousins. I haven't had any luck in removing it. I've tried various tonal adjustments. camera raw filter haze removal, looked at individual channels, etc. but the haze remains. Searching for techniques / work flow to remove it and see the detail under it. Uploading the original jpg since the site doesn't allow tiff formats.
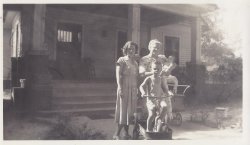
Marilyn, Ben Jr. & Gary Gammons & Lucy Coltrane - Smithfield.jpg
 

thebestcpu

Guru
Messages
2,988
Likes
2,747
Hi @WarrenG
This could be a tough job yet a forum member may jump in.

Is the haze something you see on the print/negative in regular light, or is the haze a result of the scanning.
My first attempt was not satisfactory and I saw some strange banding going on. Don't know that happened because of some light from the sun getting in the camera when it was shot, something in processing the negative print, or in the scanning process.

A better starting image if possible would go a long way in getting a better post processed result.
Thought it was worth asking
John Wheeler
 

WarrenG

Well-Known Member
Messages
46
Likes
15
Hi @WarrenG
This could be a tough job yet a forum member may jump in.

Is the haze something you see on the print/negative in regular light, or is the haze a result of the scanning.
My first attempt was not satisfactory and I saw some strange banding going on. Don't know that happened because of some light from the sun getting in the camera when it was shot, something in processing the negative print, or in the scanning process.

A better starting image if possible would go a long way in getting a better post processed result.
Thought it was worth asking
John Wheeler
Thanks, John. I scanned this a few years ago before I had any lnowledge about scanning techniques. I don't remember the condition of the print which my cousin has. I guess I should try to get his family album again and re-scan the photos now that I know more about how to properly scan photos.
 

thebestcpu

Guru
Messages
2,988
Likes
2,747
Hi @WarrenG
Its a trade off of the hassle to obtain the original again vs trying post processing as is.
I do a lot of genealogy restoration work and found that if I can get the original, I usually end up with a better "Keeper" end result.
Some forum member may still give it a go so its up to you
John Wheeler
 
Messages
4,139
Likes
6,062
@WarrenG
I worked on this image for more than 2hours.
1. 80% was done with 2 tools. The Clone Stamp Brush and the Healing Brush. And of course a lot of patience and practice is necessary.
With this technique you can reduce smudges and blotches in the image.

2. Next step was to make a selection of the family on put it on a new layer, and set the blend mode to multiply and opacity 50% .

3. Make a rough selection of the "bleached" section on the right side of the image. Give this selection a very soft edge(100 pixel).
Put it on a new layer and change the blend mode to multiply, and the opacity to 50 %.
With the curve tool you can adjust the contrast to your liking.
Add a layer mask to this layer. With a big and very soft brush with 20% opacity you can paint of what you don't need.

This is very roughly explained how I achieved my result. A step by step tutorial is herewith impossible, there are just to many little steps I might have done intuitive.

You can also read this adobe link, it might help you to understand the complexity of "restoration".

Regards Chris
 

Top