What's new
Photoshop Gurus Forum

Welcome to Photoshop Gurus forum. Register a free account today to become a member! It's completely free. Once signed in, you'll enjoy an ad-free experience and be able to participate on this site by adding your own topics and posts, as well as connect with other members through your own private inbox!

Specific Removing glare from photo


mungeys

New Member
Messages
1
Likes
0
Hi all,

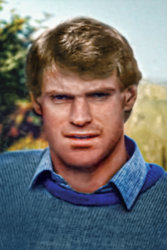
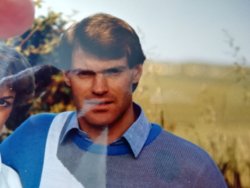
I've tried to do this myself but my knowledge of photoshop isn't good enough :( can anyone help? I'm just trying to remove the glare from the photo, or just at least from his face

Thanks in advance for any helpIMG_20190617_104517_resized_20190617_105725253.jpg
 

Babine

Guru
Messages
2,717
Likes
3,793
I seem to have trouble with this type of photo correction also. Any chance, Babine, you could pass on your method? I’m sure there are many others who would appreciate the info as would I. Thanks very much!

Well, it involved a lot of trial-and-error but I'll give you some ideas to try out.

Firstly, I set 2 duplicates over-top of the original then started with a 2nd duplicate in ACR. I made adjustments with the basic sliders, in particular Dehaze and then the colour adjustments in HSL. With this one and back in CC, I applied these adjustments to the 1st duplicate to the improved areas with masks. From here, I used numerous curves adjustments (again on duplicates) targeting the hazed areas of his face and hair and applied these to the layer below with masks. As for the right side of his mouth and his right eye, I selected his left eye and left side of his mouth, copied them to new layers, inverted the copies and used masks to apply them to the duplicate below.

I chose to make all of his sweater the same colour so I made numerous selections within his left side, copied them to new layers and moved them over to hazed side. Lots of transforming and the use of masks got them to what you see.

More curves adjustments helped with the shadowed areas of his hair, contrast improvements, etc.

I hope this is of some use to you. This one was surely not 'a one button fix'. :^)
 

PegoMan

Well-Known Member
Messages
162
Likes
143
Well, it involved a lot of trial-and-error but I'll give you some ideas to try out.

Firstly, I set 2 duplicates over-top of the original then started with a 2nd duplicate in ACR. I made adjustments with the basic sliders, in particular Dehaze and then the colour adjustments in HSL. With this one and back in CC, I applied these adjustments to the 1st duplicate to the improved areas with masks. From here, I used numerous curves adjustments (again on duplicates) targeting the hazed areas of his face and hair and applied these to the layer below with masks. As for the right side of his mouth and his right eye, I selected his left eye and left side of his mouth, copied them to new layers, inverted the copies and used masks to apply them to the duplicate below.

I chose to make all of his sweater the same colour so I made numerous selections within his left side, copied them to new layers and moved them over to hazed side. Lots of transforming and the use of masks got them to what you see.

More curves adjustments helped with the shadowed areas of his hair, contrast improvements, etc.

I hope this is of some use to you. This one was surely not 'a one button fix'. :^)
Thank you very much Babine. I’m out of town right now, as soon as I get home Thursday I’m trying your method. Thx much!
 

Top