What's new
Photoshop Gurus Forum

Welcome to Photoshop Gurus forum. Register a free account today to become a member! It's completely free. Once signed in, you'll enjoy an ad-free experience and be able to participate on this site by adding your own topics and posts, as well as connect with other members through your own private inbox!

Requesting color correction help


hotmustard

Member
Messages
6
Likes
1
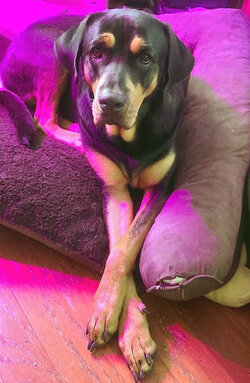
Hello! I am hoping to get some help learning how to correct the magenta out of this photo, at least at some level. This was taken with plant "grow lights" in the background, hence the overall hue of the image.

I am a newbie to PS (used it years ago but those skills are long gone, haha).

I've tried using photo filter, then color picker to select/invert the color, then tinkering with hue/saturation, but with limited success. Perhaps it's too saturated in the magenta for it to be fully removed?

I welcome all assistance and guidance. Thank you!
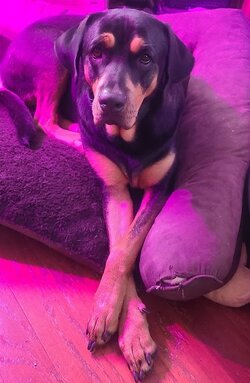
20221005_140041.jpg
 

JeffK

Guru
Messages
2,486
Likes
2,890
Here's one way I've used...

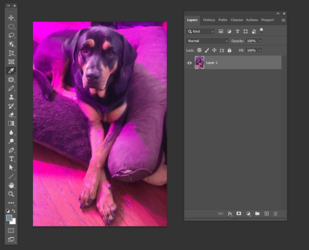
Open your image:
1672694285372.png

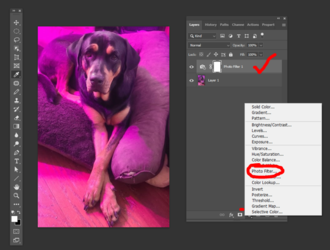
Now add a Photo Filter adjustment by pressing the half-moon icon at the bottom of the layer stack:

1672694713691.png
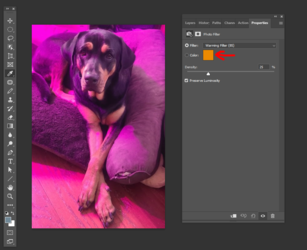
Now maker sure that the camera icon on that layer is active and double click on it - this will bring up the color picker:

1672694917558.png'

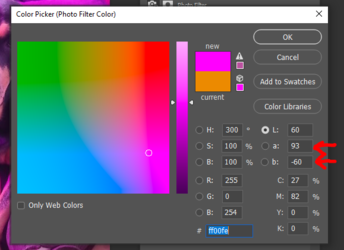
This will bring up the Color Picker - move your cursor and click on the most saturated area (I chose the wall behind the dog's butt). Dont click OK yet.
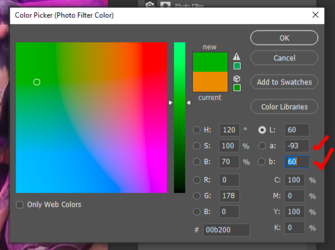
Move your cursor over to the Lab area and reverse the "a" and "b" settings - ie if there's a minus sign, remove it and if there's no minus sign, add it:

1672695400462.png 1672695532602.png

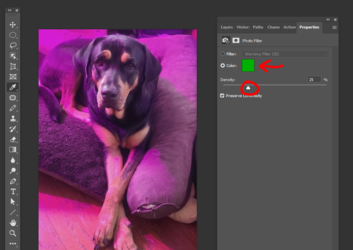
Now you've got a green swatch on the photo filter:

1672695632091.png

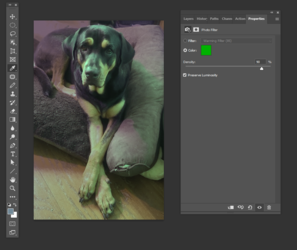
Now move that density slider over to the right until the red cast lessens:

1672695773234.png

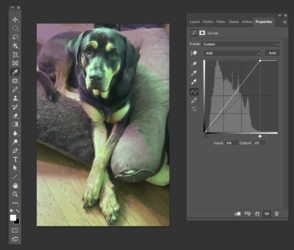
You can then play with a Hue/Saturation slider or curves to bring some color back:

1672695869663.png

It's a start. You can then make any additional adjustments from there. Just one option...

- Jeff
 

Rich54

Guru
Messages
1,733
Likes
3,416
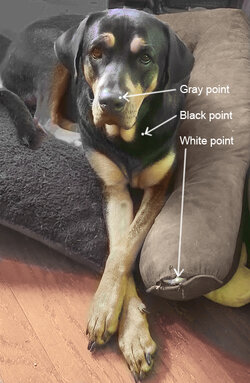
This was a very tough one (for me). My usual approach to color casts is to re-set the black, white and gray points. But this image is so extreme that plenty of magenta still remained after doing that. Making things even more difficult, there is nothing in this image where I know, for sure, what the correct color ought to be. If this is your dog and your house, then you will know better which colors things are supposed to be.

This is not yet done, but I've taken it far enough to hopefully give you some ideas on how to procede.

Color Correct.jpg


  • My first step was to set the black and white points by identifying the darkest and lightest pixels in the photo (using a Threshold adjustment).
  • I used a Curves adjustment to individually set the R, G and B channels to these approximate settings: Black = 25,25,25. White = 175,175,175.
  • Once the B & W points were established, I used another Curves adjustment to set the Gray point, which I identified as a spot on the dog's nose.
  • At this point, the image looks like this:
Color Correct2.jpg


  • Next, I used a Hue/Saturation adjustment to fully desaturate the magenta channel. Using the dog's pillow (along the right side of the image) as a guide, I also darkened the magenta channel to get it to match and blend with the non-magenta portion of the pillow (where the magenta is blocked by the dog's shadow).
  • Now that the magenta is fully desaturated, there are a number of distinct areas (the pillow on the right; the cushion the dog is resting on; the floor; the hind part of the dog; some of the background areas) that need to be colorized.
  • I suppose you could use several Hue/Saturation adjustment layers set to the Colorize option (with appropriate layer masks) to re-color these various areas. Lately, I've started to prefer using a Gradient Map adjustment layer (with layer masks). I've got three of them so far (pillow, floor and dog), but more are required to finish the job.

Here is my PSD file so that you can see the various layers and settings.
 

Attachments

  • Color Correct.psd
    1.8 MB · Views: 3
Last edited:

hotmustard

Member
Messages
6
Likes
1
Here's one way I've used...

Open your image:
View attachment 134587

Now add a Photo Filter adjustment by pressing the half-moon icon at the bottom of the layer stack:

View attachment 134588
Now maker sure that the camera icon on that layer is active and double click on it - this will bring up the color picker:

View attachment 134590'

This will bring up the Color Picker - move your cursor and click on the most saturated area (I chose the wall behind the dog's butt). Dont click OK yet.
Move your cursor over to the Lab area and reverse the "a" and "b" settings - ie if there's a minus sign, remove it and if there's no minus sign, add it:

View attachment 134593 View attachment 134595

Now you've got a green swatch on the photo filter:

View attachment 134596

Now move that density slider over to the right until the red cast lessens:

View attachment 134597

You can then play with a Hue/Saturation slider or curves to bring some color back:

View attachment 134598

It's a start. You can then make any additional adjustments from there. Just one option...

- Jeff
Thank you very much! I will give this a try. I appreciate your taking the time to teach me this :)
 

hotmustard

Member
Messages
6
Likes
1
This was a very tough one (for me). My usual approach to color casts is to re-set the black, white and gray points. But this image is so extreme that plenty of magenta still remained after doing that. Making things even more difficult, there is nothing in this image where I know, for sure, what the correct color ought to be. If this is your dog and your house, then you will know better which colors things are supposed to be.

This is not yet done, but I've taken it far enough to hopefully give you some ideas on how to procede.

View attachment 134591


  • My first step was to set the black and white points by identifying the darkest and lightest pixels in the photo (using a Threshold adjustment).
  • I used a Curves adjustment to individually set the R, G and B channels to these approximate settings: Black = 25,25,25. White = 175,175,175.
  • Once the B & W points were established, I used another Curves adjustment to set the Gray point, which I identified as a spot on the dog's nose.
  • At this point, the image looks like this:
View attachment 134594


  • Next, I used a Hue/Saturation adjustment to fully desaturate the magenta channel. Using the dog's pillow (along the right side of the image) as a guide, I also darkened the magenta channel to get it to match and blend with the non-magenta portion of the pillow (where the magenta is blocked by the dog's shadow).
  • Now that the magenta is fully desaturated, there are a number of distinct areas (the pillow on the right; the cushion the dog is resting on; the floor; the hind part of the dog; some of the background areas) that need to be colorized.
  • I suppose you could use several Hue/Saturation adjustment layers set to the Colorize option (with appropriate layer masks) to re-color these various areas. Lately, I've started to prefer using a Gradient Map adjustment layer (with layer masks). I've got three of them so far (pillow, floor and dog), but more are required to finish the job.

Here is my PSD file so that you can see the various layers and settings.
Wow, thank you so much! I am unfamiliar with most of the techniques you mentioned, so will definitely dig in and play around with them.

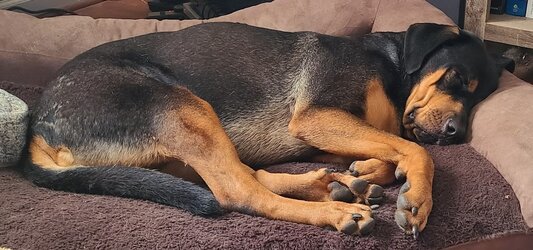
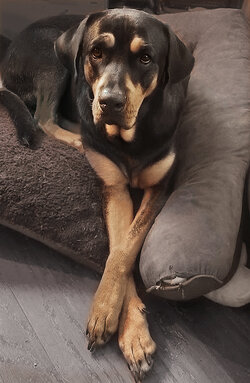
I apologies for not including a "correct" color image -- I hadn't really thought of that. I'm attaching a picture of the same dog/bed in natural light.
Based on the steps you took above, I'm thinking I can color "sample" (not sure if that's the correct term) from the accurate picture and apply it to the corrected image in order to get the fur color closer to its natural color -- is that feasible?

correct coloring.jpg
 

Rich54

Guru
Messages
1,733
Likes
3,416
Based on the steps you took above, I'm thinking I can color "sample" (not sure if that's the correct term) from the accurate picture and apply it to the corrected image in order to get the fur color closer to its natural color -- is that feasible?

Yes, that is definitely the way to go. Sample the correct colors from your good image and apply them to the bad image.

If you follow my steps, then most of the extreme magenta areas will essentially become B&W, requiring recoloring. I prefer using gradient map adjustment layers for recoloring (tutorial below). In a gradient map, you are constructing your own custom dark-to-light gradient with colors of your choosing. In this case, you would choose the accurate colors from your second photo. The gradient map then "maps" the dark colors of your gradient to the dark portions of your image, and maps the light colors of your gradient to the lighter portions of your image. Each gradient map will affect the entire image, so you'll need to use layer masks to apply the gradient maps only to their specific areas of the image.

In my opinion, separate gradient maps are required for:
  1. the dog's black/brown coat
  2. the dog's tan coloring;
  3. the dark brown mat he/she is resting on
  4. the light brown pillow
  5. the floor
  6. the back wall behind the dog.

This is a fairly complicated edit and there is no "one button fixes everything" solution. You'll need to patiently repair it sections at a time.
I'm also attaching a tutorial about setting the black, white and gray points. You should do this first before applying any gradient maps.


Last edited:

hotmustard

Member
Messages
6
Likes
1
Yes, that is definitely the way to go. Sample the correct colors from your good image and apply them to the bad image.

If you follow my steps, then most of the extreme magenta areas will essentially become B&W, requiring recoloring. I prefer using gradient map adjustment layers for recoloring (tutorial below). In a gradient map, you are constructing your own custom dark-to-light gradient with colors of your choosing. In this case, you would choose the accurate colors from your second photo. The gradient map then "maps" the dark colors of your gradient to the dark portions of your image, and maps the light colors of your gradient to the lighter portios of your image. Each gradient map will affect the entire image, so you'll need to use layer masks to apply the gradient maps only to their specific areas of the image.

In my opinion, separate gradient maps are required for:
  1. the dog's black/brown coat
  2. the dog's tan coloring;
  3. the dark brown mat he/she is resting on
  4. the light brown pillow
  5. the floor
  6. the back wall behind the dog.

This is a fairly complicated edit and there is no "one button fixes everything" solution. You'll need to patiently repair it sections at a time.


This is all so helpful, I seriously appreciate your time and willingness to share you experience and knowledge.

I haven't reviewed the tutorial video you shared, so forgive/ignore if this is answered in it, but once I set up each of the gradient maps you mentioned, can I save them, so they can be applied to subsequent images? I have several images I'm hoping to color-correct? Or do I need to create them within each individual file?

Again, my sincere thanks and appreciation!
 

Rich54

Guru
Messages
1,733
Likes
3,416
This is all so helpful, I seriously appreciate your time and willingness to share you experience and knowledge.

I haven't reviewed the tutorial video you shared, so forgive/ignore if this is answered in it, but once I set up each of the gradient maps you mentioned, can I save them, so they can be applied to subsequent images? I have several images I'm hoping to color-correct? Or do I need to create them within each individual file?

Again, my sincere thanks and appreciation!

I attached a second tutorial just a moment ago.

To answer your question... yes, once you've created a successful gradient map, you can drag that gradient layer into a new photo and all the gradient map settings will be preserved. Of course, the layer mask will be wrong from one photo to the next, so you'll need to redo all of those masks.
 

hotmustard

Member
Messages
6
Likes
1
I attached a second tutorial just a moment ago.

To answer your question... yes, once you've created a successful gradient map, you can drag that gradient layer into a new photo and all the gradient map settings will be preserved. Of course, the layer mask will be wrong from one photo to the next, so you'll need to redo all of those masks.
I'd missed the second tutorial, so thank you for pointing it out. Also appreciate the reply to my last question. I am working this weekend, but can start working on this next week. Again, thank you for all of your help!
 

DolphDawg

Member
Messages
8
Likes
9
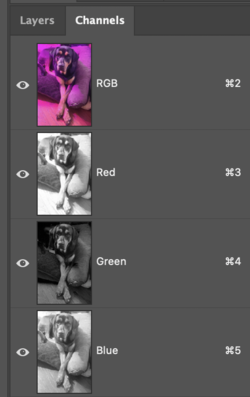
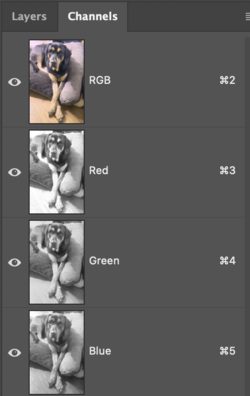
I've always found when you have color cast looking at the RGB channels i'll give you some insight. in this particular case there's really no information in the green channel. (The darker the channel the less information)

Screen Shot 2023-01-05 at 2.18.53 PM.png

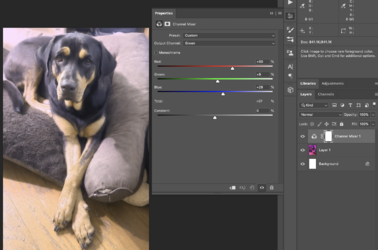
If you use channel mixer (in Layer Adjustments) I first decrease the information from the Green channel and I took information from the red and blue to compensate. Try to keep the total at 100% or so. You could tweak it a little more using curves but I think this solves the heavy lifting.


Screen Shot 2023-01-05 at 2.11.18 PM.png

This is how the channels look after using channel mixer

Screen Shot 2023-01-05 at 2.22.42 PM.png
I hope this helps
 

Top