What's new
Photoshop Gurus Forum

Welcome to Photoshop Gurus forum. Register a free account today to become a member! It's completely free. Once signed in, you'll enjoy an ad-free experience and be able to participate on this site by adding your own topics and posts, as well as connect with other members through your own private inbox!
Resizing issue keeps resizing equally.


xxnonamexx

Active Member
Messages
25
Likes
1
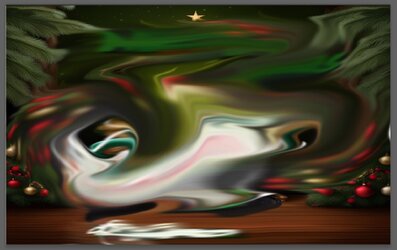
I have an image size of 8"w x 5" h. However when I try to resize it to cover the white background and resize it w/o losing quality it doesn't fill the 8x5 area. It always transforms equally when I did freeform and I have resample off. Any ideas?size.jpg
 
Don't completely understand - is the white area part of your 8 X 5 area?
Do you want to stretch the image to fill the white area?
Or do you want to fill the white area with similar/added on image?

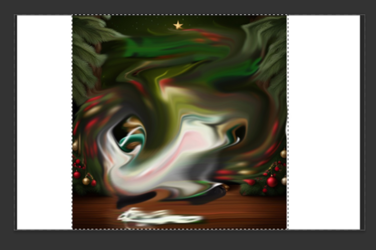
If you're just trying to stretch the image into the white area by pulling on one side at a time, use the select tool to select only the image. You'll get marching ants on the image area:

1701789039385.png

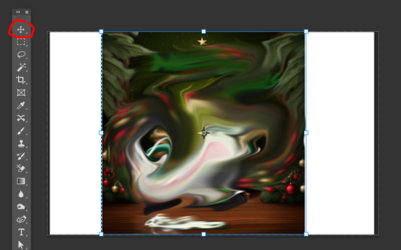
Now select your move tool and hit CTRL + T and you'll see the pull handles:

1701789189264.png

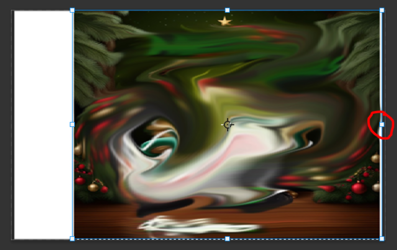
Holding down the SHIFT key, pull on the side handle:

1701789356832.png

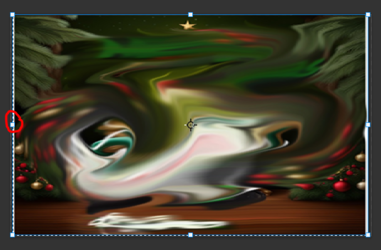
Then do the same with the other side:

1701789430162.png

This will have the effect of stretching the image.

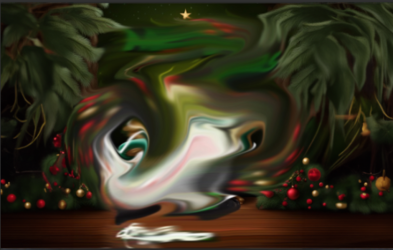
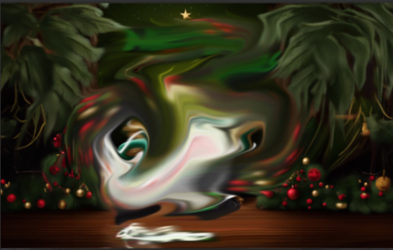
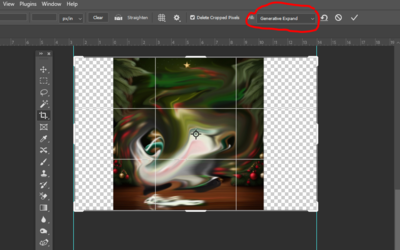
If you want to fill the area with similar pixels, you can use Generative Expand to get this result. First crop to the actual image, then recrop to large size using Generative exxpand.

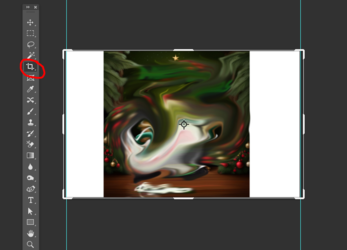
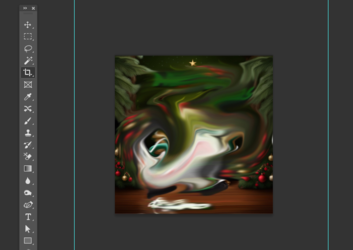
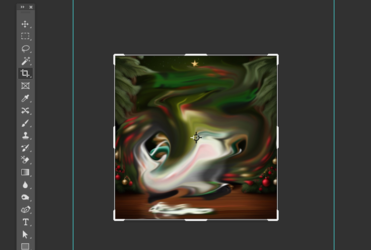
First using your crop tool, pull the sides in to match the width of your image. Then click OK (checkmark symbol at top):

1701789927556.png

1701789981369.png

With the crop tool chosen again., now pull on the side handles:

1701790024501.png

This will have the effect of adding to the image.

1701789672872.png

Hope this helps - if you have any questons or clarificatoins, please let us know.

1701789816376.png

1701790246648.png
 
Don't completely understand - is the white area part of your 8 X 5 area?
Do you want to stretch the image to fill the white area?
Or do you want to fill the white area with similar/added on image?

If you're just trying to stretch the image into the white area by pulling on one side at a time, use the select tool to select only the image. You'll get marching ants on the image area:

View attachment 141527

Now select your move tool and hit CTRL + T and you'll see the pull handles:

View attachment 141528

Holding down the SHIFT key, pull on the side handle:

View attachment 141529

Then do the same with the other side:

View attachment 141530

This will have the effect of stretching the image.

If you want to fill the area with similar pixels, you can use Generative Expand to get this result. First crop to the actual image, then recrop to large size using Generative exxpand.

First using your crop tool, pull the sides in to match the width of your image. Then click OK (checkmark symbol at top):

View attachment 141533

View attachment 141534

With the crop tool chosen again., now pull on the side handles:

View attachment 141535

This will have the effect of adding to the image.

View attachment 141531

Hope this helps - if you have any questons or clarificatoins, please let us know.

View attachment 141532

View attachment 141536
Thats the part that is confusing me. I am trying to make the image a 5"W x 8"H to print as a holiday card. For some reason its not coming out correctly. When I go to print the sizing keeps changing as I change the scale to 5x8.
 
Hi @xxnonamexx
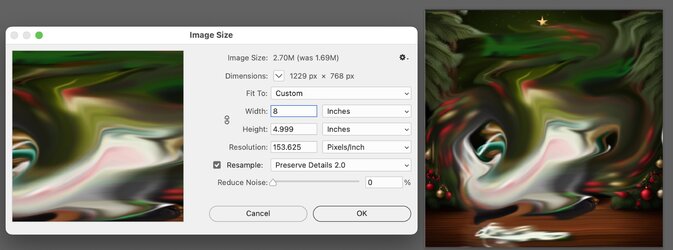
If you are trying to do this with the resize command, you will need the resample checkbox checked.

Assuming you started with a 5in x 5in image as below, you uncheck the link between the Width and the Height so they can scale independently and then may the width 8 inches:

Screenshot 2023-12-05 at 11.16.24 AM.jpg

The end result is as follows:

Screenshot 2023-12-05 at 11.16.38 AM.jpg

The quality change should be minimal for that amount of resizing.

Just another approach and hope this helps
John Wheeler
 
yes that helped but when I go to print im not getting it to have that image printed as 5"h x 8"W not sure what setting im missing thanks
 
I tested in uploading to a photo card making site for a 5x8 and its cut off. Not sure what I am missing I just want to make my image 5x7 to print it n a card.
 
Hi @xxnonamexx
It might help forum members help you if you provide the exact file you are uploading to the card site (I am assuming what you provided in your first post is not the one you are using since the file has a lot of white space to the left and right.
So if you could attach that exact file on another post or a link to a file on a file-sharing site that would be helpful.
Just a suggestion.
John Wheeler
 
FINAL23FLAT.jpg
Here is the file in JPEG or do you want the psd file Also any other suggesstions to this file to make it more realistic thanks
 
The image you provided looks excellent for a 5x7 image at 300 dpi.
By any chance when you send this file to the 5x8 card shop, is it cropped on top and bottom? If yes, then a 1/2 inch of white space would be needed on the left and right so they automatically increase the size to fill out the full image.
Just a thought
John Wheeler
yes one of the shops it cropped but if I go to print in photoshop shouldn't it be the same as if I sent to a card shop to print? Should I just add 1/2 in white on the top and bottom. That should print teh image without the white "border". How should I add it? Should it be transparent background. Any help greatly appreciated.
 
yes one of the shops it cropped but if I go to print in photoshop shouldn't it be the same as if I sent to a card shop to print? Should I just add 1/2 in white on the top and bottom. That should print teh image without the white "border". How should I add it? Should it be transparent background. Any help greatly appreciated.
Hi @xxnonamexx
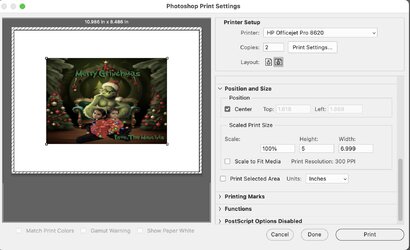
How the image prints depends on the size of the image in the file you have saved (in your case 5x7) and the settings when you use the print panel. As in the image below of the print panel, one of the options could be to scale the image to the media.

Screenshot 2023-12-05 at 7.28.13 PM.jpg
How it prints at any card shop depends on how they set up their printing and scaling. The card shops should be providing information on how to create and size your image so you get a good result with their company/product.
Please don't take my prior post suggestion as a correct way to do anything. I was trying to get more details on what was going on with your problem.

I would get the instructions from the card company and make sure your image file meets the criteria given by the card company.
John Wheeler
 
What's scanner to media mean? I tested it on Shutterfly as a test by uploading 5x7
I would need to see how those words were used in context to comment. If you have a link to the specific text forum members could more accurately comment.
John Wheeler
 
In my time before last, I did not have the Scale to Media checked. So, in the preview, you see how a 7x5 inch image would appear on 11 x 8.5 inch paper.
In the image below, the Scale to Fit Media is checked, and note that the preview (showing what will print) now fills up the paper frame in the width dimension and almost fills in the vertical dimension. The image was stretched/scaled uniformly (preserving the aspect ratio until one dimension of the image touches the margin boundary of the paper.

Screenshot 2023-12-05 at 8.34.52 PM.jpg

I hope that explains how that option is used.
John Wheeler
 

Back
Top