What's new
Photoshop Gurus Forum

Welcome to Photoshop Gurus forum. Register a free account today to become a member! It's completely free. Once signed in, you'll enjoy an ad-free experience and be able to participate on this site by adding your own topics and posts, as well as connect with other members through your own private inbox!

Saving Jpegs PS6


Richg

Member
Messages
10
Likes
1
Hi

I'm a school photographer and when it comes to editing I open up 75 orso images in PS6 at a time . I have an action set up whereby I press F6 and the edited image saves and closes. Up until now the images have been saving at maximum quality but now strangely the images are saving at high quality which is the default size. I've re recorded the action to save at maximum quality and also reinstalled PS6 but still no joy. Trouble is without this action I'm now adding 2 or 3 more stages to each image and when I'm editing 100's of images this adds a lot of extra time. Any ideas please?

Cheers
 

thebestcpu

Guru
Messages
2,989
Likes
2,750
It might help to save your Action as an ATN file and share that as an attachment in another post for forum members to take a look. It might help identify the issue.
Just a suggestion
 

thebestcpu

Guru
Messages
2,989
Likes
2,750
BTW Richg
A couple more thoughts
- How do you know the Action did not save at maximum quality level (from the file size or some other way)
- When saving the file, are you using File> Save, File > Save As, Export, etc
- Note that if the image is loaded and there are not changes, if you do a regular Save (back over the same file), as I understand it, it does not even do a Save and it would be left at its original compression level.
John Wheeler
 

Richg

Member
Messages
10
Likes
1
Good idea! Here it is, not much to it though
 

Attachments

  • Save and Close.atn
    126 bytes · Views: 2

Richg

Member
Messages
10
Likes
1
Hi John, thanks for your reply. Looking back at work from a few months ago most saved images are around 3mb now they are around 700kb. I've just edited a few more images and it seems they are now being saved at maximum again. Not really sure why as I've not changed anything
 
Last edited:

Richg

Member
Messages
10
Likes
1
Sorry, I didn't answer your other questions.... the action is basically File>Save, File>Close, I just use F6 to play this once the image has been edited and this overwrites the original image
 

thebestcpu

Guru
Messages
2,989
Likes
2,750
Hi Richg
If you shared a larger file and a smaller file that were saved at maximum quality the reason could be diagnosed.
Note that the size of the JPEG file is not just a function of the pixel dimensions and the quality level. It is also highly dependent on the content in the image. Images with large areas that are the same (solid color) are more highly compressed and images that have lower high frequency content (or less sharpening) can also be save in JPEG at much smaller sizes. So the solution just might be is that it is being saved at the correct compression and it is some other factor in the JPEG compression process that causes a different issues.
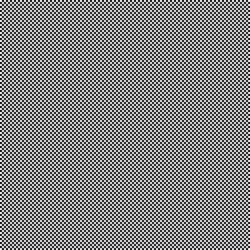
Here are two examples of a 500 pixel by 500 pixel images save at max quality of 12. One is just a pure checkerboard pattern that save at 134KB and a noise pattern that saves at 704KB over a 5X difference.
I do have software that can analyze the compression used on images so can let you know what compression was actually used on you image if that is desired.
Hope this all helps
John Wheeler

Checkerboard saved at 134KB with quality level 12
checkerboard.jpg


Noise Pattern saved at 704KB save at quality level 12
Noise Pattern.jpg
 

Richg

Member
Messages
10
Likes
1
Hi John, totally understood thanks. I've just experimented with some photos, all of which are very similar. I've attached a screenshot of the edited files, the first 3 have been saved by clicking file >save, file Close and setting the quality to maximum. The last 3 have been saved using the action. Big difference

Image 1.JPG
 

thebestcpu

Guru
Messages
2,989
Likes
2,750
Hi Richg
If you desire and have permission, to either post the exact image "as is" of a small image and a small image, I could most likely help determine why there is a difference in size if that is of any interest. There are possible other reasons for a larger file size yet doubt it applies to you. some files save additional metadata yet it usually does not cause that large of a difference.
This may be useful if the reverse engineering determines that you did not save at quality level 12, you would want to track that issue down. Yet if you are sure, they are all have the correct compression, this may be a moot point. I will leave that up to you.
John Wheeler
 

Richg

Member
Messages
10
Likes
1
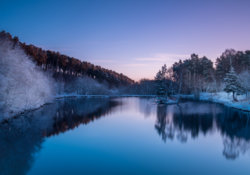
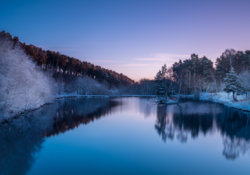
Thanks for this John. Obviously I cant use my school photos but here's a landscape..

RGP_9165 File Save File Close at Maximum.jpg

RGP_9165 USING ACTION.jpg
 

thebestcpu

Guru
Messages
2,989
Likes
2,750
Upon analysis of the two images using JPEGsnoop.exe, the larger files was saved at PS 12 level and the smaller one was saved at PS 8 level. So now the question is why.
 

thebestcpu

Guru
Messages
2,989
Likes
2,750
OK, I don't know all the rules that PS uses when saving a file, yet one thing that I noticed is that the dialog remembers what was used to save the file the last time. That might be file specific and not generic to any prior use.
So I suspect that the "Save" in your Action does not remember the details and is basing what to use for compression on either last use of the previous file or something else.
In the Action, you can turn on the dialog for saving to have it walk you through what it is doing.
All I know is that the smaller file was saved at PS quality level 8 and the dialog will default at least to the last quality save for a given file. So you can't count on the Save dialog to what you indicated.
Now, note, you could used Save As and I think it does record the exact settings in the Action and will show those settings in the Action itself. Just a consideration
Note that in the Adobe help file, they do point out this can be an issue so you have to be careful: The help file link is here with a snippet cut and paste below: https://helpx.adobe.com/photoshop/using/creating-actions.html

Hope this helps
John Wheeler

Screen Shot 2019-11-10 at 1.12.52 PM.png
 

Richg

Member
Messages
10
Likes
1
Hi John, thanks for your time looking into the photos for me. I have tried using save as but this brings its own issues whereby the action will try and save the image as the filename that was recorded when making the action but tbh I've only tried once and there may be a work around. Annoyingly this action has worked faultlessly for years for me!
Many thanks

Many thanks
 

thebestcpu

Guru
Messages
2,989
Likes
2,750
Hi Richg
You probably hit a corner case where the Action did not work. I have not seen documented what determines the default quality factor for a straight Save to JPEG format.

I did see another situation though where it defaulted to the quality level 8. I reset Preferences on Photoshop, and then brought in a PNG file. When I used your Action it saved at quality level 8 and stayed at quality Level 8 for subsequent saves of PNG files. When I read in a JPEG file that had been previously saved at quality level 12, when I used the Action it did save it at quality level 12.

So apparently, the quality level used to Save with a plain straight Save depends on a number of factors. So given the inconsistencies with the default quality level, I am not surprised you came across it and someday you are likely to trip over it again. At least you know what to look for.
John Wheeler
 

Richg

Member
Messages
10
Likes
1
Hi John

I think the easiest way would be to change the default setting to maximum but Im pretty sure this isn't possible in ps6. I'm going to have a play with the action later and hopefully find a way around it. Thanks again for your help

Cheers
 

Richg

Member
Messages
10
Likes
1
Ok so it seems that if I open all of my images as normal, edit the first image and click File>Save As, Save (set jpeg quality to 12) Ok and Close and then edit as normal and use my action to save and close the rest the action is saving them at maximum size. Just got to remember to save the first image manually now!

colleague, thanks, I've not used Image processor before but if I continue to have problems I'll certainly have a look

Cheers
 

thebestcpu

Guru
Messages
2,989
Likes
2,750
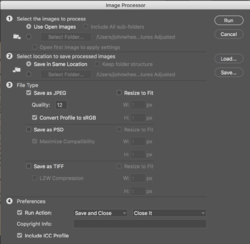
Actually, with Image Processor per @colleague, you can set the quality level right in that command and all that is missing is closing the file. You could just have an Action that is the Close command and have that be the Action that is run as the last optional step in the Image Processor Command. I added into the Action Set the Action "Close It" so you can see how that would look with the Image Processor Screen Shot below (Note: You could also call Image Processor with another Action and assign it to your keyboard shortcut with all parameters already specified)

Screen Shot 2019-11-11 at 9.37.29 AM.png


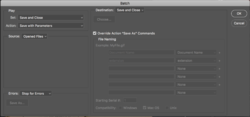
This could also be done with the Automate > Batch Command with the Action being run is an Action with only the Save As command with desired parameters. In this example I created an Action named Save with Parameters (which was just a Save As command). Again, you could also create an Action that calls Batch Processor with these parameters set and tied to your keyboard shortcut

Screen Shot 2019-11-11 at 9.38.45 AM.png


With either of the above options you don't have to do a dummy Save As prior to using either command.
 

Top