What's new
Photoshop Gurus Forum

Welcome to Photoshop Gurus forum. Register a free account today to become a member! It's completely free. Once signed in, you'll enjoy an ad-free experience and be able to participate on this site by adding your own topics and posts, as well as connect with other members through your own private inbox!

Skin tone fix


LuisM-76

New Member
Messages
4
Likes
0
Hi,

I was wondering if someone can give me some advice/tips on a problem.

I was given a picture to correct but it was stuck to the glass. I've come a long way to almost getting it done but I've hit a block. On the attached pic you will see the person on the right has a problem where I need to correct the skin colour (this part was stuck to the glass). I've tried everything I can think of but I'm not sure where to go. Can anyone offer some tips or some area to look at to correct the skin colouration issue.

Thanks,
Luis
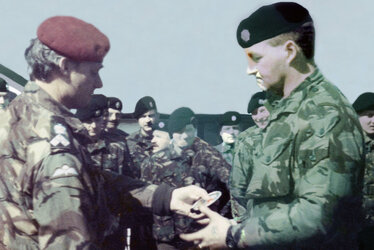
FaceFix.jpg
 
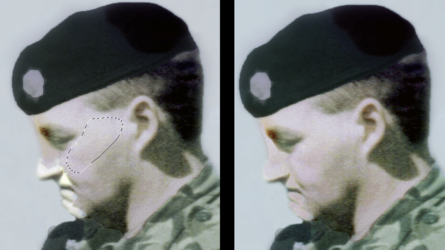
Since almost none of the face color is "good", my thought is to first make the face consistent (i.e., fixing the mouth, chin and tip of nose), and then re-coloring the whole face using a gradient map.
  • To fix the bleached-out parts of the mouth and nose, select an area of the cheek, like in the image on the left, and copy it to a new layer. Rotate and position it to cover the bleached-out areas of the mouth and nose.
  • Change the blend mode to Darken. Apply a layer mask to mask away any part of this that extends past the border of the face.
  • Do a similar procedure for the area on the upper nose, but in this case the layer blend mode needs to be Lighten.
  • When you're all done, you'll have something like the right-side image below.

1661361980998.png


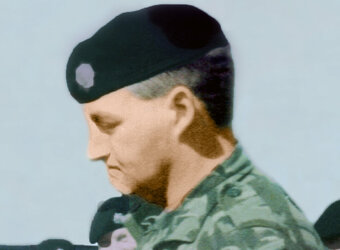
Now re-color the entire face using a Gradient Map. If you're unfamiliar with gradient maps, I've attached a tutorial.
  • On a new temporary layer, create a color swatch of three colors that you feel are appropriate for the skin tones: a dark color for the shadows under the neck, a midtone color and a highlight color.
  • Open a Gradient Map adjustment layer and create a gradient with three stops, using the colors you have chosen. (These can always be changed later.)
  • Change the layer blend mode of the gradient map to Color, and then mask out everything but the face. As an optional step, you probably want to apply this same gradient map to the guy's hand, for consistency.
I did not spend much time dwelling on the colors, but here's what I get using this approach. You can selectively tweak this, such as adding some red to his lips and other parts of the face. But since none of the other men in this photo have any of that, you don't want to overdo it to the point where the corrected guy stands out too much.

Face.jpg


Brilliant, thank you very much for that. I’ve been looking at this photo for over a year now and I’ve tried various Photoshop tutorials but nothing seems to cover anything that would remotely get me into some sort of area of adjustment. I will have a look at this and give it a go. Thank you very much for the help.
 

Top