Golden Boy
Member
- Messages
- 8
- Likes
- 0
Welcome to Photoshop Gurus forum. Register a free account today to become a member! It's completely free. Once signed in, you'll enjoy an ad-free experience and be able to participate on this site by adding your own topics and posts, as well as connect with other members through your own private inbox!
if you can, I thank you, if you also know the effect that was used on the player, which seems to me by the camera raw, would help me a lotIt appears to be just a cutout of the player placed on a background. There are many cutout tutorials on the internet. The background is made on a new layer with the pound symbol typed multiple times. I see a graduated effect on the background which you can do with a new layer and a shadow added on another layer. Various blend modes would have been used to bring it all together. If you want I can do a step-by-step tutorial for you on how to do the background effect, so you can include the player cutout.
I will do a small tutorial for the background, but I don't know what effect you are referring to on the player. It just looks like a normal photograph. If the photograph is not an "out of camera" shot, only the photographer would know how it was processed, if at all.if you can, I thank you, if you also know the effect that was used on the player, which seems to me by the camera raw, would help me a lot


Thank you so much guy, you help me !!!This is how to replicate the background effect. I am using a PC.
----------------------------------------------------------------------------------------
1: Create a New Document 1080 x 1080 px @ 72 PPI. Name the layer "Gradient Layer"
2: Set foreground color to LIGHT RED (# d82928) / background color to DARK RED (# 691817).
(The colors were selected from the image).
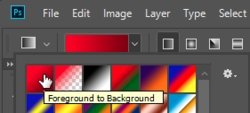
3: Select the Gradient Tool (G) (settings below) and run a diagonal gradient from top left to bottom right.
View attachment 98367
View attachment 98368
4: On a new layer select the Type Tool and enter the "Pound" symbol (ALT+156). Make it's colour the same as the DARK RED (# 691817). Select a font that suits.
5: Rasterize the text layer and turn 10 degrees RIGHT.
6: Copy and paste the "£" layer multiple times and position them as you like to fill the background layer.
7: When the "£" layers are in position, select them all and turn them into 1 layer (CTRL+E). Name the layer "£ Layer with Gradient".
8: Add a mask to the "£" layer. Click on the mask and select the "Black, White" gradient and run a diagonal gradient from bottom right to top left. This is the opposite direction to the red gradient. This will fade the "£" symbols diagonally towards the top right.
9: Drop in your player image and name it "Player Cut Out".
10: Create a new layer and name it "Shadow". With a soft brush tool, paint in the shadow where you want it and use the "Opacity skider" to get the look you want.
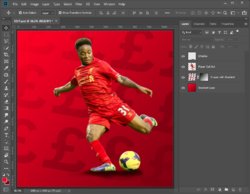
I hope this is what you were wanting. The layer panel shows all layers when completed.
View attachment 98369
I'm happy to help out anytimeThank you so much guy, you help me !!!
