What's new
Photoshop Gurus Forum

Welcome to Photoshop Gurus forum. Register a free account today to become a member! It's completely free. Once signed in, you'll enjoy an ad-free experience and be able to participate on this site by adding your own topics and posts, as well as connect with other members through your own private inbox!

struggling with a mask effect


magenta01

Active Member
Messages
28
Likes
0
hi,
i’m new here and to photoshop. i have tried a tutorial from a website and one of the steps is drawing a mask on the image then filling it but to look realistic like a ceramic mask.

i just don’t understand the instructions as there is no video and i was wondering if someone could be kind enough to guide me through these steps:

Go to Window > Paths and while holding Cmd/Ctrl, click on the Work path thumbnail to make a selection based on the path. Create a new layer and fill it with white (Shift + F5).

Next, load the selection from this layer, then choose the model layer and press Cmd/Ctrl + J to duplicate only that part of the layer. Move this part above white layer in the layer stack. Desaturate this layer with Cmd/Ctrl + Shift + U.

Again load the mask’s selection of this layer, and select Filter > Blur > Gaussian Blur with a Radius of 5px.

Apply a Levels adjustment and set the white slider at 198. Now, you need to apply some additional shadows to make it appear realistic.

Choose a brush with soft edges and a colour of #8b6952. Select an opacity of 40% and paint shadows onto a new layer with a Multiply blending mode.

Honestly, i just don’t get the terminology and wish someone could help.

kind regards
 

IamSam

Administrator
Staff member
Administrator
Messages
22,721
Likes
13,258
Hello and welcome.

Sorry you are having troubles. It's hard for any of us to determine exactly what you are having trouble with. You have mentioned a lot of steps and terminology here! The instructions seem fairly straight froward with a few exceptions. There seems to be some missing information/steps prior to those you have posted in this example.

For example:
Go to Window > Paths and while holding Cmd/Ctrl, click on the Work path thumbnail to make a selection based on the path.
I can only assume that there was a work path created prior to this step...........but I can only repeat the step. Go to the "Paths Panel" and Cmd/Cntrl + Click on the workpaths thumbnail to make a selection based on the path.
This is the "Paths Panel" containing a path.
Screen Shot 2021-02-20 at 10.09.36 PM.png
Hold the Cmd/Cntrl key and mouseover the paths thumbnail and click to make a selection based on the path.

Create a new layer and fill it with white (Shift + F5).
Return to your "Layers Panel", create a new layer, then fill the selection with white.

Perhaps you could be more specific about what you don't understand? It would also help if you linked us to the tutorial.
 

IamSam

Administrator
Staff member
Administrator
Messages
22,721
Likes
13,258
Next, load the selection from this layer, then choose the model layer and press Cmd/Ctrl + J to duplicate only that part of the layer. Move this part above white layer in the layer stack. Desaturate this layer with Cmd/Ctrl + Shift + U.
Again, I'm not sure what part you are not understanding.

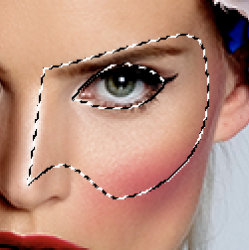
In this step, you make a selection of the work path you have created with the Pen Tool.
(To make a mask on her eye that looks like it’s made of ceramic, first use the Pen tool (P) to carefully make an outline around her eye.)
Screen Shot 2021-02-21 at 10.39.15 AM.png

You then select/highlight the models layer in the Layers Panel. This means you will be working on this specific layer.

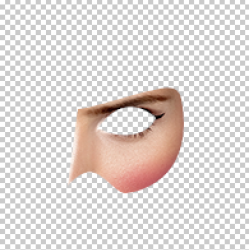
You then duplicate the contents of the selection to a new layer by hitting Cmd/Cntrl + J. (In this case, the duplicated area is part of the models face)
On this new layer, you will have something like this. I have turned off all other layers to demonstrate.
Screen Shot 2021-02-21 at 11.07.56 AM.png

Make sure this new Duplicated Face layer is selected/Highlighted.
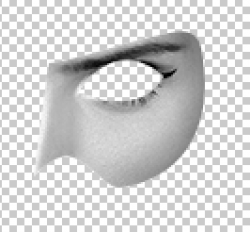
Then you will desaturate this layer with Cmd/Ctrl + Shift + U....
Screen Shot 2021-02-21 at 11.18.16 AM.png

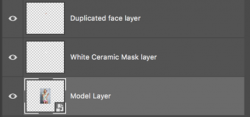
Next, in your Layers Panel, you move the newly created layer above the White Ceramic Mask layer you created earlier in the layer stack. You do this by dragging and dropping one layer above or below the other layer inside the Layers Panel.

This is what the White Ceramic Mask layer would look like.
I have turned off all other layers to demonstrate.
Screen Shot 2021-02-21 at 11.12.09 AM.png

Layers Panel...
Screen Shot 2021-02-21 at 11.13.00 AM.png
 

magenta01

Active Member
Messages
28
Likes
0
you’ve skipped the steps.

i don’t get how to go from the filled in white mask to then the guassian blur bit.

after i create the white mask i am stuck. the instructions are just too hard to follow :((
 

IamSam

Administrator
Staff member
Administrator
Messages
22,721
Likes
13,258
i don’t get how to go from the filled in white mask to then the guassian blur bit.
You don't have to do anything to the "filled in white mask" layer. All you did in the previous step was to move the desaturated "Duplicated Face layer" above the "White Ceramic mask layer". You are still working on the desatted "Duplicated Face layer".

So the next step is....
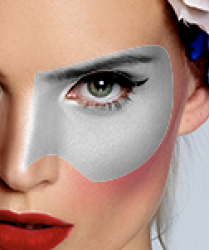
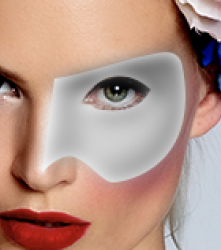
Again load the mask’s selection of this layer, and select Filter > Blur > Gaussian Blur with a Radius of 5px.
Load your work path selection again, then go to FILTER > GAUSSIAN BLUR > Set the blur to 5 pixels. By loading the selection, the blur effect will be limited to the selected area......in this case, the desatted "Duplicated Face layer"

Not blurred
Screen Shot 2021-02-21 at 10.40.57 AM.png

Blurred
Screen Shot 2021-02-21 at 10.43.09 AM.png

Just as an added notation for anyone interested in non-destructive editing..............I would convert the "Desatted, Duplicated Face layer" into a smart object and then apply a smart Gaussian Blur Filter.
 

Top