What's new
Photoshop Gurus Forum

Welcome to Photoshop Gurus forum. Register a free account today to become a member! It's completely free. Once signed in, you'll enjoy an ad-free experience and be able to participate on this site by adding your own topics and posts, as well as connect with other members through your own private inbox!

Trying to match skin color and failing


Messages
784
Likes
199
Hey, I'm trying to buy my daughter a new dress lolz but it's not working! For this face swap I tried curves and hue saturation already but maybe I'm not thinking straight, any help matching the face skin color to the hands and neck would be appreciated.

1599131315607.png
 

Argos

Guru
Messages
3,455
Likes
5,240
Hi, curves and saturation will not entirely solve the problem in this case, looks more than you need to play with colours as well, you need to remove yellow or change it using "selective colour", you would have to fix a little bit the shadows as well.

Cheers!
 

JeffK

Guru
Messages
2,486
Likes
2,890
If I understand correctly, this is your daughter's face but on another model's coat and body. So you wanted the hand to match the face.
I found that very difficult - the hand seemed overly processed and looked very flat. Couldnt get it done.
But I took a different approach And this will show your incredibly adorable daughter in a beautiful red coat!
- Jeff
red coat edited.jpg
 

IamSam

Administrator
Staff member
Administrator
Messages
22,721
Likes
13,258
@JeffK - The face replacement is still clearly visible above the eyes. The best choice here would have been to match the (doner) face to the existing (recipient) skin.

Screen Shot 2020-09-03 at 8.19.00 PM.png

There are so many great tutorials on matching skin color. HERE is one of the better ones.
 

Argos

Guru
Messages
3,455
Likes
5,240
I was playing with this image, first I tried to match the skin on the original, then I tried with adding some skin color, I can't know for sure wich tone of skin your daughter have so I just added one.

Also added some noise, sharpness, and shadows

1599131315607ff.jpg1599131315607f.jpg
 

IamSam

Administrator
Staff member
Administrator
Messages
22,721
Likes
13,258
@Argos - As this is in the General Ps Board, can you describe what you did?
 

Argos

Guru
Messages
3,455
Likes
5,240
First of all selection of face and hands, added a bit of sharpness and noise (in that order)

Using the same selection minus the hands I tried to match the color of the hand in the face. added a little bit of color on libs and desaturate the eyes.

Added shadow on the left side of the face and fix white outlines.

Finally using the same selection I just play with saturation, exposition, selective correction, etc to get the color I wanted. I think that all.

Cheers!
 

JeffK

Guru
Messages
2,486
Likes
2,890
@JeffK - The face replacement is still clearly visible above the eyes. The best choice here would have been to match the (doner) face to the existing (recipient) skin.
There are so many great tutorials on matching skin color. HERE is one of the better ones.

@IamSam and @Argos - that isn't my work. That was in the original post from the OP. I didn't touch the facial skin except on the cheeks where the hand was covering it. I didn't notice the poor match since I wasn't looking for it.
As I had mentioned, in the OPs image, that represented his daughter's original skin color. He wanted the hand and neck to match the face not the other way around. Unless I misread it.
Possibly you were just pointing out a general error in the original post?
Thanks for the link though - always looking for tips.
- Jeff
 

Argos

Guru
Messages
3,455
Likes
5,240
I wasn't sure either that's why I made both versions, but looking at the image of the face the op provides I don't think that's the color of the skin of the child ( i could be wrong). But seems like a not good quality picture made by phone or something like that, which usually has a lot of color cast on them. Let's see what the op say
 

Argos

Guru
Messages
3,455
Likes
5,240
Nice work Gene! Add some shadow to that gap on that upper left side of the head and just a bit of exposition on the upper right side and the difference will be big.:thumbsup:
 
Messages
784
Likes
199
Thanks everyone for your time, Here's the original picture which I used and untouched. You are right it was taken using mobile phone (Xperia XA1) with indoor low light.
If I understand correctly, this is your daughter's face but on another model's coat and body. So you wanted the hand to match the face.
No mate I was trying to match the face with the head skin.
There are so many great tutorials on matching skin color. HERE is one of the better ones.
I won't say thanks anymore as I'm tired of it. Lolz Thanks.
I can't know for sure wich tone of skin your daughter have
Now you know.
That was in the original post from the OP.
How on earth did you know that my name is Orangzeb Pervez. :joy:
As I had mentioned, in the OPs image, that represented his daughter's original skin color. He wanted the hand and neck to match the face not the other way around. Unless I misread it.
Possibly you were just pointing out a general error in the original post?
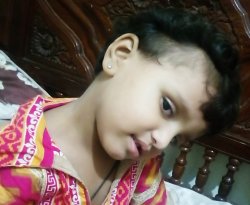
No mate I'm sorry if you misunderstood me but the hand wasn't the important part for me, I only messed up with curves and hue sat a bit so the first post image isn't original.
Note: Added 2 extra images for reference. Once again thank you all.

DSC_0005~01.jpgnew (1).JPGOnika281.JPG
 

JeffK

Guru
Messages
2,486
Likes
2,890
No mate I was trying to match the face with the head skin.
...I'm sorry if you misunderstood me but the hand wasn't the important part for me, I only messed up with curves and hue sat a bit so the first post image isn't original.

Rats - I feel like I'd been driving for several hours with the map held upside down. :shocked:
Ah well...
- Jeff
 

DianaD45

New Member
Messages
1
Likes
1
Hey, I'm trying to buy my daughter a new dress lolz but it's not working! For this face swap I tried curves and hue saturation already but maybe I'm not thinking straight, any help matching the face skin color to the hands and neck would be appreciated.

View attachment 115135
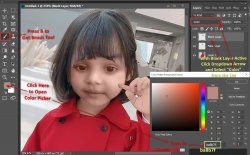
Do you still have the face you transplanted on its own separate layer? If you do, click on that layer to make it active. Then click the New Layer icon at the bottom of the layers panel (looks like a plus sign) to get a new blank layer above the transplanted face layer. At the top of the layers panel click the small dropdown arrow beside "Normal," and from the bottom of the dropdown list, select "Color." Press the B key on the keyboard to get the Brush tool. Click on the Foreground color chip and when the Color Picker opens, move the cursor away from the Color Picker, which becomes an Eyedropper and click on a spot on her neck to sample a color there. In my example I used the color# ba8b7f, which you can just type in to replace the value already there in the Color Picker. Then paint over her face in the workspace, avoiding her eyes and mouth. I also painted over her hand to make it match better.

Screenshot.jpg

Color Face Transplant.jpg
 

Top