What's new
Photoshop Gurus Forum

Welcome to Photoshop Gurus forum. Register a free account today to become a member! It's completely free. Once signed in, you'll enjoy an ad-free experience and be able to participate on this site by adding your own topics and posts, as well as connect with other members through your own private inbox!

Unusual (maybe) advise needed


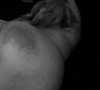
This may not be perfect or the way you want it, it's just an idea.

I used Toms idea to create the dark "spanked" area.
I then isolated this area and made a selection of it which I placed on a layer mask.

To remove the mottling, I used two original image layers, one with a Curves layer adjustment to brighten.
The other original image with a layer mask with the isolated spank area (which is slightly darker).
Then a curves adjustment layer with the isolated selection applied to it's layer mask clipped to second original image that darkens the spank area. (There's a term I never thought I would be using)

Screen Shot 2014-03-31 at 4.31.38 PM.png

Screen Shot 2014-03-31 at 4.41.54 PM.png
 
ok i don't get it :/
1st question: how do i isolate the spanked area and put on a layer mask?
 
Ok,

Remember how you had this image from post #16 and how you got there?
Duplicate this layer and turn the original (and all other) layer(s) off.
Screen Shot 2014-03-31 at 8.48.44 PM.png

Now go to SELECT > COLOR RANGE and click in the center of the darkened spanked area. Click OK.
You will now have a selection of the area.
Screen Shot 2014-03-31 at 8.52.23 PM.png

With the selection active and this layer highlighted, add a layer mask by clicking the layer mask icon located at the bottom of the layers panel. Provided you have all other layers off it will now look like this.
Screen Shot 2014-03-31 at 8.52.46 PM.png

Now you have to clean up your selection.
Click on the newly created layer mask, the white brackets around it will appear.
Choose your Brush Tool and a soft round brush. Lower your brushes fill percentage to 50%.
Press D on your keyboard. This sets your foreground and background colors to black and white (default).
Slowly begin to brush away everything but the spanked area with the brush.
Screen Shot 2014-03-31 at 8.54.12 PM.png

As you get closer to the area you want to preserve, change your brushes fill to about 5% or less.
Screen Shot 2014-03-31 at 8.55.47 PM.png

Your layers panel should look like this...
Screen Shot 2014-03-31 at 9.09.25 PM.png
 
Ok, now for the next part.

Turn off all layers.
Open the original color image into the document we were just working on.
Place it on the top layer and then desaturate the image.
Duplicate the image.
The two new additions should be the only two layers turned on. (Pardon that pun)
Screen Shot 2014-03-31 at 9.37.54 PM.png

Highlight the first new layer and add a Curves Adjustment layer (CAL) and brighten the image to your liking.
Screen Shot 2014-03-31 at 9.38.09 PM.png

Screen Shot 2014-03-31 at 9.38.23 PM.png

Ok here's a tricky part.....
Highlight the second new layer.
Place your mouse cursor over the layer mask we created earlier.
Hold down your Alt/Option key, click and drag the mask to the second new layer........should now look like this...
Screen Shot 2014-03-31 at 9.38.58 PM.png

Your image should look like this........
Screen Shot 2014-03-31 at 9.39.30 PM.png

You can stop here if you like the outcome. But if you want it darker then.....

Add another CAL to the stack.
Click this button to clip the CAL to the layer containing the isolated spanked area via layer mask.
Screen Shot 2014-03-31 at 9.55.55 PM copy.png

When you create a CAL it adds a layer mask. Highlight the CAL's layer mask by clicking.
Then hold the alt/opt key and drag the layer from the layer below to the CAL's layer mask.
You will be questioned about replacing the mask, say YES.
Now press Command/Control + I to invert the mask
You can now make adjustments that lighten or darken spanked area only.
Done.
Screen Shot 2014-03-31 at 10.03.11 PM.png
 
Last edited:
Looks like you did everything correctly.

The only thing I can see is that you may need to redo your selection (from post#24), it seems a little too close. Leave some softer edges.

As for the color, you may have to add the CAL I described at the end of post #25, and lighten the area.
 
I don't understand this icon.......?

Screen Shot 2014-04-01 at 11.36.58 AM copy.png

This should be a Curves Adjustment layer icon.
 
I don't know about that icon, the only thing I can figure is that it's different in the PC version than in the OSX version. I don't know why Adobe would do that.

As long as it's a Curves layer adjustment, I guess it doesn't matter.
 
think it's done.
still not quite perfect but it'll do, never thought i'd get fed up of looking at her butt!
i think i've learned a lot of useful stuff for future.
thanks for you help
final.jpg
 

Attachments

  • ses.jpg
    ses.jpg
    1.7 MB · Views: 1
actually just looked at yours again and now i'm not happy about it again :/
 
Last edited:

Back
Top