What's new
Photoshop Gurus Forum

Welcome to Photoshop Gurus forum. Register a free account today to become a member! It's completely free. Once signed in, you'll enjoy an ad-free experience and be able to participate on this site by adding your own topics and posts, as well as connect with other members through your own private inbox!

Urgent and huge problem with color profile


mastertasso

Member
Messages
5
Likes
0
Hi all! I have a really big problem! I am working in Photoshop and Pro Create and I am drawing digital paintings. Most of them are printed on acrylic glas at the printing house. However this time I have a huge issue with the colors in the document. The image is looking perfect and fine in my comp in Photoshop, but when test printing the image its get a lot darker and it adds more magenta into the image. The guy at the print house does not wither understand what could be the problem. I tried to change color profile and I tried even to adjust hue/saturation in order to get rid some of the colors. I also tried to put more exposure but if does just a little difference. On top of that I tried to print it out in 3 other printers which gives the same result.

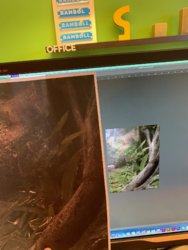
It seems there some some weird color space profile which is included in the document, but I seem not be able to get rid of it. I am attaching a photo here so you can see the clear difference between the paper and the screen.

Is there anyone that has any clue what could be wrong or how I can solve this problem? Its so urgent.
IMG_6651.jpg
 

thebestcpu

Guru
Messages
2,988
Likes
2,747
Hi Mastertasso
It would probably help forum members to help you if you could share the exact file with which you have an issue on a file sharing service such as DropBox etc to give it a closer look.
Just a suggestion for a start.
John Wheeler
 

thebestcpu

Guru
Messages
2,988
Likes
2,747
Hmmm, gave it a second look and the printed image you are showing has a brownish edge. Seems that this would either mean the paper you started with is not white or there is some setting in the printing workflow that is overprinting a brown background base and printing out to the edge of the image. Either that or the picture you took is way off on color balance for the printed image.
John Wheeler
 

mastertasso

Member
Messages
5
Likes
0
Hmmm, gave it a second look and the printed image you are showing has a brownish edge. Seems that this would either mean the paper you started with is not white or there is some setting in the printing workflow that is overprinting a brown background base and printing out to the edge of the image. Either that or the picture you took is way off on color balance for the printed image.
John Wheeler

Hi @thebestcpu and so much thanks! I was out traveling that's why I respond so late! No, the paper is totally white. This is a test print at the printing house, they have a lot of printers. I am attaching a file, its a part of the image. Perhaps somebody could locate the problem as u say? Would be so grateful!

test2.jpg
 

thebestcpu

Guru
Messages
2,988
Likes
2,747
Hi Mastertasso

The only thing that comes across to me is that the image you provided is not tagged with a color profile (nothing embedded in the image). Therefore there is not information on what color space should be used.
In the attached image the lower left is if you interpret the color numbers to be in ProPhoto RGB and the upper right is assume the image has sRGB color data.
If you have an untagged sRGB image and the receiving software assumes/asings sRGB color space to the image (that is the normal default), then the image will come out quite desatruated.
Just something to consider
John Wheeler

test2-adj.jpg
 

mastertasso

Member
Messages
5
Likes
0
Hi @thebestcpu ! Thanks for the answer. I actually tried to removed all color profiles in order to see if it made any difference. But it didn't. Thats why this image does not have any of them. Should I upload another with the color profile from the beginning? The result when printing it is the same for me.
 

thebestcpu

Guru
Messages
2,988
Likes
2,747
If you uploaded the original image "as is" to the forum or to a file sharing site if the image is too large that way, that would be best. That way, the actual color profile with the image would be included. Another way is in the lower left corner of PS, if displays a characteristic of the image (size is one option). Use the adjacent dropdown to choose "Document Profile" to see what profile is associated with the image from within PS. If you are printing directly from PS, that would be the profile when going to print.
Pretty odd problem to be that far off in color when other images print fine.
John Wheeler
 

mastertasso

Member
Messages
5
Likes
0
If you uploaded the original image "as is" to the forum or to a file sharing site if the image is too large that way, that would be best. That way, the actual color profile with the image would be included. Another way is in the lower left corner of PS, if displays a characteristic of the image (size is one option). Use the adjacent dropdown to choose "Document Profile" to see what profile is associated with the image from within PS. If you are printing directly from PS, that would be the profile when going to print.
Pretty odd problem to be that far off in color when other images print fine.
John Wheeler

Hi again! If I check the info from Document profile it says "untagged RGB"? could this be the problem and how can I solve it the easiest way?
 

thebestcpu

Guru
Messages
2,988
Likes
2,747
Hi mastertasso
I will show you how to set an appropriate color space for the image yet note that this may not solve all of your problems. This would be one good step though to start out with.

1) Does the image look good on you monitor. If yes, go to step 2
2) Is your monitor calibrated and profiled (through some calibration process preferably with an Xrite or Datacolor hardware/software calibration package. Alternately, is you monitor set to a specific color space in its settings (e.g sRGB or Adobe RGB). Note that if your monitor is not calibrated/profiled, the following steps to set a color space for the image will still look good in your monitor, yet may be a problem still when printing
3) Go to Edit > Color Settings and note the RGB color space used under Working Spaces. If the color space is not one of these three basics ones used (sRGB, Adobe RGB, or ProPhoto RGB), then stop here and report back what its set to as that would cause other problems down the line and we would want to fix that too
4) Assuming one of the three primary color spaces was used, that is the Color Space that we are going to ASSIGN to the image as the is the color space used for viewing when there is no profile for you image.
5) Go to Edit > Assign Profile and either check the box with Working Profile or using the dropdown and select the profile that you found in step 3 (those two should be equivalent). Note that if you have the preview box checked, you should not see any change to the image on your monitor (if you do something went wrong)

You should not have a that color space Assigned to your image. Do note that Assign Profile command is rarely used as it does not convert any color numbers in the image and just is a note in the image that this is the "color scale" to be used when interpreting the color numbers. When converting from one color space to another the Convert to Profile command would be normally used.

This may solve your color space issue and may or may not solve all of your printing issues. Give it a try and see if it helps.

Not that another common problem with having prints come out too dark without much color shift is editing when the monitor is set to bright. The proper brightness of the monitor should approximately match the viewing conditions of the print. Most often the luminosity of the image should be between 80 and 120 cd/m^2 and most monitors can go up to 300 or higher.

Problems with printing can also have to do with the settings in PS printing window and/or the printer color management settings.
Hope this helps some
John Wheeler
 

mastertasso

Member
Messages
5
Likes
0
Hi mastertasso
I will show you how to set an appropriate color space for the image yet note that this may not solve all of your problems. This would be one good step though to start out with.

1) Does the image look good on you monitor. If yes, go to step 2
2) Is your monitor calibrated and profiled (through some calibration process preferably with an Xrite or Datacolor hardware/software calibration package. Alternately, is you monitor set to a specific color space in its settings (e.g sRGB or Adobe RGB). Note that if your monitor is not calibrated/profiled, the following steps to set a color space for the image will still look good in your monitor, yet may be a problem still when printing
3) Go to Edit > Color Settings and note the RGB color space used under Working Spaces. If the color space is not one of these three basics ones used (sRGB, Adobe RGB, or ProPhoto RGB), then stop here and report back what its set to as that would cause other problems down the line and we would want to fix that too
4) Assuming one of the three primary color spaces was used, that is the Color Space that we are going to ASSIGN to the image as the is the color space used for viewing when there is no profile for you image.
5) Go to Edit > Assign Profile and either check the box with Working Profile or using the dropdown and select the profile that you found in step 3 (those two should be equivalent). Note that if you have the preview box checked, you should not see any change to the image on your monitor (if you do something went wrong)

You should not have a that color space Assigned to your image. Do note that Assign Profile command is rarely used as it does not convert any color numbers in the image and just is a note in the image that this is the "color scale" to be used when interpreting the color numbers. When converting from one color space to another the Convert to Profile command would be normally used.

This may solve your color space issue and may or may not solve all of your printing issues. Give it a try and see if it helps.

Not that another common problem with having prints come out too dark without much color shift is editing when the monitor is set to bright. The proper brightness of the monitor should approximately match the viewing conditions of the print. Most often the luminosity of the image should be between 80 and 120 cd/m^2 and most monitors can go up to 300 or higher.

Problems with printing can also have to do with the settings in PS printing window and/or the printer color management settings.
Hope this helps some
John Wheeler
Hi @thebestcpu! So much thanks, I am really greatful for this help!!! Helps a lot!

I hope I understod you correctly. I opened the image. I found out that the image using the sRGB IEC61966-2.1 profile. Then I opened the assign profile menu and choosed working RGB which was the same per default, was that correct? I saved it and I will try printing it out tomorrow at the printing house again as test!
 

thebestcpu

Guru
Messages
2,988
Likes
2,747
Hi mastertasso
If you followed the instructions exactly and the image still looks the same and good on your monitor, then very likely you have the correct Color Space now assigned to the image.

When you don't know the original Color Space of the iamge, it is a bit of a guessing game. This guess was based on the image being in your monitor was correct and looking good so all you had to do was assign the existing default working space profile. You could also use the the Assign Profile command and try Adobe RGB and ProPhoto RGB. Those images would change in look to more saturated versions (not necessarily correct saturation). Not easy once no Color Space is assigned to the image to find the correct one.

Hope this helps yet I am skeptical. Typically sRGB is used by the industry when no Color Space is provided so not sure the printing will change. It all depends on the printers workflow and what they did before when presented with an image with no color space.

If this does not give the desired result, you can come back with more questions as well.
Best wishes on getting to a good result
John Wheeler
 

Top