What's new
Photoshop Gurus Forum

Welcome to Photoshop Gurus forum. Register a free account today to become a member! It's completely free. Once signed in, you'll enjoy an ad-free experience and be able to participate on this site by adding your own topics and posts, as well as connect with other members through your own private inbox!

Volume Indicator for Control Panel?


mikey2018

New Member
Messages
1
Likes
0
Hi,

I just popped in to ask a question if I may?

A friend is rebuilding a Lathe and would like to replace the control panel / dial indicator graphics.

I have attached a photo of the original panel below.
DSCF0432.jpg

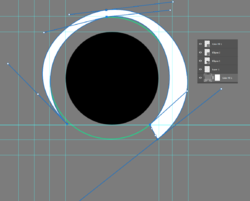
The issue I am having is with reproducing the curved tapered graphic around the RPM speed control dial (shown Bottom Left in the Panel Picture) which indicates MIN and MAX Speed.

The closest I could get was to draw out a rectangle and then taper it at one end using the perspective tool. Then I use Filter->Distort->Polar Coordinates to curve the shape.
But it's not right and doesn't look right. The center of the shape isn't round, it ends up offset and looks more like a comma and the edges of the shape are rough and distorted so it seems that's not the way to do it correctly.

I have spent a couple of hours on google trying to find a tutorial or examples to follow but I seem to end up with more results for Illustrator than anything.

I am hoping someone here can help point me in the right direction.


Many thanks!
 
Hi and welcome to this forum. I would like to point a method which may work. If you follow these steps and have any trouble, just ask and I will explain more.

1) Draw using an Elliptical Marquee tool by pressing Shift to get a circle. This circle would be the outer circumference of the tapering curve shape.
2) Next, draw another circle holding Shift (to get the inner circle) and Alt (to deduct from the outer circular selection).

3) At the end of this process, you should have two concentric selection circles.
4) Right click in between the two circles and click "Make Work Path", enter a value of 10, the maximum. At this stage, you should have two concentric shapes drawn with pen tool.

5) Now, create anchor points, delete anchor points using trial and error method to get your fader. A rough work of the same is shown here:
 

Attachments

  • 1.png
    1.png
    102.8 KB · Views: 4
I did that process in PS. With Scissors tool, it should be easier to work on paths in AI.
 
you can add as many Anchor points as you want to modify the shape, start with the pen tool and get the basic shape and follow with adding more anchor points... you can move the anchor points around to fit the shape better. Once you get the shape you want right click on it and select Fill Path... and color...
 
Hi and welcome to this forum. I would like to point a method which may work. If you follow these steps and have any trouble, just ask and I will explain more.

1) Draw using an Elliptical Marquee tool by pressing Shift to get a circle. This circle would be the outer circumference of the tapering curve shape.
2) Next, draw another circle holding Shift (to get the inner circle) and Alt (to deduct from the outer circular selection).

3) At the end of this process, you should have two concentric selection circles.
4) Right click in between the two circles and click "Make Work Path", enter a value of 10, the maximum. At this stage, you should have two concentric shapes drawn with pen tool.

5) Now, create anchor points, delete anchor points using trial and error method to get your fader. A rough work of the same is shown here:
I love reading your step-by-step instructions! :) They always get my brain-wheels turning, and I find myself working thru the ways I'd have done it on my own. It is so cool being able to follow another person's thought process. For myself, I think I'd have probably used SPC's method, using the pen tool. Paths are the cleanest and most accurate way to make and manipulate shapes.
 
you can add as many Anchor points as you want to modify the shape, start with the pen tool and get the basic shape and follow with adding more anchor points... you can move the anchor points around to fit the shape better. Once you get the shape you want right click on it and select Fill Path... and color...[/QUOTE
This is exactly how I'd have approached the situation. Fewer steps, and it lets Photoshop do the heavy lifting! :)
 
This post has been bugging me all day. If you want to trace the existing pattern, then I completely agree with PSC: the Pen tool is definitely the easiest, fastest and most accurate way to go. But if you don't have the existing pattern and want to create this from nothing—without having to guess at it—then I think I have figured out a way.

In the original image, the central dial is a circle and the outer area surrounding it is a circular shape that continually expands in radius, so to get it mathematically perfect it seems to me that the outer area is a spiral. I have CS5, which does not allow you to draw a spiral (that I'm aware of), but later versions of Photoshop do allow you to create a spiral (tutorial below). I downloaded an image of a spiral and carefully sized and positioned it to conform with the original control panel image. I masked-out the parts of the spiral I didn't need and then made a selection of what remained. That allowed me to create a clean outline that was easily filled-in to get the basic result below.

You'll notice that the edges of the blue area are very ragged, which is because I downloaded a poor image of a spiral. I'm not concerned with that for now because I only want to focus on getting the basic concept to work. You'll probably get cleaner edges if you use the built-in Photoshop feature.

Spiral tutorial here...

Control Panel.jpg
 

Back
Top