What's new
Photoshop Gurus Forum

Welcome to Photoshop Gurus forum. Register a free account today to become a member! It's completely free. Once signed in, you'll enjoy an ad-free experience and be able to participate on this site by adding your own topics and posts, as well as connect with other members through your own private inbox!

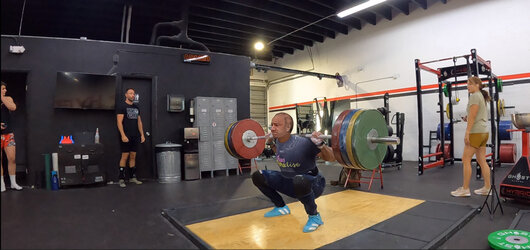
Specific Weightlifter Edit


Any chance you have the original image?
This is only 837 x 445 pixels. At only 1/3 megapixel that makes it essentially unworkable. Its a good bet the original is 10 megapixels or larger although its (probably) been cropped
 
Hopefully this is better?
Any chance you have the original image?
This is only 837 x 445 pixels. At only 1/3 megapixel that makes it essentially unworkable. Its a good bet the original is 10 megapixels or larger although its (probably) been cropped
5rm-squat-sneak-peek-2.jpg
 
Guessed on shape of your ears and had no idea what t-shirt says ???
I must appreciate the excellent work you have done there in guessing a lot of information and merging it to make it look almost real.

If you can, I would love to learn your approach. How did you manage the neck portion, jaw portion, head & hair portion, ears, Left Leg inner knee portion, the shading on the T-Shirt?
 
Thank you.

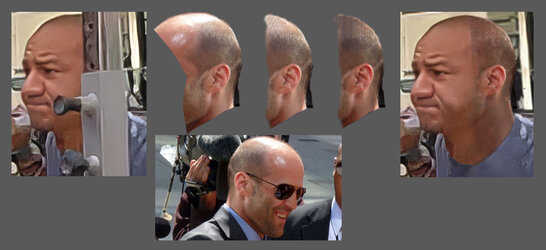
I started out by covering over the knob by the mouth. It’s all cloning with a tad of burn and dodge and an overpass of skin tone ‘color mode’ brush. A lot of the detail work is done at 200% - 300%

Then I looked for a similar ¾ profile of someone/anyone. Ultimately that meant the ear and a hint of the jaw line. The actor Jason Statham provided source material to work from. You can see what it originally looked like in a portion of the enlarged image below. I cropped the head, flipped it horizontally and resized it. It still required it to be distorted/transformed using CTRL+handles so that the head shape/jaw-line aligned. The hair area was entirely wrong and required cloning and some healing brush to hide awkward texture/tonal transitions and/or repeat patterns. Ultimately the burn tool and painting in ‘color mode’ were used to match skin tones. Somewhat later at a time-point after these examples were created, I softened the ear a bit with the blur tool to make it somewhat more consistent with the rest of the image.

The back half of the neck is all hand fabricated w/ clone and healing brush and looks it. I'm pretty sure the dodge tool and a brush in skin 'color mode' are used also. Given the small area, I find it is unlikely to garner a lot of attention. (how’s that rationale for sloppy work:)

The shirt and pants were basically drawn in using the clone and healing brush. The healing bush is a marvelous tool that I have never mastered but use all the time for it’s unique properties of overlaying texture/patterns over areas that should, but don’t have them, as well as its ability to ‘blend’ two adjacent areas color and tonal-wise. Just choose a solid area of texture (or lack thereof) and heal over the demarcation that exists. The color in the brush is essentially unimportant.

The transition area between neck and shirt is completely had drawn using a variety to tools. Delicate dark color brush for a shadow, shirt color brush below it and a light ribbon of highlight area in that dark-light transition.

Other than the ear I'm winging it. I even made up most of the right foot lifting shoe...again if scrutiny isn't applied , it comes off OK.

The example transition below are layers pulled from version 1 to version 6a and I posted version 8c. Hope this helps.

Head Transformation Remove Squat Rack.jpg
 
Last edited:
Hope this helps.
It definitely does! Thank you so much for the detailed explanation. Your courage to attempt a difficult challenge, your skill in negotiating it successfully and your helpfulness in explaining how you did it are all amazing. Inspiring stuff!
 

Back
Top