What's new
Photoshop Gurus Forum

Welcome to Photoshop Gurus forum. Register a free account today to become a member! It's completely free. Once signed in, you'll enjoy an ad-free experience and be able to participate on this site by adding your own topics and posts, as well as connect with other members through your own private inbox!

Trying to figure out an easier way to change fabric samples! help!


Turnt4834

Active Member
Messages
30
Likes
0
Hey guys, so i'm new here and my photoshop skills aren't like, amazing but i'm getting by. the last time i really used photoshop was back when AOL was still the only means of internet so i'm super rusty. i'm not even exactly sure how to word my request so please bare with me. my family owns a custom car seat cover company and i'm trying to make the different types of fabric/designs show up on a car seat without us having to waste a lot of fabric and making a seat cover per fabric/color/design. since we're a small business, money is limited so i'm trying my best to do this all on my own. i'm hoping someone can give me some pointers!

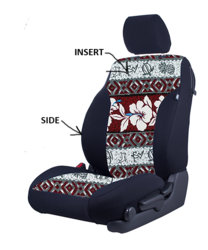
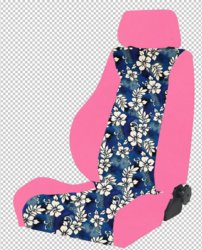
i attached an image to help understand my request a little better. in the image there's "side" and "insert" i'm trying to be able to change the insert to different fabric/designs. i also want to be able to change the "side" parts to different colors too, but that can be worked on later. but right now what i've done is trace the seat and cut it out and laid it on the fabric i want the insert to be. then i use the eraser to erase the extra parts. the bottom part (like where your butt goes) doesn't seem to turn out "natural" in some of these. could someone give me some pointers? i've been trying to figure this out and i'm going crazy!!
 

Attachments

  • HELP.jpg
    HELP.jpg
    160.6 KB · Views: 15

colleague

Guru
Messages
824
Likes
1,254
Hi

you need to make a "mockup" for your project
you can do that with smart objects

I'll attach an example PSD

the layer with the white seat makes the shadows on the fabric (mode multiply)

on top is a smart object that is invissible , but contains the pattern
if you doubleclick on the miniature , a psb file will open
and you can paste another pattern and close the psb

seat mockup.jpg
 

Attachments

  • seat mockup.psd
    2.5 MB · Views: 9

Turnt4834

Active Member
Messages
30
Likes
0
.......omg......that's freaking amazing........ok, so i need to get re-familiar with smart objects. i never worked with groups before but judging by the psd you enclosed i need to play around with all these a little more.

so on the parts i labeled sides, would this work as well? i'd like to keep the seam line as shown. judging by the mockup you attached, the smart object will keep the lines of the seat in place. is that correct?
 

colleague

Guru
Messages
824
Likes
1,254
the smart object is just the pattern (but rotated )
the lines and the seems are in the white seat and will stay on place

you can make another smart object with the sides masked to give that part another look
with another pattern or color

here is a second mockup
you make the sides - layers invissible or not
 

Attachments

  • seat mockup2.psd
    6 MB · Views: 11

Turnt4834

Active Member
Messages
30
Likes
0
oh my god. OK!!! so it looks like i have a ton of studying to do this weekend. but this has me on the right path! I'm going to dissect your psd files and check out the "group" portion next!! i hope you'll be online tonight/this weekend i have so much more to learn! holy moly. you make this look sooo easy!

btw, is the background a solid white? i'm using transparent so that it will show on our website if i decide to change the whole background color one day.
 

Turnt4834

Active Member
Messages
30
Likes
0
thank you! i'm going to try to figure it out from here. last time i really used photoshop it was before .psb files (i found my old photoshop book and it was photoshop 6) i hope i can get this all figured out but if i have anymore questions may i PM you directly?
 

IamSam

Administrator
Staff member
Administrator
Messages
22,721
Likes
13,258
i have anymore questions may i PM you directly?
Please ask questions in the forum...............there are others that can answer your questions as well. Also, everyone learns when the questions are out in the open forum.
 

colleague

Guru
Messages
824
Likes
1,254
I used a white background
the mask is made from a selection of the seat and is Always the same
for all patterns
 

Turnt4834

Active Member
Messages
30
Likes
0
in the group (mock up 2) it looks like you have layers dependent on the the "sides" and "click here to change pattern". So the outline of the seats are showing against the background itself.
 

polarwoc

Guru
Messages
1,576
Likes
1,421
Really, any seat cover should suit. Generally, it could be difficult to cover up dark with lighter colours, but covering dark with dark or light with dark should be convincing. Sometimes, you may need to use a second layer of light background on top with Darken blend mode to cover up a dark BG.
 

Turnt4834

Active Member
Messages
30
Likes
0
Really, any seat cover should suit. Generally, it could be difficult to cover up dark with lighter colours, but covering dark with dark or light with dark should be convincing. Sometimes, you may need to use a second layer of light background on top with Darken blend mode to cover up a dark BG.
Yeah, I found a seat to work with but when I do, it doesn't look good. It just looks like a kindergardener drew with crayons.
 

Attachments

  • test.JPG
    test.JPG
    128.6 KB · Views: 7
  • seatTest1.jpg
    seatTest1.jpg
    166.9 KB · Views: 7

polarwoc

Guru
Messages
1,576
Likes
1,421
It appears like in the file Test.jpg the layers are cut to shape correctly but the blending modes were not applied. Check at around 7:24 where the blending mode is changed from Normal to Multiply - I think you missed that step.
 

Top