What's new
Photoshop Gurus Forum

Welcome to Photoshop Gurus forum. Register a free account today to become a member! It's completely free. Once signed in, you'll enjoy an ad-free experience and be able to participate on this site by adding your own topics and posts, as well as connect with other members through your own private inbox!

Need help making paint splatter on wall look better


drdog111

New Member
Messages
4
Likes
1
Hi everyone,

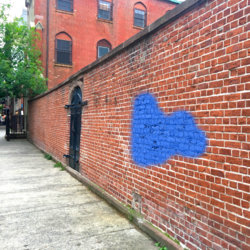
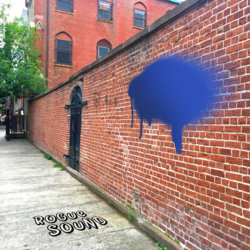
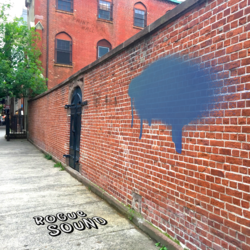
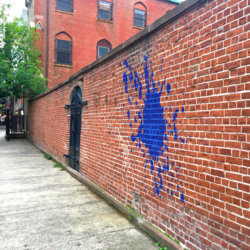
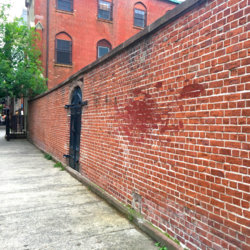
I'm designing album artwork for my band and I am trying to Photoshop a paint splatter onto a wall. I've got a decent start going, but something still comes off as jarring and not quite convincing enough. The goal is to not make it as realistic as possible, but good enough to make it seem like it could actually be there. This is important to the image because it will be the focal point, considering the name of the album is "Paint on a Wall".
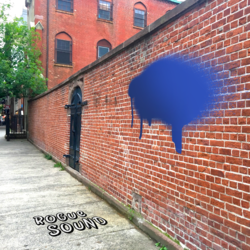
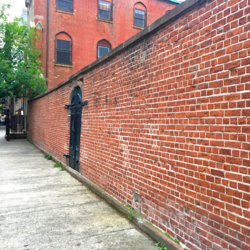
paint on a wall wip.pngpaint on a wall but with no paint.png

Here's my edit vs the original photo for reference. If anyone could provide a suggestion or two to help improve it, I would greatly appreciate it. Thanks!

P.S. Not that it matters, but I plan on adding a warming filter to the image once it's done to give it a more vintage look.
 
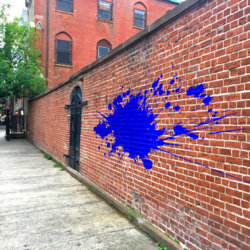
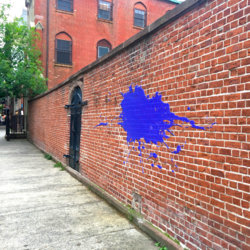
In a real paint splatter, you would still see the underlying texture of the bricks and the seams between the bricks. To get that effect, experiment with layer blend modes. I initially painted a blue splatter and changed the layer blend mode to Multiply. That allowed the brick texture to show through, but it made the seams too light for my taste. For my next try (below) I have two identical blue splatter layers. For the first one, I used Blend-If to cover only the seams with blue, and then I changed the layer blend mode to Linear Burn. For my top layer, I used the other blue splatter and set the layer blend mode to Color. All of this was trial and error to see what the different blend modes would do.

Note that I didn't spend any time on the shape of the blue splatter itself because I was focused on getting the brick texture to show through. Your splatter is much better than mine, with the drips and faded areas.

Wall.jpg
 
Here's a version with subtle brick texture coming through. I drew some black lines in a layer and reduced the opacity to 4%.paint on a wall wip.jpg
 
Kenbo that attempt needs some work, the brick texture is so subtle that looks like wood panels instead, the perspective looks good, but the paint splash can't have a darker zone because the wall is getting the same amount of light, has to be all the same like rich54 did. In my opinion, the splash contours don't have to be blurred at all.

Cheers!
 
In a real paint splatter, you would still see the underlying texture of the bricks and the seams between the bricks. To get that effect, experiment with layer blend modes. I initially painted a blue splatter and changed the layer blend mode to Multiply. That allowed the brick texture to show through, but it made the seams too light for my taste. For my next try (below) I have two identical blue splatter layers. For the first one, I used Blend-If to cover only the seams with blue, and then I changed the layer blend mode to Linear Burn. For my top layer, I used the other blue splatter and set the layer blend mode to Color. All of this was trial and error to see what the different blend modes would do.

Note that I didn't spend any time on the shape of the blue splatter itself because I was focused on getting the brick texture to show through. Your splatter is much better than mine, with the drips and faded areas.

Rich:
Many thanks for the insight into your thought process and workflow. Very nice work!
- Jeff
 
It's hard to tell what you may like. This is an older technique using a displacement map and some other upgrades. Like Rich, I was concentrating more on how the paint interacts with the wall and not so much on the edges. Will be glad to share the technique if you like this. It's still a little bright and saturated to me but that can be adjusted.

PaintOnWallDisplacementMap_01.jpg
 
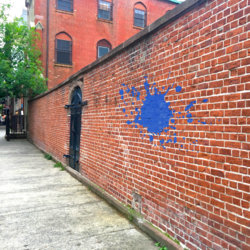
Hi everyone, thanks so much for the advice. After some more edits, here is what I've got:

paint on a wall wip 2.png

I'll probably be tweaking this a lot more, but I think it looks a lot better than before. Thanks so much for the advice and if you have any more, please let me know.
 
Ok, so here's what you wanna do:

1567921321105.png

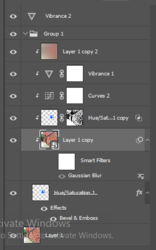
-Put your paint where you want it, and leave it at normal blending mode. to add some thickness on the edges, double click on it and enable bevel and emboss, and use VERY subtle settings (1 depth, 0 size, 0 soften, 14 opacity on highlight and shadows on this case.

-Duplicate the original layer, put it on top and set it to clipping mask (right click -> clipping mask)

-set this new layer's blend mode as luminosity. blur it by about 0.6 pixels (in this image) i you wanna give it some thickness inside.

- to make paint on the white areas, i went to the channels, Ctrl + left clicked on the rgb channel (selects brightest parts of the image) and copied the paint layer, using this selection as a mask. I then used the mask's tools to change it's limits as to not get glowing edges on the bricks

- use curves, vibration or any other setting you want to get the paint color and brightness right

- duplicate the original layer again and apply a massive gaussian blur (i used 800 pixels). Set it to color blend mode and set it's opacity very low. This is just for color correction (dont be afraid to leave the color a little washed out)

- Finally, add any saturation you may need to make the image (and paint) look as you want it to.

hope I helped. Cheers

paint on a wall.jpg
 
Ok, so here's what you wanna do:


-Put your paint where you want it, and leave it at normal blending mode. to add some thickness on the edges, double click on it and enable bevel and emboss, and use VERY subtle settings (1 depth, 0 size, 0 soften, 14 opacity on highlight and shadows on this case.

-Duplicate the original layer, put it on top and set it to clipping mask (right click -> clipping mask)

-set this new layer's blend mode as luminosity. blur it by about 0.6 pixels (in this image) i you wanna give it some thickness inside.

- to make paint on the white areas, i went to the channels, Ctrl + left clicked on the rgb channel (selects brightest parts of the image) and copied the paint layer, using this selection as a mask. I then used the mask's tools to change it's limits as to not get glowing edges on the bricks

- use curves, vibration or any other setting you want to get the paint color and brightness right

- duplicate the original layer again and apply a massive gaussian blur (i used 800 pixels). Set it to color blend mode and set it's opacity very low. This is just for color correction (dont be afraid to leave the color a little washed out)

- Finally, add any saturation you may need to make the image (and paint) look as you want it to.

hope I helped. Cheers
P.S.: all layers except the original, paint and final adjustments must be used with clipping mask
 
Ok, so here's what you wanna do:

View attachment 105993

-Put your paint where you want it, and leave it at normal blending mode. to add some thickness on the edges, double click on it and enable bevel and emboss, and use VERY subtle settings (1 depth, 0 size, 0 soften, 14 opacity on highlight and shadows on this case.

-Duplicate the original layer, put it on top and set it to clipping mask (right click -> clipping mask)

-set this new layer's blend mode as luminosity. blur it by about 0.6 pixels (in this image) i you wanna give it some thickness inside.

- to make paint on the white areas, i went to the channels, Ctrl + left clicked on the rgb channel (selects brightest parts of the image) and copied the paint layer, using this selection as a mask. I then used the mask's tools to change it's limits as to not get glowing edges on the bricks

- use curves, vibration or any other setting you want to get the paint color and brightness right

- duplicate the original layer again and apply a massive gaussian blur (i used 800 pixels). Set it to color blend mode and set it's opacity very low. This is just for color correction (dont be afraid to leave the color a little washed out)

- Finally, add any saturation you may need to make the image (and paint) look as you want it to.

hope I helped. Cheers

View attachment 105992


Hi, thanks for the help. I think I understand what you're saying but I'm having trouble making it look like yours. Could you explain this part again?

"- to make paint on the white areas, i went to the channels, Ctrl + left clicked on the rgb channel (selects brightest parts of the image) and copied the paint layer, using this selection as a mask. I then used the mask's tools to change it's limits as to not get glowing edges on the bricks"
 
1568515151817.png
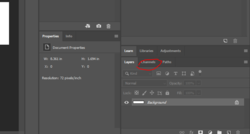
Right beside the layers tab is the channels tab. There, you will find the red, green and blue channels, as well as the RGB channel, which represents the whole image as black and white. By holding Ctrl and clicking on the RBG channel, you will notice that photoshop does an automatic selection of the brightest parts of the image (the white lines between the bricks in this case). when you have this selection active, you can click the mask button to create a mask on the active layer using the selection
1568515399166.png

this way the layer will only be visible in the brightest parts of the image. If you have some weird glowing or white edges, do some adjustments by double clicking the layer and changing these:
1568515497566.png

(alt click to separate each arrow).
for more information, check videos about "blend if"
 
Here is my go:
Bric Wall.jpg

To distort splatter along the grooves of thw wall I used Dostort->Glass filter with the Blue channel of the original wall image as the texture.
Finally to better pronounce wall texture behind the splatter added Bevel&Emboss texture style for splatter layer where as texture I used the same Blue channel of the original wall image.
 
Wow that's a lot of great approaches and certainly depends on the feel you want. Here is what I did
1) Got a stock splatter image and overlayed with image
2) Transformed to match perspective of the bricks
3) Clipped a Hue Sat Layer to make the saturation and lightness seem more realistic
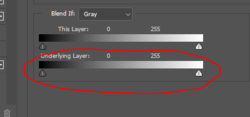
4) Back on the splatter Layer I used the Blend If slider for the lower layer to make some underlying layers peak through as real paint might.
5) ADDED EDIT - I also made the splatter a Smart Object and very slightly made the left end just a bit more desaturated than the right end to simulate what happens in real life (almost forgot to add this step)

Thought the result was worth sharing
John Wheelerpaint-on-a-wall-but-with-no-paint.jpg
 
Last edited:
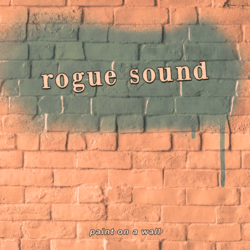
Thank you to everyone who helped. All of your suggestions helped me improve the design. I went for something different for the final product. Hope you like it.

paint on a wall 4.png
 

Back
Top