Photoshop Gurus Forum
Welcome to Photoshop Gurus forum. Register a free account today to become a member! It's completely free. Once signed in, you'll enjoy an ad-free experience and be able to participate on this site by adding your own topics and posts, as well as connect with other members through your own private inbox!
You are using an out of date browser. It may not display this or other websites correctly.
You should upgrade or use an alternative browser.
You should upgrade or use an alternative browser.
White Noise
- Thread starter relssek
- Start date
-
- Tags
- noise restoration
chrisdesign
Guru
- Messages
- 4,269
- Likes
- 6,330
1. From the original image I chose the best channel (red channel), and cpoy/pasted it into the blue channel and into the green channel.
2. The result is a good and clean black+white looking RGB image.
3. On your final image I made a selection of all the colored parts and put them on a new layer.
4. I selected the black+white image and put it on a new layer .
5. Final little adjustments where applied using curves and color correction.
And I used the spot-healing brush on the mens trousers.
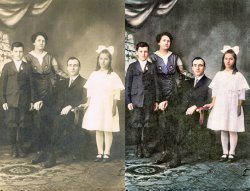
Here is my result.
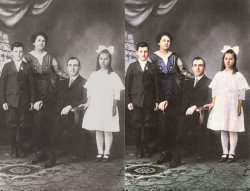
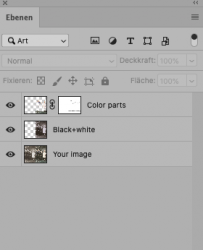


Last edited:
thebestcpu
Guru
- Messages
- 3,328
- Likes
- 3,071
HI @relssek
I really think @chrisdesign's results are excellent.
My thoughts are about the starting image.
1) The image you shared on the forum is a highly compressed JPEG (lossy compression). I hope you had a better starting image yet if this was your actual starting image, getting a scan made to PNG or TIFF without a lossy compression would be an important step.
2) I don't know if you have access to the original, yet sometimes the blacks for some images are in really bad shape due to silvering caused by aging of certain photographs. If you have the original image, there are some techniques to eek out some better detail to begin with before the post processing. This usually helps with the overall end result. Some techniques that can work with silvering are
a) scanning in color at multiple 90 degree orientations and combining
b) using a copy stand with polarized lights and polarized filter on the camera
c) I have even used a technique for some images of scanning though the print (as I would with a negative) with controlled exposure times on the scanner (not all scanners can do this) which pulled out the detail in the silvered areas. This is an option if you can shine a bright light on the back of the print and can tell some light comes through. Then flip the image, line up and combine with the original to enhance the detail.
d) Sometimes scanning at 16 bit depth can help in these cases yet less often then one may think
Having a much better starting image goes a long way in what can be done successfully in post processing
Hope the additional ideas help some
John Wheeler
chrisdesign
Guru
- Messages
- 4,269
- Likes
- 6,330
@thebestcpu
I agree with you.
I just had to work on the images provided by the OP.
If we could work on the "real" original image it would certainly result in a much better quality.
I agree with you.
I just had to work on the images provided by the OP.
If we could work on the "real" original image it would certainly result in a much better quality.
Chris - How do you paste the red channel into the green & blue channels?1. From the original image I chose the best channel (red channel), and cpoy/pasted it into the blue channel and into the green channel.
2. The result is a good and clean black+white looking RGB image.
3. On your final image I made a selection of all the colored parts and put them on a new layer.
4. I selected the black+white image and put it on a new layer .
5. Final little adjustments where applied using curves and color correction.
And I used the spot-healing brush on the mens trousers.
Here is my result.
View attachment 118657View attachment 118658
chrisdesign
Guru
- Messages
- 4,269
- Likes
- 6,330
Sorry about my german version of Photoshop.

Select the Channel Window from the Top-Bar of Photoshop.
On top of the window is an icon of the RGB image. Below you see a red channel, a green channel and a blue channel.
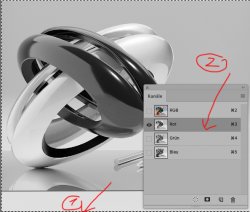
1. cmd A makes a selection of your image. See the running line.
2. Click on the red channel. This will activate it.
cmd C put the red channel into the clipboard. (you don't see any change yet.)
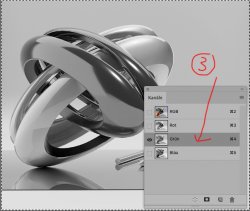
3. Click on the green channel.
cmd V paste the red channel from the clipboard into the green channel.
Next and final step is to paste the red channel also into the blue channel.
If you click now on the RGB image icon the result will be a black and white image, chosen from the best channel.

Select the Channel Window from the Top-Bar of Photoshop.
On top of the window is an icon of the RGB image. Below you see a red channel, a green channel and a blue channel.

1. cmd A makes a selection of your image. See the running line.
2. Click on the red channel. This will activate it.
cmd C put the red channel into the clipboard. (you don't see any change yet.)

3. Click on the green channel.
cmd V paste the red channel from the clipboard into the green channel.
Next and final step is to paste the red channel also into the blue channel.
If you click now on the RGB image icon the result will be a black and white image, chosen from the best channel.
Wow. Thanks very much Chris for the clear as a bell instructions. I've learned something new and will try it out. Silvering is always a challengen to remove from old photos and your technique is so simple.Sorry about my german version of Photoshop.
View attachment 119904
Select the Channel Window from the Top-Bar of Photoshop.
On top of the window is an icon of the RGB image. Below you see a red channel, a green channel and a blue channel.
View attachment 119905
1. cmd A makes a selection of your image. See the running line.
2. Click on the red channel. This will activate it.
cmd C put the red channel into the clipboard. (you don't see any change yet.)
View attachment 119906
3. Click on the green channel.
cmd V paste the red channel from the clipboard into the green channel.
Next and final step is to paste the red channel also into the blue channel.
If you click now on the RGB image icon the result will be a black and white image, chosen from the best channel.

