What's new
Photoshop Gurus Forum

Welcome to Photoshop Gurus forum. Register a free account today to become a member! It's completely free. Once signed in, you'll enjoy an ad-free experience and be able to participate on this site by adding your own topics and posts, as well as connect with other members through your own private inbox!

Would like advice please trying to salvage damaged B&W negatives


photoscoo

Active Member
Messages
35
Likes
15
Hello again,

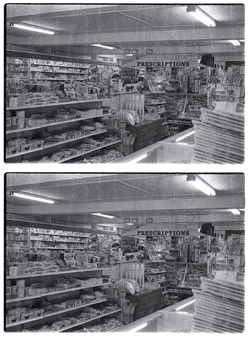
As part of this project I am working on, I need to somehow use a handful of images where the negatives suffered damage a long time ago. These negs were never printed, so there are no prints to work from unfortunately.

Here is one of them:
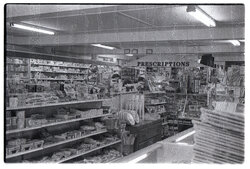
interior_scan_1_unedited.jpg
And what I came up with using the clone tool mostly:
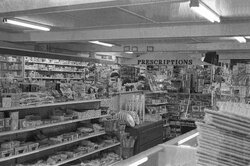
interior_scan_1.jpg

My edits are obvious. I lack the knowledge to do this better. I'm thinking that the healing brush might be useful somehow?

In any case, if you guys have any thoughts as to how you would approach something like this I would love to listen to your thoughts.
 

thebestcpu

Guru
Messages
2,988
Likes
2,747
HI @photoscoo
If I were you I would also want to know the parameters needed for the restoration. Does this need to be historically very accurate or is there flexibility such as replacing with items from other pictures that might be similar. What is the needed quality for the end result?

I think it is important to figure out the time involved to meet the "must" needs of the customer and the acknowledge reality if it is even worth the investment of time to take on the project.

If you are facing a tremendous amount of hours, I would suggest looking into some possible options that are more extreme.

I would check into if there are any options in repairing the damage on the negatives. Depending on the damage an expert may be needed here. Also, there are "wet" scanning techniques that can do a decent job of filling in surface damage scratches on negatives. If the damage is beyond the surface this may not be helpful.

There are more extreme scanning techniques (not standard scanners) using tunable lasers type illumination (single frequency light). Sometimes you find a certain frequency that the damage is not so prominent (this is a long shot).

Bottom line, use all creative and scientific techniques to get the best possible starting image for post processing.

Then with post processing, acknowledge reality of how much work ahead, decide whether to proceed and just take small chunks at a time in making progress.

Just keep in mind that this might be a Mission Impossible, if you decide to accept the mission, if you or any member of your team fails to complete the project, PS Gurus will disavow any knowledge or your actions. :roflmao:
 

nurgle

Well-Known Member
Messages
181
Likes
39
hi, having a very large negative collection damaged by flood waters, I have good experience at this. your restoration is very god.

I would like to ask if the negs were B&W and then scanned as B&W.?

the reason I ask, is that some stains give colour casts to B&W, and I find I can use that to my scanning advantage using channel mixing or channel lightening etc...

and also that would help with selecting areas that need to be retouched only.

Regards, Sandy
 

photoscoo

Active Member
Messages
35
Likes
15
HI @photoscoo
If I were you I would also want to know the parameters needed for the restoration. Does this need to be historically very accurate or is there flexibility such as replacing with items from other pictures that might be similar. What is the needed quality for the end result?

I think it is important to figure out the time involved to meet the "must" needs of the customer and the acknowledge reality if it is even worth the investment of time to take on the project.

If you are facing a tremendous amount of hours, I would suggest looking into some possible options that are more extreme.

I would check into if there are any options in repairing the damage on the negatives. Depending on the damage an expert may be needed here. Also, there are "wet" scanning techniques that can do a decent job of filling in surface damage scratches on negatives. If the damage is beyond the surface this may not be helpful.

There are more extreme scanning techniques (not standard scanners) using tunable lasers type illumination (single frequency light). Sometimes you find a certain frequency that the damage is not so prominent (this is a long shot).

Bottom line, use all creative and scientific techniques to get the best possible starting image for post processing.

Then with post processing, acknowledge reality of how much work ahead, decide whether to proceed and just take small chunks at a time in making progress.

Just keep in mind that this might be a Mission Impossible, if you decide to accept the mission, if you or any member of your team fails to complete the project, PS Gurus will disavow any knowledge or your actions. :roflmao:
Hi thebestcpu. Thanks for the reply.

Regarding quality, what I have done will actually suffice. This will be printed in a photo book. Details down to being able to read individual product labels etc. - those are not essential.

My main concerns are the larger areas - the ceiling etc. - you can see that I did a crap-ton of cloning there. I am puzzled how to better match the shades etc. - the transitions of my edits are pretty stark.

These negatives were stored in glassine sleeves. They got wet in a plumbing incident and ended up drying out while still in the sleeves. They essentially ended up being bonded to the glassine. I did a bit of googling and it seems that whatever is left behind (minerals, organic material) seems to get imbedded into the emulsion. I do not know a way to successfully clean them, although I have a good selection of non-critical negatives that I could try something with.

Regarding Mission Impossible, message received!!
 

photoscoo

Active Member
Messages
35
Likes
15
hi, having a very large negative collection damaged by flood waters, I have good experience at this. your restoration is very god.

I would like to ask if the negs were B&W and then scanned as B&W.?

the reason I ask, is that some stains give colour casts to B&W, and I find I can use that to my scanning advantage using channel mixing or channel lightening etc...

and also that would help with selecting areas that need to be retouched only.

Regards, Sandy
Hey Sandy!

Yes the negs are B&W and I scanned them as B&W. I then de-saturated them in PS because they had a slight purple cast to them.

I'm not sure what to do. My abilities seem to only be able to take me so far.

- Ken
 

thebestcpu

Guru
Messages
2,988
Likes
2,747
Hi thebestcpu. Thanks for the reply.

Regarding quality, what I have done will actually suffice. This will be printed in a photo book. Details down to being able to read individual product labels etc. - those are not essential.

My main concerns are the larger areas - the ceiling etc. - you can see that I did a crap-ton of cloning there. I am puzzled how to better match the shades etc. - the transitions of my edits are pretty stark.

These negatives were stored in glassine sleeves. They got wet in a plumbing incident and ended up drying out while still in the sleeves. They essentially ended up being bonded to the glassine. I did a bit of googling and it seems that whatever is left behind (minerals, organic material) seems to get imbedded into the emulsion. I do not know a way to successfully clean them, although I have a good selection of non-critical negatives that I could try something with.

Regarding Mission Impossible, message received!!

After the cloning, in the transition areas, just trying using the spot healing brush just over the transition. You might be surprised how well it blends those edges.
Just something to try
John Wheeler
 

nurgle

Well-Known Member
Messages
181
Likes
39
I then de-saturated them in PS because they had a slight purple cast to them.
- Ken

Hi Ken
a Purple cast can indicate the present of the Antihaliation layer not being totally removed in the fixer bath, but such would generally be uniform across the image. not to be mistaken for a blue-ish cast, that can indicate Iron in the water which has an effect on the silver itself by metallic replacement. Copper in the water would have a greenish effect. (Silver is very prone to Metallic replacement where buy of will swap with other metals in the water. in cases of this Gold or sepia toning the negs may help.

is the grain in pattern in the neg from any grain pattern in the plastic sleeve. if that is so it can be reduced by "Wet Scanning". placing the neg in mineral serpentine or mineral oils and using a west scanner like the Top Epson flat bed which has wet scanner attachments. Th turps or old doe son damage to negs.

since you said a Plumbing accident. I assume Town, Rain or Dam/Bore water.? Town Water can contain Chlorine which can attack silver, or Calcium which can form a hard white coating, VERY hard to remove. Rain can be acidic, something Silver hates. and last can have possible silt/grit or ar worst Fungal contaminants. Stuff you can drink safely, but would grow wildly on film Gelatine (as all film bases contain Agar-Agar, the stuff they use to grow cultures in labs. this is my problem with tens of thousands of ness covers in rain far wash off water. The smell rotting regs at my pals is so putrid people thing there is a dead body under mu house... I have had most of my sinuses removed in cancer ops so can smell it, but friends say it is eye watering)

also on retouching large area selection an flattening curves to reduce the hi light vs shadow differences in that area can even out tonal differences and thus making them appear flatter in tone. large area cloning or using gradation overlays may also help... I note small area clone near the high in the celling has the bumpity-bump look of a uneven area clones often repeating itself, a result of using the clone brush. that can be re over worked from the opposite side.

Wet negs can also be stored in freezers till Tim for restoration. 65,000 negs by one Photographer I had were placed in a commercial Freezer that was -40*.. and seriously no further degradation occurs, that took several years to work though, and batches of hundred a day, but this time my car would not go and I could not get them to the freezer over 100kms away. so years of work since destroyed...

it is all heartbreaking...
wish you well in you project.

regards, Sandy
 

thebestcpu

Guru
Messages
2,988
Likes
2,747
Hi @photoscoo
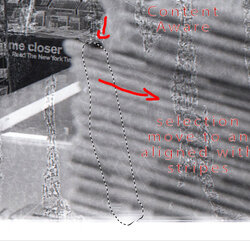
As an example of the content aware fill capability, I selected one common portion of a beam in the ceiling, selected that bad areas, and then within the Content Aware Tool, allowed the good sampling areas only to be the good areas of the beam.
I made this into an animation GIF showing before and after. Without any special efforts, it did a decent job.
I made a full size GIF so hope that displays correctly. If not, will repost with a smaller version.
Just an example of another tool that could be used.
John Wheeler

interior_scan_1-example-content-aware-fill.gif
 

photoscoo

Active Member
Messages
35
Likes
15
I then de-saturated them in PS because they had a slight purple cast to them.
- Ken

Hi Ken
a Purple cast can indicate the present of the Antihaliation layer not being totally removed in the fixer bath, but such would generally be uniform across the image. not to be mistaken for a blue-ish cast, that can indicate Iron in the water which has an effect on the silver itself by metallic replacement. Copper in the water would have a greenish effect. (Silver is very prone to Metallic replacement where buy of will swap with other metals in the water. in cases of this Gold or sepia toning the negs may help.

is the grain in pattern in the neg from any grain pattern in the plastic sleeve. if that is so it can be reduced by "Wet Scanning". placing the neg in mineral serpentine or mineral oils and using a west scanner like the Top Epson flat bed which has wet scanner attachments. Th turps or old doe son damage to negs.

since you said a Plumbing accident. I assume Town, Rain or Dam/Bore water.? Town Water can contain Chlorine which can attack silver, or Calcium which can form a hard white coating, VERY hard to remove. Rain can be acidic, something Silver hates. and last can have possible silt/grit or ar worst Fungal contaminants. Stuff you can drink safely, but would grow wildly on film Gelatine (as all film bases contain Agar-Agar, the stuff they use to grow cultures in labs. this is my problem with tens of thousands of ness covers in rain far wash off water. The smell rotting regs at my pals is so putrid people thing there is a dead body under mu house... I have had most of my sinuses removed in cancer ops so can smell it, but friends say it is eye watering)

also on retouching large area selection an flattening curves to reduce the hi light vs shadow differences in that area can even out tonal differences and thus making them appear flatter in tone. large area cloning or using gradation overlays may also help... I note small area clone near the high in the celling has the bumpity-bump look of a uneven area clones often repeating itself, a result of using the clone brush. that can be re over worked from the opposite side.

Wet negs can also be stored in freezers till Tim for restoration. 65,000 negs by one Photographer I had were placed in a commercial Freezer that was -40*.. and seriously no further degradation occurs, that took several years to work though, and batches of hundred a day, but this time my car would not go and I could not get them to the freezer over 100kms away. so years of work since destroyed...

it is all heartbreaking...
wish you well in you project.

regards, Sandy
Hi Sandy,

I appreciate your reply very much. Your idea of wet scanning is a good one. So I just ordered a fluid mount and some acetate and will try just that. I bet it improves things.

The negs got wet from a community water supply back in the 1980's. If there was chlorine in the water it was not detectable by taste. The water was definitely hard tho.

The repetitive bumpity-bump look in my edit is from my sheer frustration causing me to get lazy and going with a "oh screw it" attitude. I will go back and clean that up if I can.

Yes the word heartbreaking is appropriate. I keep reminding myself that the vast majority of people who are the subject of my project are long deceased. That, among other things, helps keep me going.

- Ken
 

photoscoo

Active Member
Messages
35
Likes
15
Hi @photoscoo
As an example of the content aware fill capability, I selected one common portion of a beam in the ceiling, selected that bad areas, and then within the Content Aware Tool, allowed the good sampling areas only to be the good areas of the beam.
I made this into an animation GIF showing before and after. Without any special efforts, it did a decent job.
I made a full size GIF so hope that displays correctly. If not, will repost with a smaller version.
Just an example of another tool that could be used.
John Wheeler

View attachment 129331
Hi John,

Hey that is excellent! Far better than I did.

I will try doing this myself for sure. Thank you very much!

- Ken
 

nurgle

Well-Known Member
Messages
181
Likes
39
Hi Ken, the reason bumps in the emulsion show up as either light or dark spots, is that the gelatine acts like miniature lens Clemens, concave or convex, and that is why wet scanning evens them out.

the problem with chlorine in water is that is is also great at attacking gelatine even in almost infinitesimal traces, we in Australia also add Flouride to town waters, and that ends up as a whites scum on the surface of negs, which when too thick can appear as dark marks... and to relieve that Kodaks Photo-Flo 200 was an essential past of the last wash, also done in trace amounts....

I total understand frustration.. I have been in PTSD since.. (its 1am as I type this here, as I just can't sleep. and I had the same situation one 2011,after my big flood, and that took me 2 years to get over. not helped by looters trying to get in. Chased one with a samurai sword. In 2011 The looters called the police on me when I tried to get them off my property.)

and part of my self shame at letting down the hundreds of thousand of portrait customer of one of our most famous photographers, and for Americans more upsetting was a great percentage were US army personnel, as the photographer was in McArthurs HQ support building, across the road from His Offices, now known as "The McArthur Building" and for many that was the last know images before they were sent off to the pacific war. I am haunted by that.

We dedicated historians try and save the past for the future, and end up getting kicked for doing so... the criticism of me this last month even from my own club members has been never ending... (what hurts even more is that I tried to donate much of my collections (I had 22 Photographers estates in my shed) to State libraries and museums and was treated like crap, and still am, and many historical societies and museums that use the images I saved not only don't acknowledge me, but when I try and post to rare fact inside the images , I am scolded... One guy wrote a book about a glass neg I discovered and donated a contact print to a museum, and failed to read the writing on the banners in the background that contradicted his text, he hung up on me when I pointed it out. etc.

best wishes, Sandy
 
Last edited:

nurgle

Well-Known Member
Messages
181
Likes
39
Hi, John.
here is a Content aware trick, not sure, but probably teaching you to suck eggs.

that if there is line in the image that are straight, and you drag a content aware selection over a matching line section it will copy that area, like a stamp took, and could be used to copy edges where straight lines occur. remaining in architecture there are converging lines, so only do one area with one line at a time.
you will see in below that out has also copied the flaws and textures (those white line especially) but has blended the line well, but I did not quite get the top bar right due to the lines not being parallel. in more careful.

also there is a difference between a selection, move and let go of the mouse, and a selection move and count to 3 and let go of the mouse. the later is what I did below.

regards, Sandy

pattern content.jpg
 

thebestcpu

Guru
Messages
2,988
Likes
2,747
Hi, John.
here is a Content aware trick, not sure, but probably teaching you to suck eggs.

that if there is line in the image that are straight, and you drag a content aware selection over a matching line section it will copy that area, like a stamp took, and could be used to copy edges where straight lines occur. remaining in architecture there are converging lines, so only do one area with one line at a time.
you will see in below that out has also copied the flaws and textures (those white line especially) but has blended the line well, but I did not quite get the top bar right due to the lines not being parallel. in more careful.

also there is a difference between a selection, move and let go of the mouse, and a selection move and count to 3 and let go of the mouse. the later is what I did below.

regards, Sandy
Thanks for the info Sandy. I usually use the Stamp tool or in this case the Patch tool (within the healing brush tools) when lining up patterns. Sometimes I use a combination of the Stamp tool followed by a healing tool on the boundaries. Always more to learn. In particular, I was not aware of the idiom about teaching me to suck eggs. I had to look that one up.
Thank you for sharing you scanning techniques. I am just on the front end of wet scanning.

A bit off topic for this thread: one of my other joys is being a genealogist and have a treasure trove of all sizes of family negatives from over a 100 years ago. My grandmother who was born in the 19th century was an amateur photographer and processed her own images and kept all of her negatives. One of my aunts offered them to me right before they were headed for the trask (yikes).

So with grandkids, photography, photoshop, genealogy, and photo restoration I am "snug as a rat in a granary." :) A long lost expression from the mid 1800s that my GG Grandfather used in his journal.
John Wheeler
 

nurgle

Well-Known Member
Messages
181
Likes
39
Hi John.
My flat bed scanner ia an Epson 10000XL, which in Australia cost over $6,500... twice what it does in US. and I use Silverfast with all its bells and whistles... but at all the settings and doing triple scans and averaging them in Silverfast it could easily take 10 to 30 minutes.
funny, all my idioms come from old American TV shows... ahahha
I have written 12 books/Manuscripts to help genealogists date early Australian Photographers works. But only Published one, and then only 175 copies,. our National Library (our equivalent of you Library of Congress) thinks the lost are so important they actually have an online page selling copies, and never have ever asked me.
The only photos I have of my paternal grandfather were taken by myself as a student of photography at th college of art..
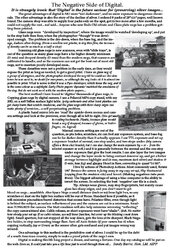
I have never done any wet scanning at all. but know several mates that do it. I have found the best way to convert old negs to digital is to use digital cameras. and it can be done using wet bath on the negs.

wrote many articles for a local Photographic mag. one on that subject below.
regards
Sandy


Negative Digitals.jpg
 

nurgle

Well-Known Member
Messages
181
Likes
39
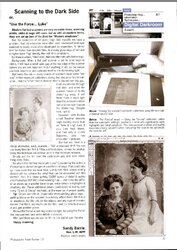
I just forgot to add this not. as almost all flat bed scanners have limited range compared to digital camera, and old glass negs developed by inspection can in some cases , be as dark as welder glass, here is a trick for forcing more light though a scanner.

the scanner I had then was an Epson 4900 or something. my 10000Xl has even more leeway, and silver fasts ability to auto multiple scans make it amazing for not so good negs ie over exposed or over developed. but I had 22 photographers works, and som I could have used as welder glass.

regards

Sandy


Screen Shot 2022-05-05 at 04.55.26am.jpg
 

nurgle

Well-Known Member
Messages
181
Likes
39
And just incase you have old print photo that show silvering out. here is a great technique for defeating diachronic silver. that shiny metallic silver that appears on some photo processes over 60-75 years old.

regards, SandyScreen Shot 2022-05-05 at 05.12.53am.jpg
 

nurgle

Well-Known Member
Messages
181
Likes
39
a test for checking any depth of field of a flatbed scanner. just incase.

regards, SandyScanning Wedge.jpg
 

photoscoo

Active Member
Messages
35
Likes
15
Hi @photoscoo
As an example of the content aware fill capability, I selected one common portion of a beam in the ceiling, selected that bad areas, and then within the Content Aware Tool, allowed the good sampling areas only to be the good areas of the beam.
I made this into an animation GIF showing before and after. Without any special efforts, it did a decent job.
I made a full size GIF so hope that displays correctly. If not, will repost with a smaller version.
Just an example of another tool that could be used.
John Wheeler

View attachment 129331
Hi John,

I am just getting back to this project, and I tried using this technique but I don't have the "Content-Aware Fill..." option showing. Do I need a newer version of PS?

Screen Shot 2022-05-28 at 9.53.23 AM.jpg


REPLY
 

JeffK

Guru
Messages
2,486
Likes
2,890
Hi John,
I am just getting back to this project, and I tried using this technique but I don't have the "Content-Aware Fill..." option showing. Do I need a newer version of PS?
Hi - just jumping in here...from the looks of the window header - top center - you have Photoshop CC 2017:

1653751621920.png

Content Aware Fill was first available in PS CC 2019. You'll need to upgrade to have that option.
 

photoscoo

Active Member
Messages
35
Likes
15
Hi Jeff. Yes I just figured that out. Thank you.

I just purchased the newest version of PS but so far I have not been able to run the installer. (Chatting with Adobe now)
 

Top