What's new
Photoshop Gurus Forum

Welcome to Photoshop Gurus forum. Register a free account today to become a member! It's completely free. Once signed in, you'll enjoy an ad-free experience and be able to participate on this site by adding your own topics and posts, as well as connect with other members through your own private inbox!

Photoshop for map editing


Olde Kyng 83

Member
Messages
8
Likes
1
Hello everyone! I am a title abstractor for a small oil and gas company. I am also the go to person for maps inside of our organization. We keep and use a lot of old maps and the set that we use the most is in rough shape. The unfortunate thing is that we also track our files on this particular set of maps. By "track", I mean once a title is completed, the abstractor will draw the mineral tract on this map with a green highlighter and write the file number inside the highlighted area in pen. There are also some other marks and colors of highlighter that were put on the maps way back in the early days of the company.

The real kick in the pants is that we don't have the original maps in digital format. We do have a large format printer/scanner so I can scan these maps in as a JPEG, TIFF, or PDF, but they of course will have highlighter all over them. We would like to have the full set of maps, which is around 50, clean and free of highlighter or pen marks so that we can print fresh copies. Each map is roughly 26" high and 36" wide so manual editing would be tedious and time consuming.

I scanned a map in and opened it in Microsoft Paint to see if the color swap function would do this, but it didn't work the way I had hoped. I can manually remove the highlighter and pen marks in MS Paint, but there is so much other stuff that I don't want to remove that it makes this process extremely time consuming. Image editing is not my wheelhouse and I really don't know what to do or how to go about this project.

I don't know if Photoshop is the right tool for the job (because I have exactly zero experience with it) or if there is another software that could handle the task. I'm hoping someone here can at least point me in the right direction or at least let me know if this task is nigh impossible.

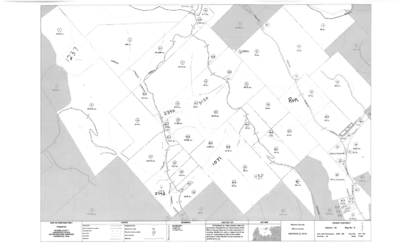
The attached file is a replica of what one of the maps would look like (I can't use the actual map because it has proprietary information on it). We also have a Wacom Intuos Pro pad and pen if that helps or makes a difference in any way. I appologize if this topic has been covered before, but my knowledge on this subject is so limited that I didn't really know what to search for. Thanks in advance for any help or direction you can offer!
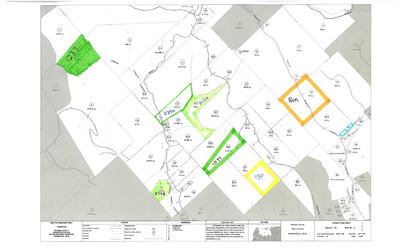
Example Map.png
 

Rich54

Guru
Messages
1,732
Likes
3,412
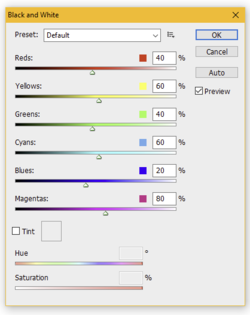
Since you have no Photoshop experience, you may not fully follow this, but this first step was quite simple and took just a few seconds. Photoshop contains a variety of "Adjustment Layers" that can modify an image. One of these adjustment layers converts colors to Black & White. When you initially open this Black & White Adjustment Layer, you get this:

1673973725421.png

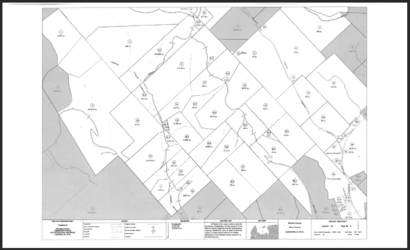
Each of the color channels (red, yellow, green, etc.) defaults to the percentage settings that you see above. You can then manually adjust, say, the Red slider to change the brightness of whatever used to be red in the original image. In your case, the highlighter colors to be removed are yellow, green and orange. I adjusted the Yellow slider to the right (brighter) to about 151 and the Green slider to the right to about 165. (Just do this by eye.) Here's what it looks like now:

1673974416844.png


There is no automatic fix to distinguish the text that needs to be erased vs. the text that needs to remain. From here, what you'd need to do is to sample the exact shade of white in your image and then manually paint over the text with that white color.

Once that's all done, there are other adjustment layers that, for example, can boost the contrast and make the black lines darker, if that's desireable. All of these fixes are quite easy, but you'd need somebody with at least an advanced-beginner level of Photoshop ability.
 

JeffK

Guru
Messages
2,486
Likes
2,890
@Rich54 - this was a great workaround for the filled in areas. One thing I was concerned about, even before you posted, was that with any solution I could think of, the borders on the colored areas might be obliterated. Those might have to be redrawn based on historical data which sounds like the OP doesn't have. Somewhat of a dilemma...
 

IamSam

Administrator
Staff member
Administrator
Messages
22,721
Likes
13,258
Agree with both Rich and Jeff.

After removing the color, I tried to restore some of the lines and clean it up a bit..............far too time consuming!

Screen Shot 2023-01-17 at 11.51.47 AM.png

A better scan would help.
 

Olde Kyng 83

Member
Messages
8
Likes
1
Since you have no Photoshop experience, you may not fully follow this, but this first step was quite simple and took just a few seconds. Photoshop contains a variety of "Adjustment Layers" that can modify an image. One of these adjustment layers converts colors to Black & White. When you initially open this Black & White Adjustment Layer, you get this:

View attachment 134921

Each of the color channels (red, yellow, green, etc.) defaults to the percentage settings that you see above. You can then manually adjust, say, the Red slider to change the brightness of whatever used to be red in the original image. In your case, the highlighter colors to be removed are yellow, green and orange. I adjusted the Yellow slider to the right (brighter) to about 151 and the Green slider to the right to about 165. (Just do this by eye.) Here's what it looks like now:

View attachment 134926


There is no automatic fix to distinguish the text that needs to be erased vs. the text that needs to remain. From here, what you'd need to do is to sample the exact shade of white in your image and then manually paint over the text with that white color.

Once that's all done, there are other adjustment layers that, for example, can boost the contrast and make the black lines darker, if that's desireable. All of these fixes are quite easy, but you'd need somebody with at least an advanced-beginner level of Photoshop ability.
Thank you so much Rich. This is exactly what I needed to know. It sound like I need to learn how to use Photoshop. Are there any resources you recommend for learning the software? Skillshare comes to mind as a possibility. Also, I noticed some of the lines were lightened by the color removal process. You mentioned being able to darken the lines. Would this be a done by changing setting within the software or would it involve drawing them back in by hand? Some of these maps are already kind of light in areas and it would be beneficial to be able to darken them and/or draw features back in by hand. Is this possible in Photoshop? I realize these are all pretty basic things and I appreciate you taking the time to explain them to me.
 

Rich54

Guru
Messages
1,732
Likes
3,412
Photoshop can be very daunting at first because it can do so much. You will need to be patient and put in a fair amount of study just to become a beginner. There are lots of good tutorials and websites on YouTube. One recommendation is called PHLEARN, run by a guy named Aaron Nace. I'm attaching his 30-day introductory course below. Another tutorial series I like is called PiXimperfect.

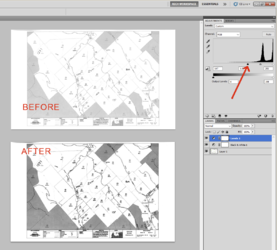
In Photoshop, there are usually many different ways to accomplish the same thing. One of many ways to darken faint lines is to use a Levels adjustment. You can see the Before & After versions of your map below after I applied a Levels adjustment. I did this by adjusting the black point slider to the right (where the red arrow is pointing).

A lot depends on the quality of your original image. For example, when I darkened the blacks, it also darkened stray noise and imperfections in your lines. Also, some of your map lines were too faint and indistinct to begin with, so they will never look very good. There are ways to deal with all of these issues, but it takes time and Photoshop knowledge. For example, you can see in @IamSams post above that he cleaned up many of your lines, but he also said that it was a fairly tedious process.


1673980288348.png


Olde Kyng 83

Member
Messages
8
Likes
1
Agree with both Rich and Jeff.

After removing the color, I tried to restore some of the lines and clean it up a bit..............far too time consuming!

View attachment 134928

A better scan would help.

Agree with both Rich and Jeff.

After removing the color, I tried to restore some of the lines and clean it up a bit..............far too time consuming!

View attachment 134928

A better scan would help.
I scanned this in on our copy machine just as an example. I didn't realize you all would be so proactive in visually showing me what could be done. I really appreciate you all going above and beyond! Our wide format scanner can do up to 600 DPI which is usually where I have it set. Is one particular file type better than another as far as image quality goes?
 

Rich54

Guru
Messages
1,732
Likes
3,412
I scanned this in on our copy machine just as an example. I didn't realize you all would be so proactive in visually showing me what could be done. I really appreciate you all going above and beyond! Our wide format scanner can do up to 600 DPI which is usually where I have it set. Is one particular file type better than another as far as image quality goes?

Not my area of expertise. Hopefully somebody else will comment about scanner settings and file types, especially as you said your maps are roughly 26" x 36". Normally, I'd suggest TIFF, but you don't want the file size to be so huge that it overwhelms the computer.
 
Last edited:

Olde Kyng 83

Member
Messages
8
Likes
1
Photoshop can be very daunting at first because it can do so much. You will need to be patient and put in a fair amount of study just to become a beginner. There are lots of good tutorials and websites on YouTube. One recommendation is called PHLEARN, run by a guy named Aaron Nace. I'm attaching his 30-day introductory course below. Another tutorial series I like is called PiXimperfect.

In Photoshop, there are usually many different ways to accomplish the same thing. One of many ways to darken faint lines is to use a Levels adjustment. You can see the Before & After versions of your map below after I applied a Levels adjustment. I did this by adjusting the black point slider to the right (where the red arrow is pointing).

A lot depends on the quality of your original image. For example, when I darkened the blacks, it also darkened stray noise and imperfections in your lines. Also, some of your map lines were too faint and indistinct to begin with, so they will never look very good. There are ways to deal with all of these issues, but it takes time and Photoshop knowledge. For example, you can see in @IamSams post above that he cleaned up many of your lines, but he also said that it was a fairly tedious process.


View attachment 134929


Thank you so much! I will check those out for sure. I have always had in interest in learning Photoshop, but never had a real reason to other than touching up vacation photos or something like that. It seemed to daunting to learn for something as trivial as that so I never did. I don't mind putting in the time and also doing some tedious processes if I have to. We use these maps a lot for various things and I know it will be worth the time and effort to have a good legible copy of these.
 

thebestcpu

Guru
Messages
2,988
Likes
2,747
Hi @Olde Kyng 83
A lot of good posts on how to approach your problem. I will add some info on the file type to use and scanner settings.
For file type it is best to use one the supports lossless compression. TIFF and PNG allow that. You need to avoid JPEG or any step in the workflow the has lossy compression
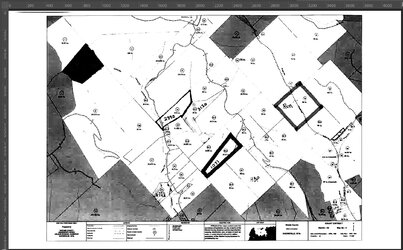
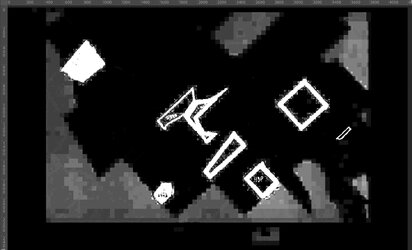
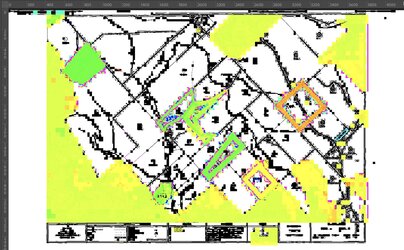
In your example map image, even though it is PNG format at some point it went through lossey compression. Information is lost. In the pictures below, I have extracted out separately the Hue, Saturation, and Luminosity components and amplified the contrast so you can see what gets lost. Even though you had reasonable scanning resolution, the lossey compression saves space by blocking things up. In your image there are blocks that are 24 pixels and 48 pixels square. You will get better results with lossless compression in TIFF or PNG.

As far as resolution, the way I think abou tit is that the smallest line you want to resolve should be no less than 3 pixels wide (more would be better yet there is a tradeoff on file size). Easy way to tell is to scan your iamge and zoom in very close and see if the smallest lines appear well defined. If not, best to up the scanning resolution. Another way to tell is look at the text. If it is not easy to read and crisp, that higher scanning resolution will help.

Here are those images that show the chunking with lossey compression you want to avoid

Luminosity Component

Screen Shot 2023-01-17 at 10.29.23 PM.jpg


Saturation Component

Screen Shot 2023-01-17 at 10.28.39 PM.jpg


Hue Component

Screen Shot 2023-01-17 at 10.31.20 PM.jpg

Hope this helps some
John Wheeler
 

Olde Kyng 83

Member
Messages
8
Likes
1
Hi @Olde Kyng 83
A lot of good posts on how to approach your problem. I will add some info on the file type to use and scanner settings.
For file type it is best to use one the supports lossless compression. TIFF and PNG allow that. You need to avoid JPEG or any step in the workflow the has lossy compression
In your example map image, even though it is PNG format at some point it went through lossey compression. Information is lost. In the pictures below, I have extracted out separately the Hue, Saturation, and Luminosity components and amplified the contrast so you can see what gets lost. Even though you had reasonable scanning resolution, the lossey compression saves space by blocking things up. In your image there are blocks that are 24 pixels and 48 pixels square. You will get better results with lossless compression in TIFF or PNG.

As far as resolution, the way I think abou tit is that the smallest line you want to resolve should be no less than 3 pixels wide (more would be better yet there is a tradeoff on file size). Easy way to tell is to scan your iamge and zoom in very close and see if the smallest lines appear well defined. If not, best to up the scanning resolution. Another way to tell is look at the text. If it is not easy to read and crisp, that higher scanning resolution will help.

Here are those images that show the chunking with lossey compression you want to avoid

Luminosity Component

View attachment 134942


Saturation Component

View attachment 134943


Hue Component

View attachment 134944

Hope this helps some
John Wheeler
Thank you John for the information on file type and scanning. I'm at the end of my day here, so I will delve into the scanner's settings in the morning and see what options I have. Is lossless TIFF or PNG different than "regular" Tiff and PNG or is lossless just an inherent quality of those file types? Or is it a particular process by which you go about scanning or handling the digital file? I just want to make sure I fully understand the information you have given. Thank you all again so much for all the help and information. I appreciate it very much!
 

thebestcpu

Guru
Messages
2,988
Likes
2,747
Thank you John for the information on file type and scanning. I'm at the end of my day here, so I will delve into the scanner's settings in the morning and see what options I have. Is lossless TIFF or PNG different than "regular" Tiff and PNG or is lossless just an inherent quality of those file types? Or is it a particular process by which you go about scanning or handling the digital file? I just want to make sure I fully understand the information you have given. Thank you all again so much for all the help and information. I appreciate it very much!
That is a good question @Olde Kyng 83

It is my understanding that PNG files only have lossless compression.

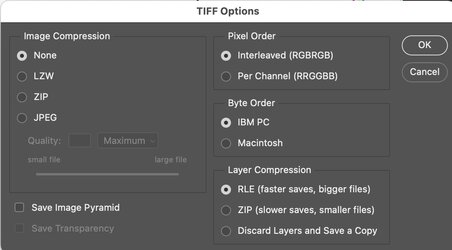
TIFF supports no compression, several lossless compression options, and also a lossey option. The image below shows what options Photoshop offers when saving to TIFF. I believe the only lossey compression option is JPEG and all the others are lossless. If the device/software you are using does not have specific settings you might have to check the manual on what type if any compression is being used. It may be device/software specific.
John Wheeler

Screen Shot 2023-01-19 at 7.32.18 PM.jpg
 
Last edited:

Olde Kyng 83

Member
Messages
8
Likes
1
That is a good question @Olde Kyng 83

It is my understanding that PNG files only have lossless compression.

TIFF supports no compression, several lossless compression options, and also a lossey option. The image below shows what options Photoshop offers when saving to TIFF. I believe the only lossey compression option is JPEG and all the others are lossless. If the device/software you are using does not have specific settings you might have to check the manual on what type if any compression is being used. It may be device/software specific.
John Wheeler

View attachment 135006
I looked through the on-screen options of the scanner and didn't see anything specifically regarding compression. It just gives you the option to choose between JPEG, TIFF, or PDF. I will have to get into the manual to see what it says. I read somewhere that PDF is best for archiving, which is why I initially scanned all the maps in using that format. For the purpose of removing the color from the maps I should use TIFF, but after I have managed to get all that done should I continue to use the TIFF format or should I use something else? In our day to day operations the maps are used for two things: Just viewing the map on screen to compare it to the other more current maps that we have access to and then for every file we put together, a screen shot is taken of the section of the map that has whatever tract the file covers and then printed off and put in the file. I put this screen shot procedure in place because we used to just put the map on the copy machine and make copies for the files, but it was causing a lot of wear and tear after several years of doing this. For this to work and have the most up to date file information on the map, when anyone makes a copy, I re-scan a map when someone finishes a file and draws their tract on the map. Do you see anything wrong with this procedure? Is there anything I should be doing differently? I personally would be ok with digitizing this process if it is possible (drawing tracts on the map and writing the file numbers on the tracts), but I think they would still want me to maintain a working set of paper maps. Thanks again for all your help.
 

thebestcpu

Guru
Messages
2,988
Likes
2,747
Hi @Olde Kyng 83

I am not an archivist so you may want to consult with one. I will share what I know.

First, PDF is often used because it is universally used and Readers for Acrobat files are widely available. However, PDF has many options on how it saves images and some of those options are to reduce resolution and use lossey compression. I am not an expert on using PDF and to avoid loss of data, it would be improtant to know the ins and outs of how "Preferences and other Settings" shoud be set to meet you needs. From an achival standproint, you want to avoid reduction in resolution and lossey compression settings in any program. I think you would want an Adobe Acrobat expert to get this right (that's not me).

I am sure there are pros and cons with which workflow to use in your business. One key thing to look for is in either workflow, how to avoid degradation or loss of information. That does mean whether it is paper or digital you need to have appropriate backup plans in case of disaster e.g. fires. Electronic copes are subject to digital storage failure as well.

Whichever workflow you take it is probably best to identify what will be the Master Copy and make changes from that Master Copy. In parricular, what you want to avoid is a process where changes are made on paper, you scan it in, and print it back out for future changes to be added via paper. This would introduce incremental degradation from rescanning and printing where both will give a slight degradation. The mentioned process would accumulate degradation with each turnaround. That is why having a Master Copy from which to make changes is a better way to go.

Hope this helps
John Wheeler
 

Olde Kyng 83

Member
Messages
8
Likes
1
Hi @Olde Kyng 83

I am not an archivist so you may want to consult with one. I will share what I know.

First, PDF is often used because it is universally used and Readers for Acrobat files are widely available. However, PDF has many options on how it saves images and some of those options are to reduce resolution and use lossey compression. I am not an expert on using PDF and to avoid loss of data, it would be improtant to know the ins and outs of how "Preferences and other Settings" shoud be set to meet you needs. From an achival standproint, you want to avoid reduction in resolution and lossey compression settings in any program. I think you would want an Adobe Acrobat expert to get this right (that's not me).

I am sure there are pros and cons with which workflow to use in your business. One key thing to look for is in either workflow, how to avoid degradation or loss of information. That does mean whether it is paper or digital you need to have appropriate backup plans in case of disaster e.g. fires. Electronic copes are subject to digital storage failure as well.

Whichever workflow you take it is probably best to identify what will be the Master Copy and make changes from that Master Copy. In parricular, what you want to avoid is a process where changes are made on paper, you scan it in, and print it back out for future changes to be added via paper. This would introduce incremental degradation from rescanning and printing where both will give a slight degradation. The mentioned process would accumulate degradation with each turnaround. That is why having a Master Copy from which to make changes is a better way to go.

Hope this helps
John Wheeler
Thanks so much John, I appreciate your input on this. I will take all of this into account and revise our SOP accordingly. I feel like I'm at least pointed in the right direction now. I'm sure I'll have a billion questions once I get rolling on the project and start trying to learn the software, but I feel like this is a good place to be when I inevitably get stuck on something. Thanks again to all who gave their input and assistance. Ya'll have a great week!
 

thebestcpu

Guru
Messages
2,988
Likes
2,747
You are correct @Olde Kyng 83 , PSGururs is a good place to go for help as there are many forum members willing to help.
Best of skill on your project.
John Wheeler
 

Olde Kyng 83

Member
Messages
8
Likes
1
I wanted to add an update to this thread now that I have been working on this project for a while. I studied enough of the Phlearn 30 days of PS to understand how to do what I needed to do for my mapping project. I switched our preferred file type for scans to TIFF which made a world of difference. I just wanted to let y'all know that I have a system down (which basically consists of everything explained above) and can bang one of these maps out pretty quickly if there isn't too much manual correction involved. Thanks again to everyone that contributed!
 

Top