What's new
Photoshop Gurus Forum

Welcome to Photoshop Gurus forum. Register a free account today to become a member! It's completely free. Once signed in, you'll enjoy an ad-free experience and be able to participate on this site by adding your own topics and posts, as well as connect with other members through your own private inbox!

Beginner Help Please?


Croon

New Member
Messages
2
Likes
0
Hi all,

I have just joined the forum today.

I mainly use AutoCAD & Sketchup in day to day work so I am used to drawing and layer control etc, however I have been given a basic (hopefully it is basic!) task in work. I am keen not to start bad habits, as in the past I have done some very basic Photoshop, but it is all guesswork and probably not best/good practise.

I have a of a jpeg of a row of buildings. I need to remove the end building, then draw a chimney breast on, extend the roofline, cut 1 chimney, copy another chimney in place of it, then apply a graphic onto the blank gable end (the graphic will have to wrap around the newly drawn chimney breast. I have watched various youtube videos on how to do use vanishing point etc and I'm pretty sure I could do that part. This is more aimed towards the best practice and tips to get to where I need to be.

Here is where I am up to:
  1. I have the base jpeg, then I take a copy of that layer to work from
  2. I used the pen tool to create a path, then used the path to create a vector path to remove the building
Once I start doing anything more, I end up with lots of layers that may be unnecessary and also make the file huge. Is there a way I can use 1 "base layer" then take my paths, etc from there? So effectively just cutting and pasting parts of that base layer and then use layer control to display what I want etc?

Here are the basics of the task:
  1. Remove a building
  2. Remove a chimney stack
  3. Copy an existing chimney stack to replace the removed one
  4. Draw a chimney breast what combined both chimneys
  5. Extend the roof line to tie in with new chimney breast
  6. Wrap a graphic around the new gable end (including wrapping around the chimney breast)

Can anybody help with some guidance please??

I hope anyone reading gets a grasp of what I am trying to do!


Thanks,
 
Without seeing the image it's difficult to comment accurately. However, the first thought that comes to mind is rather than cutting, you should be using a layer mask or a vector mask on the background copy to remove the parts. Place the replacement parts on separate layers above the background. Don't be afraid of using layers, it is very seldom that I do anything without using a separate layer.
 
Without seeing the image it's difficult to comment accurately. However, the first thought that comes to mind is rather than cutting, you should be using a layer mask or a vector mask on the background copy to remove the parts. Place the replacement parts on separate layers above the background. Don't be afraid of using layers, it is very seldom that I do anything without using a separate layer.

Thanks for the reply. What is the best way to create a layer mask or vector mask? And what is the difference?
 
There are various ways to add a mask but the simplest is with the layer mask icon at the bottom of the layers panel. Paint with a black brush to conceal and white to reveal.
A vector mask uses a path to mask. Create from Layer-Vector Mask and choose Reveal All. Hide All or Current Path. With a vector path you can adjust the path after the fact to get the best selection.
Unless you know how to use the pen tool you are better off with a simple layer mask.


The problem relates to a long running discussion of destructive vs. non-destructive. You can probably do all the steps on a single layer - but if you make an error midway thru, or even towards the end of the project, there's no going back a few steps to correct. You'd have to start all over again. That's the destructive way to work.
In non-destructive, you work with masks as @hawkeye said above and you work with layers. You can choose how many layers you want to work with. So if you make an error, you can just redo a single layer, not the entire project.
Again, if you work on a single layer, if you miss one cut, make a bad move on a paste, you have to start all over again. That can be dang frustrating when you've put in an hour's work or more.
Then, at the end of making all your deletions, pastes, and moves, you can go to the top layer, hit CTRL +ALT + Shift + E, (control + command + shift + E on a Mac) you can combine all into a single layer on top of the stack. Should you ever need to go back to that image, you can delete the top combined layer, and go back to your layers for changes.

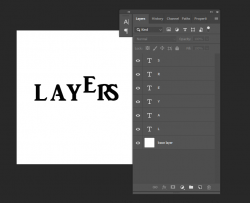
For example, some type work by stacking layers:

1611025963998.png

I can correct the layout by just going to the layers with the error and correcting

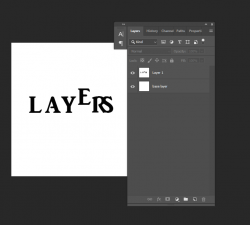
But if I worked on a single layer:

1611026048821.png

I can't easily correct it and would either have to struggle with cut and paste, or start all over again, ie that RS contraction is unfixable. The more complex, the more work it would take.

Working on layers shouldn't slow you down at all - you'll still do the same amount of manipulation but in a non-destructive way.
Your first move was correct though - always make a copy of your base layer then work on the copy upward. That way you always have the original to go back to to compare your work.
Sorry to go on at such a length - but I learned this lesson the hard way. ;)

- Jeff
 
Last edited:

Back
Top