What's new
Photoshop Gurus Forum

Welcome to Photoshop Gurus forum. Register a free account today to become a member! It's completely free. Once signed in, you'll enjoy an ad-free experience and be able to participate on this site by adding your own topics and posts, as well as connect with other members through your own private inbox!

Compositing a picture, what approach your recomend


_alexbrandt_

Well-Known Member
Messages
66
Likes
8
Hello Photoshop Gurus,

I haven't been using PS enough to be good at it yet.
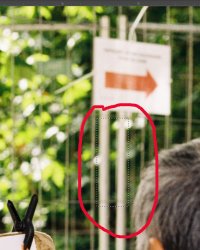
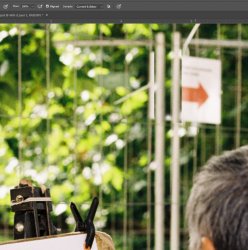
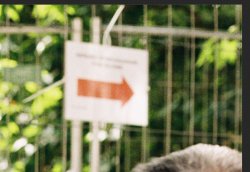
I've got a picture for which I'd like to remove the ugly sign in the upper right background.
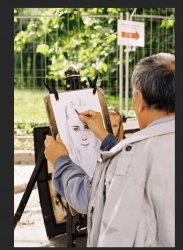
Screenshot 2020-11-07 at 21.27.28.jpg

Screenshot 2020-11-07 at 21.27.45.jpg

Since the sign is on the fence, I'd like to preserve the pattern of the fence. Yet since its soft focus, it makes it more challenging.
Is there a way to use the rectangle tool to use one edge as a mask in order to limit the clone stamp tool or healing brush tools. Allowing the re-recreate the foliage between the fence bars.
Or is that too complicated as approach?
 

polarwoc

Guru
Messages
1,576
Likes
1,421
Yet since its soft focus, it makes it more challenging.
The soft focus should not be an issue, because the rest of the fence from where we are going to source pick is in similar soft focus too.

Is there a way to use the rectangle tool to use one edge as a mask in order to limit the clone stamp tool or healing brush tools.
You could duplicate the background layer and use a polygonal lasso tool to draw a rectangle covering the sign so as to mask out the rest of the layer from getting affected, but this is probably not necessary in this case seeing that the background area where work needs to be done is with similar blur, random patterned leaves, plenty of space to work with.

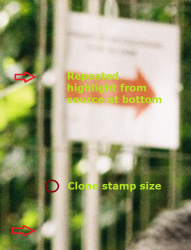
The way I have approached this is to get the two fence panel end bars clone sourced from the bottom using a very soft brush with a small size, focusing initially on getting the fence bar edges continuous (at this point, there will be repeating patterns of highlighted leaves from the source which can be fixed later)
6.png
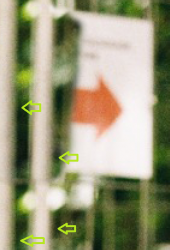
Continue to work with similar small sized clone stamp size and soft edges and focus on getting the edges continuous as shown in Green arrows:
7.png

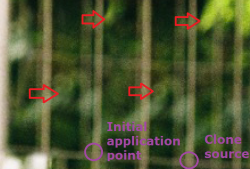
That method should cover left half of the sign. Next, Clone Source the smaller fence bars from the right using small clone stamp size with soft edges, again noting the repeating highlights or patterns (shown in red arrows) but ignoring them for now:
8.png

Next, break the repeating patterns, repeating highlights or anything that should not appear in the newly clone stamped area, sourcing from different places, making sure all the previously noted repeating areas are covered up. Once completed, give yourself a break and then come back to check out the work. You will usually find newer things to fix up after the break. Check it critically from different zoom points.

Share your work and ask for critique so you may find inputs to improve. All the best.
 

_alexbrandt_

Well-Known Member
Messages
66
Likes
8
The soft focus should not be an issue, because the rest of the fence from where we are going to source pick is in similar soft focus too.


You could duplicate the background layer and use a polygonal lasso tool to draw a rectangle covering the sign so as to mask out the rest of the layer from getting affected, but this is probably not necessary in this case seeing that the background area where work needs to be done is with similar blur, random patterned leaves, plenty of space to work with.

The way I have approached this is to get the two fence panel end bars clone sourced from the bottom using a very soft brush with a small size, focusing initially on getting the fence bar edges continuous (at this point, there will be repeating patterns of highlighted leaves from the source which can be fixed later)
View attachment 116752
Continue to work with similar small sized clone stamp size and soft edges and focus on getting the edges continuous as shown in Green arrows:
View attachment 116753

That method should cover left half of the sign. Next, Clone Source the smaller fence bars from the right using small clone stamp size with soft edges, again noting the repeating highlights or patterns (shown in red arrows) but ignoring them for now:
View attachment 116756

Next, break the repeating patterns, repeating highlights or anything that should not appear in the newly clone stamped area, sourcing from different places, making sure all the previously noted repeating areas are covered up. Once completed, give yourself a break and then come back to check out the work. You will usually find newer things to fix up after the break. Check it critically from different zoom points.

Share your work and ask for critique so you may find inputs to improve. All the best.

Hello Polarwoc
Thanks for the tip. I see what you are doing. Are you working with a digital pad type Wacom?
It’s fairly hard with a mouse. Is there a way to draw some sort of matt/guide/mask that I can align exactly with the fence lines which would keep me in "line" when cloning?
 

polarwoc

Guru
Messages
1,576
Likes
1,421
Are you working with a digital pad type Wacom?
I work on the mouse. Just gotten used to it, I guess.
Is there a way to draw some sort of matt/guide/mask that I can align exactly with the fence lines which would keep me in "line" when cloning?
You could use the Guide Lines to assist, but the Fence Bars are at a slight angle of about 7 degrees clockwise, so you would have to tilt the image before working with guidelines. Alternately, you can make a thin Red line that follows the Fence Bar in another layer with decreased layer transparency. I generally prefer working without guides, going by the eye and making sure I zoom in and out to see if the edit is going okay from different zoom points. After clicking for a Clone source, before applying the initial clone point, you can increase the brush size (using keyboard shortcut ']') to know your alignment better before reducing the size (using keyboard shortcut '[') to suit.

Any questions, just ask.
 

JeffK

Guru
Messages
2,486
Likes
2,890
Hi Alex -
I also have trouble with a tablet since my hands aren't that steady - so the mouse is my go-to PS tool
How I compensate for that is to use a cut-and-paste method and then come back with the clone tool to clean up.

For this particular image, I used the rectangular marquee tool. You can also use the lasso or polygonal select tool. Whichever works for you.
Choose a particular portion of the fence:

fence section.jpg

Then hit CTRL + J and create a new layer from the selection.
You can also go to Layer-New-Layer Via Copy.
This selection will now appear on a separate layer by itself.

With that new layer selected, choose the Move tool, and start sliding the piece up by using the arrow keys on your keyboard.
You'll end up with something like this:

fence patch.jpg

Use a small soft clone tool to repair any odd matches.
Grab sections of fence and continue to use this method.

Here's where I ended up:

fence section final.jpg

I had each section of fence that I copied on a separate layer. I used both cloning tool and some masking to do final retouching.
This does not work in all circumstances but seems to work well here. Also considering you're working with a mouse, it's a bit more exact than trying to clone all the lines in to cover the mask.
By the way, the bottom layer is the original image. I always duplicate it and work with the 2nd copy - that way I leave the original image intact to compare to.
Just a thought.

- Jeff
 

_alexbrandt_

Well-Known Member
Messages
66
Likes
8
Hi Alex -
I also have trouble with a tablet since my hands aren't that steady - so the mouse is my go-to PS tool
How I compensate for that is to use a cut-and-paste method and then come back with the clone tool to clean up.

For this particular image, I used the rectangular marquee tool. You can also use the lasso or polygonal select tool. Whichever works for you.
Choose a particular portion of the fence:

View attachment 116843

Then hit CTRL + J and create a new layer from the selection.
You can also go to Layer-New-Layer Via Copy.
This selection will now appear on a separate layer by itself.

With that new layer selected, choose the Move tool, and start sliding the piece up by using the arrow keys on your keyboard.
You'll end up with something like this:

View attachment 116845

Use a small soft clone tool to repair any odd matches.
Grab sections of fence and continue to use this method.

Here's where I ended up:

View attachment 116846

I had each section of fence that I copied on a separate layer. I used both cloning tool and some masking to do final retouching.
This does not work in all circumstances but seems to work well here. Also considering you're working with a mouse, it's a bit more exact than trying to clone all the lines in to cover the mask.
By the way, the bottom layer is the original image. I always duplicate it and work with the 2nd copy - that way I leave the original image intact to compare to.
Just a thought.

- Jeff

Hey Jeff
Thanks for the tips.
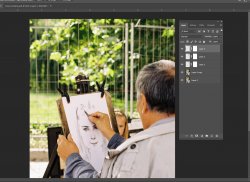
I tried your approach by using big copied chuncks, it makes it much easier indeed.

What I did then was instead on relying on the clone stamp to fixe anomalies, I use the eraser tool to arrase the edges of my copied layers.

Screenshot 2020-11-11 at 18.17.58.jpg

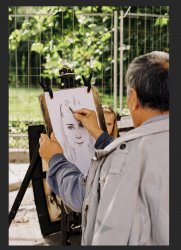
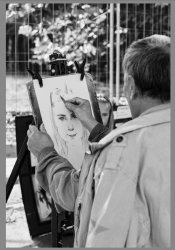
I ended up deciding to crop my image and have it in B&W (I didn't like the skin tones and colors in general)

Screenshot 2020-11-11 at 18.17.20.jpg

Screenshot 2020-11-11 at 18.15.57.jpg
 

JeffK

Guru
Messages
2,486
Likes
2,890
Hey Jeff
Thanks for the tips.
I tried your approach by using big copied chunks, it makes it much easier indeed.
What I did then was instead on relying on the clone stamp to fix anomalies, I use the eraser tool to erase the edges of my copied layers.
I ended up deciding to crop my image and have it in B&W (I didn't like the skin tones and colors in general)

Hi Alex -
I was once told that Photoshop gives you at least 12 different ways to do the same thing. Glad you're happy with the result!

One note of caution - using the eraser tool is what's called a destructive method. What that means is when you erase part of an image, it's gone. Can't get it back.
Rather than Eraser tool, apply a mask and brush out the parts you don't want. That gives you an opportunity to bring parts back if you need to since they're still there - just hidden. So it's non-destructive. You want to use non-destructive methods as much as possible. Avoid the eraser as much as you can.

The image is a nice one. Have you read about the Rule of Thirds? It's about creating a point of interest in the image. A lesson an artist/photographer once taught me is to understand why you took the image. That becomes your point of interest. Then you can use cropping, blurring, and other methods along with Rule of Thirds to emphasize the point of interest.

There are plenty of references using Google - here's one:


Photoshop also has a grid that you can apply showing the Rule of Thirds. Just go to View-Show-Grid.

Keep learning - every day's a school day! :cheesygrin:

- Jeff
 

_alexbrandt_

Well-Known Member
Messages
66
Likes
8
Hi Alex -
I was once told that Photoshop gives you at least 12 different ways to do the same thing. Glad you're happy with the result!

One note of caution - using the eraser tool is what's called a destructive method. What that means is when you erase part of an image, it's gone. Can't get it back.
Rather than Eraser tool, apply a mask and brush out the parts you don't want. That gives you an opportunity to bring parts back if you need to since they're still there - just hidden. So it's non-destructive. You want to use non-destructive methods as much as possible. Avoid the eraser as much as you can.

The image is a nice one. Have you read about the Rule of Thirds? It's about creating a point of interest in the image. A lesson an artist/photographer once taught me is to understand why you took the image. That becomes your point of interest. Then you can use cropping, blurring, and other methods along with Rule of Thirds to emphasize the point of interest.

There are plenty of references using Google - here's one:


Photoshop also has a grid that you can apply showing the Rule of Thirds. Just go to View-Show-Grid.

Keep learning - every day's a school day! :cheesygrin:

- Jeff

Hey Jeff,

Yep, I undertand the eraser tool is distructive. I've taken a PS class on Udemy so understand the fundamentals.
I figured, since I'm errasing a second layer in which I have my cloned stuff its not that much of a "risk".

Yep, I know all about the rule of thirds. I studied Art History in High School and actually used to work professionally in video production before ;)
 

Top