What's new
Photoshop Gurus Forum

Welcome to Photoshop Gurus forum. Register a free account today to become a member! It's completely free. Once signed in, you'll enjoy an ad-free experience and be able to participate on this site by adding your own topics and posts, as well as connect with other members through your own private inbox!
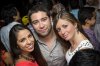
First re touch


Mute

Member
Messages
5
Likes
0
Hi guys, I have always been a fan of photoshop and decided I would try some re touching on random portraits / pictures. This is the first one I have ever tried so feedback is greatly appreciated. (Google led me to this site and exact sub forum :)
 

Attachments

  • 1378067327840.jpg
    1378067327840.jpg
    572.6 KB · Views: 6
  • fixed.jpg
    fixed.jpg
    845.9 KB · Views: 6
Messages
4,139
Likes
6,062
Hi mute...welcome to the forum. You did a nice job here.

The skintones look natural, though a little bit too flat. (No highlights) Then you should have left some of the wrinkles on the guy's forehead. Men like the male touch. I like the pink eye make up. Just a little detail with a great effect.
 

ibclare

Queen Bee
Messages
11,034
Likes
4,638
I also notice that the shine on is forehead has turned to an orangish overlay. I agree with the flat looking faces, which are the most important part to improve. They need more highlight and shadow and the color looks flat too, desaturated, on the guy.

Whatever you used to change the light, curves or levels perhaps, the color was leeched out.

The skin treatment looks good; not too much smoothing, enough realistic imperfections left. And as chrisdesign mentions, maybe a peek of the wrinkles! Or maybe you want him to look like a stud with a couple of cougars? LOL! Sorry . . . NOT.

Sometimes, you can take a copy of the original, place it above and change the blend mode, maybe the opacity, so that it adds back some of the shine and depth. You might try desaturating a copy, placing that above and changing the blend mode. Just a thought.
 

Mute

Member
Messages
5
Likes
0
Without going into details of these people that is almost the exact look I was going for lol.. I'll try to add back some lighting on their faces though.

Sent from my Nexus 7 using Tapatalk 4
 

ibclare

Queen Bee
Messages
11,034
Likes
4,638
Here is an alteration I made. I cloned at low opacity over the forehead orangeness. I cloned over just a little bit more of the rough skin and blemish, which you might not care for. I didn't smooth entirely, but at full enlargement, it seems like an error in retouch. That however is up to you since it's yours! Finally I moved a copy of the original to the top, set it to multiply and lowered the opacity to 20%.

It doesn't bring out the wrinkles and you might accomplish the same thing by changing the levels or curves adjustment, but just an idea for you.

Touch.jpg
 

Mute

Member
Messages
5
Likes
0
Hmm I like everything except the blurry dot on his forehead :p

I'm still in the process of playing with lighting, I have never used photoshop for this sort of thing so it's all new to me.
 

ibclare

Queen Bee
Messages
11,034
Likes
4,638
Good work then. Progress not perfection.

I hope I'm not sickening you with my critique, but I took a closer look at the cheekbone, under the eye, on the blonde lady. It looks like there are skin discolorations there which are not in the original. Some careful cloning or healing brush should cover that up. Even a paintbrush.

Keep up the good work!
 

ibclare

Queen Bee
Messages
11,034
Likes
4,638
OK, I don't think it is "bad." I am just bothered by the orange shine in the center of his forehead; the loss of luster overall - compare the jewelry and see the difference in contrast; and the paleness of the guy's face, which to me looks like an almost deathly pallor. That might be overstating it, but there is a loss of vibrance and saturation that doesn't seem normal to me.
 

Inkz

Guru
Messages
2,358
Likes
1,554
Hope you don't mind..

I mixed subtle retouch, basic wrinkle removal and a slice of high contrast lol. I think the vignette in the original draws focus directly to the faces thus spotting faults rather easily.

Highcontrastversion_zps3b957f66.png
 
Messages
4,139
Likes
6,062
I really like this one, do you have a psd or something where I could see how you adjusted the lighting / skin tone? Was it with the burn / dodge tools?

Sent from my SAMSUNG-SGH-I747 using Tapatalk 4

1. Retouching the skin blemishes. Enlarge pic to 200% on your screen. Work with small brush with 50% opacity.
Retouching skin.jpg

2. Set highlight, shadow and curve how you want your effect. As you can see I adjusted the curves also in the different canals to get a bit more color in the skin tones.
Curves for skin.jpg

3. Color corrections. I treated the ladies and the guy individually. You draw a quick mask around the face , give it a soft edge and apply color correction. In the screenshot you see that I darkened the guys skin a little.
Color corrections.jpg

On this image I didn't use the dodge and burn tool. Skin tones remain more natural if you just use the curves and color corrections. Finally I masked the eyes, gave them more contrast with the curve tool, then sharpened them a little with unsharpmasking.

I hope I could help you here, excuse my english because I'm german speaking, and I only use a german version of Photoshop.
 

Mute

Member
Messages
5
Likes
0
1. Retouching the skin blemishes. Enlarge pic to 200% on your screen. Work with small brush with 50% opacity.
View attachment 36522

2. Set highlight, shadow and curve how you want your effect. As you can see I adjusted the curves also in the different canals to get a bit more color in the skin tones.
View attachment 36523

3. Color corrections. I treated the ladies and the guy individually. You draw a quick mask around the face , give it a soft edge and apply color correction. In the screenshot you see that I darkened the guys skin a little.
View attachment 36524

On this image I didn't use the dodge and burn tool. Skin tones remain more natural if you just use the curves and color corrections. Finally I masked the eyes, gave them more contrast with the curve tool, then sharpened them a little with unsharpmasking.

I hope I could help you here, excuse my english because I'm german speaking, and I only use a german version of Photoshop.

Thanks, that beats a psd.

Sent from my SAMSUNG-SGH-I747 using Tapatalk 4
 

Top