What's new
Photoshop Gurus Forum

Welcome to Photoshop Gurus forum. Register a free account today to become a member! It's completely free. Once signed in, you'll enjoy an ad-free experience and be able to participate on this site by adding your own topics and posts, as well as connect with other members through your own private inbox!

Getting REALLY good selections on wildlife (birds)


GracieAllen

Active Member
Messages
37
Likes
7
In general, I can do most simple things in Photoshop. But I have trouble getting really good selections on things like bird feathers. Or fur. I had hopes that Photoshop 2021 would make it easier to get really good selections. And it may, but if so, I lack the skills…

I’ve watched people make selections. I’ve read things on getting perfect selections. I’ve spent way more time in “Select and Mask” than it should take to not awful. I’ve watched Julieanne Koss make what looks like a pretty perfect selection of a mountain goat just using the Refine Edge Tool.

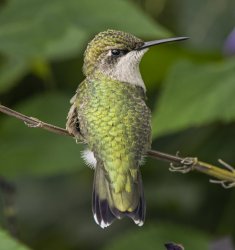
I can’t even get CLOSE… As an example, I have an image of a hummingbird that seems like it should be pretty simple. And I want to drop a sky with clouds behind it. Not because I NEED one, but because if I can do THIS well, I should be able to get very good selections on at least slightly complex subjects.
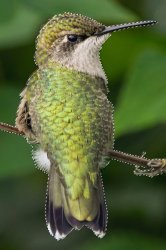
selected bird.JPG

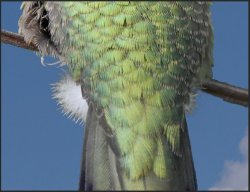
I did a Select Subject. Then I went into Select and Mask, put it on onion skin at 35%, and used the Refine Edge Brush at 70 px, 0 hardness, Spacing 20, to fix the feathers the selection missed around the head. I made it worse. I tried a larger brush and a smaller brush. Makes no difference. Trying to refine the feathers on the back of the birds head gets worse every time I touch it. Eventually, I end up resorting to the quick select, which usually doesn't help, and finally the lasso, and just brute force try to fix the worst of the mess created, and try to fix the worst of the small pieces of feathers that make up the edge. And on areas by the feet, where the feathers are finer, I never really get it very good. I've tried setting the Radius to 1 or 2 px. I've tried Decontaminate Colors at 25, 50, 75 and 100%.

I've attached an example, but I figure there HAS to be something obvious I’m missing in how to set up Select and Mask to get the great selections everybody keeps demonstrating.
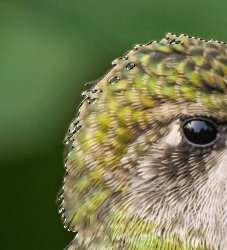
selection after refine edge.JPG
 

GracieAllen

Active Member
Messages
37
Likes
7
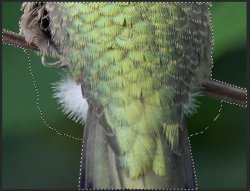
I cropped off the extraneous ends to make it a bit smaller. Basic exposure adjustments and knocked down the noise a bit. It was shot as a jpeg (long, boring story). I've now gone though this at least 15 - 20 times in Select and Mask... The fine, white feathers on the left, near the birds feet, I can SORT-OF get a not completely wretched selection sometimes, and with decontaminate it doesn't have so much green showing, but overall, I think I'm Select and Mask challenged!

_D502579.jpg
 

thebestcpu

Guru
Messages
2,988
Likes
2,747
Hi @GracieAllen
One question I have are you working with a raw image when processing or are you starting with a compressed JPEG? That can make some difference. If you are processing with a JPEG see the images below. If you only posted with JPEG, then forum members may have a problem because the compression blocks up the Hue and Saturation components quite a bit. Not sure if it makes it harder for the selection algorithms in PS yet I had more luck doing the selection on the Luminosity component of the image and using that selection of the color bird image.

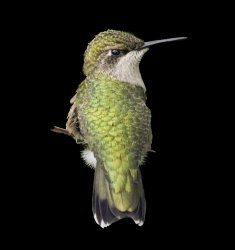
First is the selection I made on the Luminosity component of the posted image (least amount of compression) and just the Mask and Select tools on the Layer Mask:

Bird-with-Black-Background.jpg


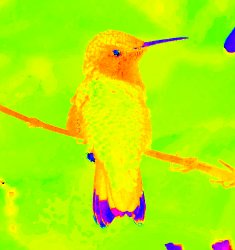
Here is an image with just the Hue component of the posted image. You will notice that the Hue is blocked up in 8 bit chunks and the detail is gone in the places you were having trouble (download my images and enlarge to look at the edges)

Bird-Hue-component.jpg


And here is the saturation component of the posted JPEG image. It too is blocked up with much less detail than the original raw file I am sure (again, download my images and look at the edges):

Bird-Sat-component.jpg


Could part of the problem be is that you are trying to make a selection on the image and the JPEG compression is getting in the way?
Not sure this is your issue yet thought it was worth exploring.
John Wheeler
 

Rich54

Guru
Messages
1,732
Likes
3,412
I have an old version of Photoshop, so I'm sure there have been improvements to Select & Mask and Refine Edge, but I have never had much luck with them. I also find that many tutorials conveniently choose a photo that perfectly suits their purposes, which is then hard to replicate on photos that aren't so perfect. Your image presents difficulties because there is not much difference between the bird and the background. Both have a lot of green and similar tonal values.

An entirely different way to make selections of feathers, hair and fur is to use Channels (sometimes called Alpha Channels) to create a layer mask. If your goal is to practice these kinds of selections, then I suggest you start with a photo that's a little easier than your bird example — a photo where there is already good dark/light contrast between the subject and background, like the ones in the videos attached below. Then follow the techniques in the videos.

Once you're comfortable creating masks from channels, you can try to tackle more difficult situations like your bird photo. There are ways of manipulating the channels to artificially create stronger contrast between subject and background in order to create a mask. One of them is called Calculations. I used Calculations in the bird image below. From here, it's easier to separate the bird from the background. (This last paragraph will make more sense once you've viewed the videos.)


Bird - Calculation.jpg
 

GracieAllen

Active Member
Messages
37
Likes
7
I put a reply in here yesterday, but I have NO idea where it went...

Thanks for the replies. I switched to a RAW image that's somewhat similar to the one I sent. I have the same problems. I can sort-of get a selection. It creates holes in the bird, it doesn't cover the tiny feathers well, I can't decontaminate the green, and so on... I keep working at it, but I think I'm now stuck in a loop of doing the same thing over and over and expecting different answers.

I also went off and watched yet ANOTHER tutorial on making perfect selections. This time the person doing the tutorial answered the important question - "WHY do we always do these using some contrasting, monochromatic background?" Answer: "Duh, because it makes it POSSIBLE to do these perfect looking selections." Then he proceeded to do a selection of a person's body, then a separate selection of the hair, and, of course, it was perfect...

Unfortunately, not being able to get my subjects to pose in front of contrasting, monochromatic backgrounds, I need to figure out how to make this work in the real world.

In your replies, I can see what you're doing - the luminosity, hue and saturation components are interesting, but how do I get them? And how do I use them to make precise selections in this kind of subject? Are these coming from Select and Mask? Do you even USE Select and Mask?

Same for the last one with the Calculations popup... What am I looking at and how do I do it? How do I turn it into a precise selection?
 

thebestcpu

Guru
Messages
2,988
Likes
2,747
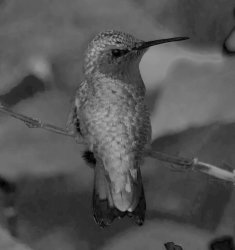
You don't need the Hue and Sat images for the selection. I used those so you could zoom in and see that those two color components did not have a lot of detail and the JPEG compression may interfere with a good selection.

Here is the link to the tutorial about how to extract the luminosity: Extract Luminosity Tutorial
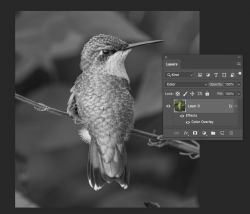
Its a simple matter of applying a Color Overlay Layer Style with White and blend set to Color.

Here is the specific image using that technique which was the starting point for the selection:

Screen Shot 2020-11-18 at 8.50.34 AM.png


Hope that helps some.
John Wheeler
 

IamSam

Administrator
Staff member
Administrator
Messages
22,721
Likes
13,258
I put a reply in here yesterday, but I have NO idea where it went...
Not sure why this would happen. The forum shows your most recent previous visit was on Sunday. You have not visited the forum since, until today. The forum has no record of you making a post with this account or in this thread since Sunday and no posts of yours were removed either by myself or the system.

You did attempt to create a second account on Sunday that is not valid but you can still log into. You may have done this by accident. Also, you had problems validating that account due to some problem with your IP or having an invalid email account.

I'm certainly not saying that the forums software has not possibly developed some glitch, but it's highly unlikely. It almost always has something to do with a connection problem. Typing a response and hitting "post reply" does not always ensure a post is made if you are experiencing a connection issue with your IP. Always wait and double check if there are any delays. Let me know if this happens again.
 

thebestcpu

Guru
Messages
2,988
Likes
2,747
Another similar approach to create larger contrast for selections if with an more accurate conversion to B&W. Here are links to that tutorial that I recently posted:
Part 1: Part 1 Higher Accuracy Conversion to B&W
Part 2: Part 2 Higher Accuracy Conversion to B&W

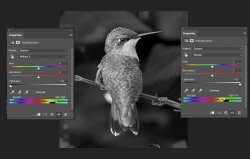
Using that approach here is the higher contrast image I achieved with the two settings in the Hue/Sat Layer to achieve that effect:

Bird-B&W-conversion.jpg

Hope this gives you some directions to consider
John Wheeler
 

Rich54

Guru
Messages
1,732
Likes
3,412
Same for the last one with the Calculations popup... What am I looking at and how do I do it? How do I turn it into a precise selection?

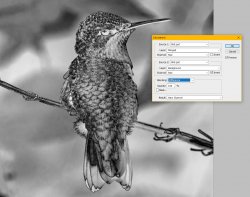
Here are the detailed steps I used to select and extract the bird:
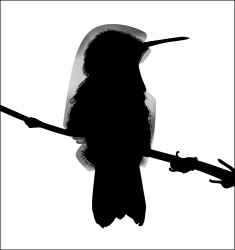
  • The ultimate goal is to create a layer mask where the bird and branch are pure white and everything else in the background is pure black.
  • However, sometimes it's easier to create a reverse mask, i.e., make the bird black and the background white. This is no problem because, once you're done creating the mask, you can simply invert it. I took this latter approach for the bird photo.
Step1
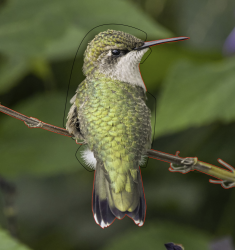
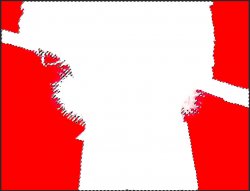
  • For everything except feathers, fur and hair, the Pen Tool makes the best, most precise selections. The first image below shows the path I created with the Pen tool. Where the path is red, it precisely outlines the branch and the parts of the bird with smooth edges. Where the path is black, I deliberately left a wide margin around the feathers because the Pen tool is not effective for those.
1605721105941.png


Step2
  • Go into the Channels panel and find the best channel (Red, Green or Blue) that gives the most contrast between subject and background. Make a copy of that channel (called an Alpha Channel), which will eventually become the layer mask. If necessary, use Levels, Calculations or other photoshop features to create the greatest possible contrast between foreground and background.
  • Once you've created your Pen path, make a selection of it, invert it, and fill the Alpha channel entirely with white. You have now masked-away 95% of the background.
  • Invert the Pen selection again and paint on the Alpha channel with black to fill in the branch, beak and tail. Avoid painting any feathers.
  • Using a 100% hard brush, paint with black within the interior of the bird's body. Fill in as much as you can, avoiding the feathers. At this point, your Alpha Channel should look like this:
1605721645263.png


Step3
  • Now the hard part—dealing with the remaining feathers.
  • For the area on the bird's head and upper back, we have these loopy feather shapes where the interior of them is nearly the same tonal value as the background. I could not figure out any way to fill those with black, so I did it the hard way and carefully painted them black by hand.
  • I then used the Brush tool (set to Overlay blend mode as discussed in the videos) to paint white on the background.
  • For the feathers on the bottom half and on the bird's chest, I used the lasso tool to select those areas and then used a Levels adjustment to get the bird black and the background white. I then did final clean up by painting white on the background with the brush in Overlay mode.
Step4
  • Once your Alpha channel is done, you need to make a mask from it.
  • Go back into the Layers panel and duplicate your bird layer. Turn off the visibility of the original layer.
  • On your duplicate layer, go to Select>Load Selection. In the drop-down box for Channel, select your alpha channel and hit OK.
  • With that selection active, create a layer mask on your duplicate layer. If the layer mask is masking-out the bird instead of the background, then simply invert the mask.
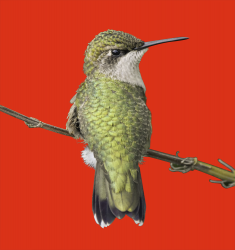
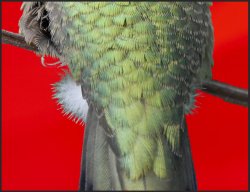
  • Here's my final result. I put the bird on a red background for ease of visibility.
1605722933097.png
 
Last edited:

GracieAllen

Active Member
Messages
37
Likes
7
Thanks for all the replies… I’ve tried a couple other birds, and those fine, white feathers by the feet and the regular feathers where there's very little area between them, kill me no matter what I do.

Thanks John… I’ll go look at the tutorial…

I DID find a comment somewhere about using a path for a selection. I don’t know if this is an offshoot of using channels or something different, but I know how to use channels to create luminosity masks, but didn’t see anything that would help doing selections. Can you elaborate on how to use channels to make more precise masks (or is this something that will be covered by the “extract luminosity tutorial?”

I’ve continued on other images, and easy ones are easy. Taking a bunch of buildings and dropping in a sky or doing pretty much anything is trivial. It’s the image that has a tree in the foreground with a thousand spots of sky behind, and all the other stuff that’s normally in the way that’s a problem. Or birds.

Or cats. When photographing cats at shows, I sometimes get a question about replacing a backdrop. It can be done, but in the majority of cases, it’s very difficult to get a precise selection, just like the fine feathered areas on the bird. Thus my efforts to find a way to make better selections.

IamSam, you not having a record of me being here, and me thinking I put in a reply is not incompatible… I may have been reading the replies and writing a response in word, as I am now. And the domestic associate walks in the mancave and composts the whole workflow, I get dragged off for a few hours to do some chore, come back having completely forgotten I’d written a reply, thought I put it in the post, and rebooted the computer because some !@#^%$# product has decided to puke all over it’s feet.

I’ll also take a look at the other approach for “Higher Accuracy Conversion to B&W”, which I presume I can use to get a selection/mask to use on the color image…

Rich54, I’ll try your process – it’ll give me a chance to learn more about channels… I DID notice you have some of the same problem I do. In step 3 you mention that you have to paint in areas by hand. So, it MAY BE that I’m expecting more from Photoshop than it’s capable of delivering. BUT, if I can get rid of 99% of the busywork and manual junk, that last 1 or 2% wouldn’t be so bad……

And while I asking… Do any of you have a REALLY GREAT tutorial you can recommend on using Select and Mask, or have the methods you’ve recommended here supplanted that tool?
 

Rich54

Guru
Messages
1,732
Likes
3,412
Can you elaborate on how to use channels to make more precise masks (or is this something that will be covered by the “extract luminosity tutorial?”

And while I asking… Do any of you have a REALLY GREAT tutorial you can recommend on using Select and Mask, or have the methods you’ve recommended here supplanted that tool?

If you look at the two videos I attached in post #6 in this thread, they specifically address using channels to create precise masks.

Personally, I don't like Select & Mask and have never had much success with it, so I do not have a tutorial to recommend. Others here may differ on that.

Lastly, I think your bird image is fairly difficult. Most of the time with hair or fur, it's only the wispy ends that create difficulty. But in the bird photo, there are tonal gradations just slightly within the perimeter of the bird that cause difficulty in generating an accurate mask.
 

GracieAllen

Active Member
Messages
37
Likes
7
Thanks for all the replies and pointers... Maybe I'm looking at this wrong. If other people haven't found the Select and Mask to be the simple, automated, quick, idiot-proof way to make perfect selections, (as the demos and tutorials always make it look) maybe I'm not as bad as this as I thought. A lot of my process isn't as well defined as what Rich54 provided (I'm still churning through tutorials and trying things between disruptions by the domestic associate), but other than using the Pen tool I'm having to do a lot of the same things... Use the brush and paint over problem areas, and the lasso to fix other stuff.

And if the bird, which I thought was pretty simple compared to fixing every hair on some supermodel's head, isn't all that simple, then maybe I'm not as bad with these tools as I thought. I'm still bad, and clearly have a LOT to learn, but I'm working through the information...

Here's the other part of the problem - and this isn't anything I want you guys to fix, it's just an example of the kind of things that happen...

Photograph a cat for a client. Client says - "We want Cletus on the purple backdrop." Which is mostly blue, but... SO, we photograph cat on that background. A few months later I get an email that says something like "My <pick relative> loves the pictures of Cletus, and wants a print of <nnnn>. BUT, the background doesn't go with her house, so can you replace the background with a shot of a barn? You use Photoshop, right? And you've got pictures of different barns and such, right? She says you can just swap in a new background in a few seconds!"

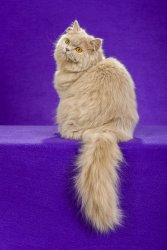
Here's the cat - it wasn't THIS cat, but it was one that was just as furry, except it was mostly gray and they had me shoot it on a GREY background. And wanted a nice, red barn:

cletus.jpg
 

thebestcpu

Guru
Messages
2,988
Likes
2,747
Thanks for all the replies and pointers... Maybe I'm looking at this wrong. If other people haven't found the Select and Mask to be the simple, automated, quick, idiot-proof way to make perfect selections, (as the demos and tutorials always make it look) maybe I'm not as bad as this as I thought. A lot of my process isn't as well defined as what Rich54 provided (I'm still churning through tutorials and trying things between disruptions by the domestic associate), but other than using the Pen tool I'm having to do a lot of the same things... Use the brush and paint over problem areas, and the lasso to fix other stuff.

And if the bird, which I thought was pretty simple compared to fixing every hair on some supermodel's head, isn't all that simple, then maybe I'm not as bad with these tools as I thought. I'm still bad, and clearly have a LOT to learn, but I'm working through the information...

Here's the other part of the problem - and this isn't anything I want you guys to fix, it's just an example of the kind of things that happen...

Photograph a cat for a client. Client says - "We want Cletus on the purple backdrop." Which is mostly blue, but... SO, we photograph cat on that background. A few months later I get an email that says something like "My <pick relative> loves the pictures of Cletus, and wants a print of <nnnn>. BUT, the background doesn't go with her house, so can you replace the background with a shot of a barn? You use Photoshop, right? And you've got pictures of different barns and such, right? She says you can just swap in a new background in a few seconds!"

Here's the cat - it wasn't THIS cat, but it was one that was just as furry, except it was mostly gray and they had me shoot it on a GREY background. And wanted a nice, red barn:

View attachment 117124

Don't you just love it when clients say that. I see that on posts on this forum too for free requests with the presumed "its simple." Or for photographers: since you have a nice expensive camera that is all you need (as if the photographer adds not value). Same here. If you have photoshop, you just have to push a few buttons and you are done right?

So how to deal with clients that have wrong assumptions and maybe even expectations (its so easy its not going to cost me anything more right?(the hidden message).

So hindsite is 20/20 yet maybe in the future get shots (or in addition to the preferred background) of the subject with a background where you can swap backgrounds more easily?
Also, responses are hard to clients as you don't want to offend them yet maybe(?) educate them.

A simple keeping it light response is "Ha, I'm sure glad its not that easy to do that because it would then be a cell phone app and I would be out of work" You follow up with what the job would cost. They are paying for your time, experience, training, investments and a quality result.

Just some quick thoughts
John Wheeler
 

GracieAllen

Active Member
Messages
37
Likes
7
Fortunately, it doesn't happen very frequently. I have occasionally replaced an eye that squinted or replaced a droopy tail with one that has a nice arc. Simple things like that where the source and destination were all from the same shoot on the same background. But the occasional, "Well, can you just change the background from x to y doesn't happen too often.
Even doing a "simple" color change can be interesting because the tools in Photoshop for replacing color don't work perfectly either - at least not for me on long-haired cats - nobody EVER asks to change a background on a Sphynx!
I like your line about the cell phone app. There probably is one!
Unfortunately, unlike most people (I suspect, though I don't photograph people), most cats do NOT have a lot of patience. We usually figure we'll have about 15-20 minutes to work with the cat and get images. Occasionally we'll switch backgrounds, maybe shoot some images on black, but normally the cat lets us know when the shoot is over.
 

GracieAllen

Active Member
Messages
37
Likes
7
I've watched the tutorials a couple times and played along enough to figure some of WHY I'm doing what I'm doing. One BIG thing I learned is that NONE of the tools is 100% With the hair, he'd go around and get a better selection, then talk about all the areas he was going to have to go in with a brush or something and fix all the areas the tools didn't get. So, as I've heard many times in the last 15 years: Most tools in Photoshop sort-of work. And a good demo can make them look like they work great. In reality, most of the tools will get you about 75% of the way. In most cases, getting 90% of the way takes 10% of the time. The lat 10% will eat the other 90% of the time. Pretty much like everything else!

I took the image and went through it using Rich54's instructions above. I threw out the part that either ISN'T a problem or is going to have to be fixed by brute force...

First thing I discovered was that I still have no skill with the pen tool. I THINK I may have tried it once at least a decade ago, and never again. So, learning that will take a little time. In the meantime, I did an object select, then spread the selection in the problem areas. Hopefully, this will work similarly.
8614 selection.JPG
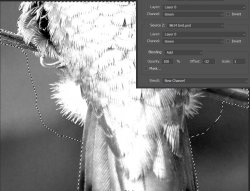
None of the channels provided great contrast difference to my eye, but green seemed the best. I went into Calculations. Green on Green seemed the best, but getting a good contrast between white feathers and background is different on the left and right sides. I decided about -30 was “good”…
8614 calculations.JPG
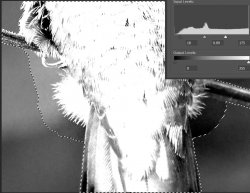
I ran levels and made more contrast. My image looks very different than yours, but I’m not sure what I did differently. I have white feathers on a darker background and white on the majority of the rest of the bird’s interior.
8614 levels.JPG
I switched and made the background black and the bird white, and did the brush overlay, painting black and white on the feathered areas. It seems to have come out OK, but, I have a lot of color contamination on the feathers. Is that because I switched and made the background black?
8614 second selection.JPG8614 final.JPG
I tried taking the selection into select and mask to do a decontaminate, but it didn’t do anything, I’m not sure how to get rid of the contamination so I did a little replace color.
8614 decon.JPG

Still much to learn, but I'm think I'm safe in saying I've never gotten a selection this good on a bunch of such minuscule hair, fur, feathers, or anything else. You guys rock!

I've got a 16-bit RAW I'm going to play with.

Thanks for the help, and if y'all have any other advice, please put it out here!

8614 quick mask.JPG
 

Rich54

Guru
Messages
1,732
Likes
3,412
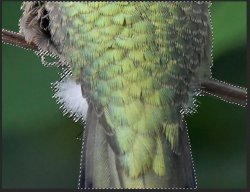
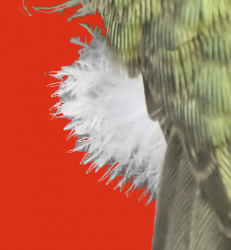
For this particular area, I also experienced color contamination. I addressed it with a Vibrance adjustment layer and a Levels adjustment layer:
  • In the Vibrance adjustment layer, I completely reduced Saturation to negative 100. Then, activating my bird selection, I masked this so that only the color-contaminated tips of the feathers would be affected.
  • Then I added a Levels adjustment layer and clipped it to the Vibrance layer, so that both of them would have an identical layer mask. In the Levels adjustment, I increased the brightness of the desaturated area to get it to blend in with the rest.
Your bird photograph is very large and very well focused, which lulls us into thinking that it is an easy masking candidate. But in fact, I personally found it to be extremely difficult, presenting all sorts of different problems in different parts of the image.


1606074643935.png
 

Top