What's new
Photoshop Gurus Forum

Welcome to Photoshop Gurus forum. Register a free account today to become a member! It's completely free. Once signed in, you'll enjoy an ad-free experience and be able to participate on this site by adding your own topics and posts, as well as connect with other members through your own private inbox!

Help on how to properly white balance a picture


recipesbynora

Member
Messages
20
Likes
0
Hello!

I'm wondering if a link is allowed here. But this is the best explanation of what my question is about:

(scroll to 2:30 minute point)

I followed his tutorial but I could not understand where in the picture will I put the eyedropper to select the point for which to apply the curves adjustment layer so that the picture will have a proper white balance. The picture I'm trying to white balance is attached. Different pictures will have different threshold levels. Where in the picture will I select to achieve this result? and is there a way to check if my image is properly white balanced? thank you very much and I appreciate all the help!11.jpg
 
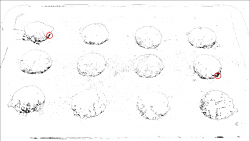
When the pointer under the Histogram is shifted completely to the left and you see a white image, as you move the pointer towards the right, the first black mark you observe is going to be where you would drop the EyeDropper. I noticed the following at around 15, and I could have used either of the Red circled areas because in those spots there is a good concentration of black.
1.png
I found this video to be descriptive about the same topic.
 
Hi @recipesbynora

Good question about white point.
Most techniques involve clicking on parts of the image that should have a neutral color tone (e.g. gray or white). If you images have no proper gray or white, what some do is buy a color card that has a range of colors and also graytones. From that sample with the color card in the image with you subject, you can make adjustments on the gray tones and then use those same settings on your image that does not have the color card.

Yet there may be a simple solution that works pretty well and is pretty straightforward

- On the Layer panel with you pixel image Layer(s) selected, right click on that Layer and Convert the Image to a Samrt Object
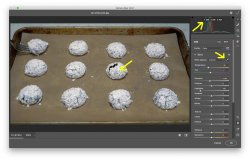
- Then use the Filers > Camera Raw Filter to open up the following up that filter (virtually the same as Lightroom and ACR capabilities (shown in image below)

White-point-ACR-with-pointers.jpg
In this Camera Raw Filter panel, i have marked the important points with yellow arrows.
- On the right side in the middle is the white point dropper. Click that and move to a gray tone (the sugars) and click on the image. What this does is change the whole image until that clicked point is also a gray tone (see upper right yellow arrow showing that the RGB values are now near identical)
- As a bonus, in this panel you can adjust tone in many other ways. I reduced exposure just a bit and turned down the highlights. So almost one stop shopping for changes to you image.

Just one more approach to consider.
John Wheeler
 
When the pointer under the Histogram is shifted completely to the left and you see a white image, as you move the pointer towards the right, the first black mark you observe is going to be where you would drop the EyeDropper. I noticed the following at around 15, and I could have used either of the Red circled areas because in those spots there is a good concentration of black.
View attachment 126456
I found this video to be descriptive about the same topic.

Thank you so much for this! I will try it out.
 
Hi @recipesbynora

Good question about white point.
Most techniques involve clicking on parts of the image that should have a neutral color tone (e.g. gray or white). If you images have no proper gray or white, what some do is buy a color card that has a range of colors and also graytones. From that sample with the color card in the image with you subject, you can make adjustments on the gray tones and then use those same settings on your image that does not have the color card.

Yet there may be a simple solution that works pretty well and is pretty straightforward

- On the Layer panel with you pixel image Layer(s) selected, right click on that Layer and Convert the Image to a Samrt Object
- Then use the Filers > Camera Raw Filter to open up the following up that filter (virtually the same as Lightroom and ACR capabilities (shown in image below)

View attachment 126457
In this Camera Raw Filter panel, i have marked the important points with yellow arrows.
- On the right side in the middle is the white point dropper. Click that and move to a gray tone (the sugars) and click on the image. What this does is change the whole image until that clicked point is also a gray tone (see upper right yellow arrow showing that the RGB values are now near identical)
- As a bonus, in this panel you can adjust tone in many other ways. I reduced exposure just a bit and turned down the highlights. So almost one stop shopping for changes to you image.

Just one more approach to consider.
John Wheeler

Hi John!

I appreciate your response. Oh, that camera RAW filter. I usually use that when I open up a RAW file to edit the white balance and other stuff but I could not perfect getting a good white balance for every picture so I thought there might be a better way so I followed the video above. I tried doing what you said and making sure the RGB have the same values but the picture looked bluish. I use a color checker card all the time. I pulled the photo above from a video file so we can do process shots. My process is to face the color checker card on the overhead camera and then front camera with all the lights set up prior to shooting the sequence. Then I balance the color in final cut pro x by placing the dropper on the gray card. After that I save a screenshot of the photo and then edit again in photoshop to enhance exposure etc. But I'm finding it difficult to do the white balance. Am I doing the right thing? thank you again!
 
When the pointer under the Histogram is shifted completely to the left and you see a white image, as you move the pointer towards the right, the first black mark you observe is going to be where you would drop the EyeDropper. I noticed the following at around 15, and I could have used either of the Red circled areas because in those spots there is a good concentration of black.
View attachment 126456
I found this video to be descriptive about the same topic.

Hi Polarwoc,

How do I know which black spot in the picture to put the dropper on when they appear at the same time? Thanks again and I appreciate your help!
 
Hi Polarwoc,

How do I know which black spot in the picture to put the dropper on when they appear at the same time? Thanks again and I appreciate your help!

Sorry to butt-in (too many cooks...), but this is an easy one. Those black areas that appear represent all spots on the image that need to be set to 50% Gray. It doesn't matter which one you choose when they appear simultaneously. Setting any one of them to gray has the effect of setting all of them to gray, and thereby eliminating any color cast from the entire image.
 
If you really want to be accurate, use a grey-card when you take your photos. Then balance the grey off of that.
 
Hi John!

I appreciate your response. Oh, that camera RAW filter. I usually use that when I open up a RAW file to edit the white balance and other stuff but I could not perfect getting a good white balance for every picture so I thought there might be a better way so I followed the video above. I tried doing what you said and making sure the RGB have the same values but the picture looked bluish. I use a color checker card all the time. I pulled the photo above from a video file so we can do process shots. My process is to face the color checker card on the overhead camera and then front camera with all the lights set up prior to shooting the sequence. Then I balance the color in final cut pro x by placing the dropper on the gray card. After that I save a screenshot of the photo and then edit again in photoshop to enhance exposure etc. But I'm finding it difficult to do the white balance. Am I doing the right thing? thank you again!

I think you are getting a lot of good help on the PS forum and hope one of the paths help you out.

I wanted to add a couple thoughts here
- The color balance that you want/need also depends on the lighting in which you took the image. If you took the picture in lighting that is nice and warm such as tungsten lights, you would want a warmer color balance (e.g. in ACR or Camera Raw Filter moving the slider to the right some)

- Also, getting it good match on your computer screen usually requires that your monitor is accurate out of the box from the manufacturer (not all do that) and best if you have done color calibration and profiling to have good color management for your whole work flow.

- I think it has already been stated yet using a gray card for white balance is a good first step yet it again depends on the lighting that you are using for the feeling you want in the end.

So, don't just go by white balance and getting the exact R=B=G yet keep in mind the color temperature desired.

My image came out looking more blue either because the cookies themselves were not white (not a good reference) or that you really wanted a warmer look. So its more than just tools and math.

Hope these thoughts are helpful rather than just one more think about in the midst of all the other advice.
John Wheeler

Hi John,

Thanks for your detailed response.

"- The color balance that you want/need also depends on the lighting in which you took the image. If you took the picture in lighting that is nice and warm such as tungsten lights, you would want a warmer color balance (e.g. in ACR or Camera Raw Filter moving the slider to the right some)"

For front shots, we use 2 GVM 800D-RBG set to 100% power on the back left and right of the front camera (Sony A7Riii with FE 4/24-105 G OSS lens) - light is facing the subject. For overhead shots, we use 1 Neewer 18" LED light and 1 Eoto light 18N ring light overhead with another Sony A7Riii with FE 4/24-105 G OSS lens. We shoot different times of the day so the light cast varies. What do you recommend for lights that we should use to achieve near-perfect colors? And should we shoot during the night only to minimize different cast of light?

"- Also, getting it good match on your computer screen usually requires that your monitor is accurate out of the box from the manufacturer (not all do that) and best if you have done color calibration and profiling to have good color management for your whole work flow."

We use an iMac 5k, 27 inch 2019 model and 3 sceptre side monitors. Is there a gadget you could recommend to calibrate all 4 monitors so that they will have consistent and accurate colors?

"- I think it has already been stated yet using a gray card for white balance is a good first step yet it again depends on the lighting that you are using for the feeling you want in the end."

I use a color-checker passport with different colors for reference and a gray card in the back. I only use the gray point to reference for white balance. I want to achieve a perfect skin tone so that the other colors of the food that we are shooting will also be color-balanced. Am I correct in saying this?

"My image came out looking more blue either because the cookies themselves were not white (not a good reference) or that you really wanted a warmer look. So its more than just tools and math. "

Not really a warmer look but I wanted to achieve the food's natural colors across all our pictures and I want to have consistent lighting for both the front shots and overhead shots. If you visit my website you can see the pictures there have inconsistent exposure. It's really difficult to achieve consistency. Is there a course you could recommend?

I appreciate your time John thank you very much!
 
If you really want to be accurate, use a grey-card when you take your photos. Then balance the grey off of that.

Hi Hawkeye, I have a color-checker passport but I think I'm using it incorrectly. Kindly see my response to John. I outlined my setup and my challenges. thank you very much!
 

Hi @recipesbynora and your welcome

First, I have looked at your web site and overall it looks great to me. I am sure there are ways to get incremental improvements yet I think the advice should be taken in perspectivce of your goal to have an attractive website with recipes and yummy looking pictures that attract viewers to your website. You are doing great!

Also note that not matter how you set up your website, you are not in control of the viewers monitor and the settings they use. So all you can do is all the right things to make it look good on your system and everything to allow the maximum number of viewers to have a good an image as is possible for the monitor they use and the settings they used on the system/monitor.

For front shots, we use 2 GVM 800D-RBG set to 100% power on the back left and right of the front camera (Sony A7Riii with FE 4/24-105 G OSS lens) - light is facing the subject. For overhead shots, we use 1 Neewer 18" LED light and 1 Eoto light 18N ring light overhead with another Sony A7Riii with FE 4/24-105 G OSS lens. We shoot different times of the day so the light cast varies. What do you recommend for lights that we should use to achieve near-perfect colors? And should we shoot during the night only to minimize different cast of light?

I am not the expert on lighting so others may jump in. What I can say is you want good full spectrum lighting so all colors can be differentiated among themselves. I don't see an issue on your website so this may be a non issue. You of course have to have enough lighting to get the exposure with the aperture you use to get the depth of field in the image. With those elements and using color checker cards for good reference colors you are doing great. Again I see not issue for the images in your website.

We use an iMac 5k, 27 inch 2019 model and 3 sceptre side monitors. Is there a gadget you could recommend to calibrate all 4 monitors so that they will have consistent and accurate colors?

First let me point out that when using a device for calibration/profiling of your monitors, that will enable them to have the capabilities to best reproduce accurate colors within the limits of the color gamut and stability of the hardware. As far as consistent colors, you also need to have a fully color managed workflow. What is not in your control is that the Apple monitor has a wide gamut color space "P3" and most Specter monitors typically have a smaller gamut and sometimes smaller gamut then the internet color space standard of sRGB. The only time this becomes an issue is when the colors in your image have a higher saturation than the limits of the Specter monitors. At that point the apple monitor being wide gamut, would more accurately represent colors better than the Specter monitors. I suspect this would be for the minority of images as most food colors are not highly saturated.

I think it would be good over time for you to be familiar with Color Management concepts and in practice. There is a lot of information online and beyond the scope of a quick response here. I would point out that since you are focused on internet viewing of your images, editing and saving in the sRGB color space is advised. Also, I noticed that the images on you web site do not have a color space embedded with the images. This allows web browsers to best color manage your image correctly. The good news is that most (not all) web browsers will assume when no color space is embedded, that it is sRGB color space. Some browsers still do not do this and the image data when sent to a wide gamut monitor will look over saturated.

A good color device for displays can be purchased from Xrite or Data Color. I use the i1 Display Pro for my monitor

I use a color-checker passport with different colors for reference and a gray card in the back. I only use the gray point to reference for white balance. I want to achieve a perfect skin tone so that the other colors of the food that we are shooting will also be color-balanced. Am I correct in saying this?

I believe you are using the card correctly yet there are plenty of tutorials online on how to use the color checker cards

Not really a warmer look but I wanted to achieve the food's natural colors across all our pictures and I want to have consistent lighting for both the front shots and overhead shots. If you visit my website you can see the pictures there have inconsistent exposure. It's really difficult to achieve consistency. Is there a course you could recommend?

I am going to suggest that other members cover this question as I am stronger in post processing information than in consistent lighting and exposure as in right the first time straight out of the camera.
 
Hi @recipesbynora and your welcome

First, I have looked at your web site and overall it looks great to me. I am sure there are ways to get incremental improvements yet I think the advice should be taken in perspectivce of your goal to have an attractive website with recipes and yummy looking pictures that attract viewers to your website. You are doing great!

Also note that not matter how you set up your website, you are not in control of the viewers monitor and the settings they use. So all you can do is all the right things to make it look good on your system and everything to allow the maximum number of viewers to have a good an image as is possible for the monitor they use and the settings they used on the system/monitor.


I am not the expert on lighting so others may jump in. What I can say is you want good full spectrum lighting so all colors can be differentiated among themselves. I don't see an issue on your website so this may be a non issue. You of course have to have enough lighting to get the exposure with the aperture you use to get the depth of field in the image. With those elements and using color checker cards for good reference colors you are doing great. Again I see not issue for the images in your website.


First let me point out that when using a device for calibration/profiling of your monitors, that will enable them to have the capabilities to best reproduce accurate colors within the limits of the color gamut and stability of the hardware. As far as consistent colors, you also need to have a fully color managed workflow. What is not in your control is that the Apple monitor has a wide gamut color space "P3" and most Specter monitors typically have a smaller gamut and sometimes smaller gamut then the internet color space standard of sRGB. The only time this becomes an issue is when the colors in your image have a higher saturation than the limits of the Specter monitors. At that point the apple monitor being wide gamut, would more accurately represent colors better than the Specter monitors. I suspect this would be for the minority of images as most food colors are not highly saturated.

I think it would be good over time for you to be familiar with Color Management concepts and in practice. There is a lot of information online and beyond the scope of a quick response here. I would point out that since you are focused on internet viewing of your images, editing and saving in the sRGB color space is advised. Also, I noticed that the images on you web site do not have a color space embedded with the images. This allows web browsers to best color manage your image correctly. The good news is that most (not all) web browsers will assume when no color space is embedded, that it is sRGB color space. Some browsers still do not do this and the image data when sent to a wide gamut monitor will look over saturated.

A good color device for displays can be purchased from Xrite or Data Color. I use the i1 Display Pro for my monitor


I believe you are using the card correctly yet there are plenty of tutorials online on how to use the color checker cards


I am going to suggest that other members cover this question as I am stronger in post processing information than in consistent lighting and exposure as in right the first time straight out of the camera.

Hi John!

Thanks again for this very detailed response. I will consider everything you said and improve my knowledge of these things.
 

Back
Top