What's new
Photoshop Gurus Forum

Welcome to Photoshop Gurus forum. Register a free account today to become a member! It's completely free. Once signed in, you'll enjoy an ad-free experience and be able to participate on this site by adding your own topics and posts, as well as connect with other members through your own private inbox!

How to make a custom bitmap pattern?


Pocahontas

New Member
Messages
4
Likes
0
HI, I have tried few days to find out the answer, but no luck. I use Photoshop CC.
I managed to make and apply a pattern but it does not scale according to light and dark areas.
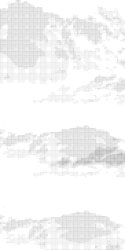
Cloud1- orig image
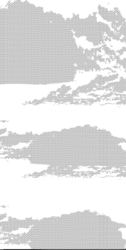
Cloud 2- Photoshop pattern which scales accoring to grayscale
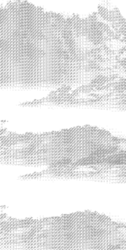
Cloud3- Pattern I made but it does not scale.

Is that mission impossible or do I miss something?

clouds1.jpg

clouds3.png

clouds2.png
 

thebestcpu

Guru
Messages
2,994
Likes
2,760
Hi Pocahontas

Your objective your are trying to achieve and you question may not be clear enough to answer.

The original image are gray scale clouds

The second set of images do not scale with the gray level. It appears that the second set of images is just a filled pattern of a selection. That selection is achieve by a Threshold Adjustment Layer to create a B&W boundary and the use of a magic wand tool to form the selection and a then pattern fill.

The third set seems like you are trying to achieve something quite different which is a gray scale image using a pattern. I am not sure I understand your objective yet images with varying tone which is based on a pattern is possible.

So I suggest maybe providing some clarification on your objective and maybe sharing a screen shot of your image and Photoshop Layer Stack for the approach you are attempting.

Just a suggestion

John Wheeler
 

Pocahontas

New Member
Messages
4
Likes
0
Ahh, okay, thanks John. I want to create a bitmap pattern myself but no success.
Image>Mode>Bitmap>custom pattern
I am able to pick my pattern (9*9 pixels, and tried also bigger) but it does not scale.

Dunno if this would work in Illustrator instead....

Poc
 

thebestcpu

Guru
Messages
2,994
Likes
2,760
Hi Pocahontas

I am probably not understanding what you mean by "does not scale" so further advice until I understand better may send you in the wrong direction. I believe Photoshop is doing exactly as you are asking and there may be a misunderstanding of what is needed when you use a custom pattern in the conversion.

As the next step I suggest you look at the following link which may help you along with your project. The pattern size needs to be significant enough in size relative to you image size to show up the pattern very well. Hope this link helps:

John Wheeler

https://helpx.adobe.com/photoshop/using/converting-color-modes.html
 

thebestcpu

Guru
Messages
2,994
Likes
2,760
BTW - If you want to get something like the second image you provided you can

1 - Create you own pattern with the Edit > Define Pattern
2 - Create an object on a layer with the shape you want (many ways to do this) and then
3a) Either do Edit > Fill (with pattern you created)
3b) Or for more flexibility use a Layer Style using the Pattern Overlay option which gives you the flexibility to scale the pattern right there

Just another path to consider

John Wheeler
 

Pocahontas

New Member
Messages
4
Likes
0
Let's say my pattern is a star. In readymade patterns, the star is smaller in light areas and bigger in dark areas, exactly as I would like (see image 3- that is a readymade pattern). Maybe this is called halftone effect or something?

Problem is that my pattern only divides the image into 3 groups- total white, total black and pattern without any change in size. (see image 2- I don't want that)

Poc
 

thebestcpu

Guru
Messages
2,994
Likes
2,760
Hi Pocahontas
Providing images of your Layer Stack and results would be much easier to understand your issue and provide suggestions.
Here is my best shot without that information.
You want to a half tone pattern (bit map style) made from a gray tone image where the shape is of varying sizes to represent the gray tones (when viewed form a distance)
The path you were taking does have issues and there is another way that gives you more adjustment capability. This also helps easily solve some potential issues such as small tonal range of either the original image or the pattern.

I have created an example made from you original could picture and using a 10 x 10 pixel diamond pattern with shades from black to white.

The end result does show varying diamond sizes depending on gray tone of the original image. Hope this gives you a good starting point.

You need to create a desired pattern of sufficiently small size compared to your original image and create it with Edit > Define Pattern

First here is the Layer Stack that I used:
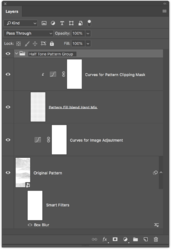
Screen Shot 2019-01-04 at 11.03.48 PM.png

The lowest Layer is the original image made into a Smart Object with an optional box blur filter applied. Turns out that if you make the box blur ~ the same size as the pattern size the shape will more closely represent the pattern you use. If you don't use the box blur you will have a little more precision in the image a far as gray tone

The second Layer is a cures adjustment layer (could use Levels Adjustment Layer) to create an image with a high level of tone range (your starting clouds do not)

The third Layer was just a blank Layer filled with the pattern you created (Edit > Fill..... use the pattern option and selection your pattern. This Layer is set to blend of Hard Mix (this is important)

The fourth is another curves adjustment Layer (again you could use a Levels Adjustment Layer) to adjust the tone range of the pattern you defined.

I used a grouping to group Layers 2 thru 4 to easily turn all adjustments on and off for comparison to the original.

The first image below is the results of playing around with the curves adjustment Layers with the Smart Object blur blend turned off

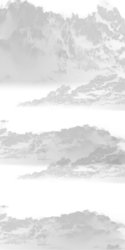
The second image below is the the same except for turning on the fox blur.
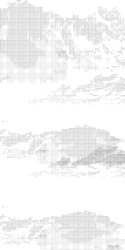
Diamond-Pattern-no-Box-Blend.jpg


Diamond-Pattern-with-Box-Blend.jpg


Finally, since the above was all done in grayscale you an always change modes to bit map using the 50% gray threshod which will keep the image the same other than the mode/format is changed.

Hope this helps

John Wheeler
 

Pocahontas

New Member
Messages
4
Likes
0
Wow John thank you so much! It will take some time for me to go through your suggestion.

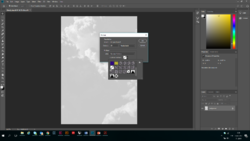
I did nothing to layers, just took the pattern and selected it directly, as I do if I apply existing Photoshop patterns which are in the same selection. (at the moment random settings, just to show what I did)
Just out of curiosity, I wonder how these existing patterns are different because they need no additional layers or anything.

Cheers
Poc

1546812501384.png
 

thebestcpu

Guru
Messages
2,994
Likes
2,760
Hi Poc

I am no expert on the options of using grayscale to bit map. What I can say is that in my use of that option the results I got were highly variable based on
- the pattern in use and amount of grayscale
- the size of the pattern
- and in particular, the input dpi vs the output dpi (I note in your picture that was 300 dpi vs 35 dpi respectively)

I do know that for some patterns I tried the results were awful and others they worked very nice.
I have not tracked down the details of why so sorry I cannot help you out any more. There may be other forum members that might have more details.
Best wishes on your project.
John Wheeler
 

Top