What's new
Photoshop Gurus Forum

Welcome to Photoshop Gurus forum. Register a free account today to become a member! It's completely free. Once signed in, you'll enjoy an ad-free experience and be able to participate on this site by adding your own topics and posts, as well as connect with other members through your own private inbox!

How To Sharpen Up A Portrait Photograph?


abrogard

Member
Messages
13
Likes
5
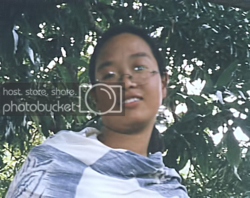
I have this old photo that I'd like to see a little sharper but I don't know how to go about it. I've tried a bit and only made things worse so I thought I'd ask for direction before going any further.

I'll include it here so's you know what I'm talking about, if that's okay..
 

Attachments

  • juantoga2 copy.jpg
    juantoga2 copy.jpg
    643.5 KB · Views: 6
No tool is going to fix the lack of sharpness in this image, it's just too blurry and both the resolution and quality are simply too low. In such cases I always try to focus on contrast to give the illusion of sharpening. Use for example levels and adjust the black point until it meets the starting point of the histogram and finish off with a slight saturation boost. You can also consider some slight use of the burn tool on some of the darkest details in the image, set it to shadows and an exposure of 4% with a soft brush, just don't go overboard with it.
 
John gave you some good advice. I would add that if one is going to try to sharpen it, it's critically important to first minimize all of then noise / grain present in the original. I did this in several steps. I first used the noise reduction capability of ACR. I then down-rez'ed the image to 700px wide. Reducing the resolution effectively averages several adjacent pixels of the higher resolution (starting) image to get one pixel in the lower rez version, and thereby also reduces noise. I then applied CC PS 6's new shake reduction tool to the smaller image and then adjusted contrast, blacks, etc. as per John's suggestion.

T
 

Attachments

  • juantoga2-tjm01_acr_ps02a_698px_wide-02.jpg
    juantoga2-tjm01_acr_ps02a_698px_wide-02.jpg
    210.4 KB · Views: 46
For this I used my arsenal of plugins lol......

First I used Topaz DeNoise, then Nik Software Sharpener Pro 3, then done a little retouching with the clone tool.

Then finally unsharpen mask. Chances are you won't have the above, but I just thought I would through it in there lol.

Sharper_zps6d7a2680.png
 
I first added a geometric distortion, just to see if I could alleviate the fuzziness a little bit.
a horizontal distortion of .01% and a vertical distortion of .10% a kind of compressing effect
I then used the vibrant filter at +20 both scales
Then used shadows/highlights
Shadows amount 19% total with 41% rating is 75 pixels highlights about 47% total with 50% radius 30 pixels adjustments color correction +20
Midtone contrast -5
white clip .01
black clip .01

juantoga_i.gif

did not try noise filters and all, that sure could use it. and a few minor touches here and there
 
Here is a smaller.GIF file to see the difference

juantoga2.gif
 
A few more comments abrogrard: if you want to sharpen an image of this quality, then try to focus on those areas where you can expect maximum visual gain, like tiny shadows in mouth, nostrils, near eyes and areas like that, do not sharpen the complete image. In this image I would avoid sharpening the background for example. Think out of the box and ask yourself if it needs to be sharpened. In my opinion the photo would look better when you slightly blur the background and remove the noise, because it creates a slight depth of field, which makes the main subject stand out and again creates the illusion of sharpness.

It's also important that you analyze an image. Never retouch an image without a careful examination first and focus not only on what you should do, but also what you shouldn't do, because less is often better. In the case of noise, ask yourself what kind of noise you're looking at. Also examine the channels and ask yourself if it's wiser to focus on one particular channel only.

Secondly, skin only needs to be retouched, there is no point in sharpening this skin, because the fine pores are already completely gone and any sharpening will only make any artifacts stand out. As for noise removal, only focus on areas that truly matter, never apply noise removal to the completely image, but in the case of people try to focus on important areas like skin and avoid blurring the eyes at all cost.

People often apply corrections to the complete image. This might work well for many images straight out of a modern digital camera, but with older images that's often the wrong approach.

Let's say you want to sharpen the image. Make a copy of the image after all the major retouching, sharpen it and then add a black mask that hides all the sharpening. Now paint in all the areas that need to be sharpened with a soft white brush on your mask. If you make a mistake, then paint it back with black. Of course you can also use the reversed approach and start with a white mask and black brush. The same technique can be used for other corrections.

Also make sure that you never try to make it a rush job. Laziness is a retoucher's worst enemy and make sure you work as much as possible non-destructively and constantly monitor your progress in every area of the image with a before/after view.
 
iDad, what did you add the kind of distortion that photographers actually want to avoid by shooting with a 90mm lens or more, instead of using a 50mm that creates this kind of distortion?
 
I used Topaz denoise and adjust for the face, then only Topaz adjust for the BG.
In PS I put the face on a layer above the BG, then applied unsharpmasking with different settings for each layer.
Finally I did a little retouching.

LeavesFace.jpg
 
Thanks for all that guys. Maybe I should have said 'improve' instead of 'sharpen'. Might have picked the wrong word. Inkz seems to have got to the sort of thing I was after - I'll have to chase up those plugin tools he's got.

I was thinking a sharpen of the edge of the neck and the jawline is what it mainly needed. To have good clear sharp edges there would make the face stand out clearly from the background and hence give an illusion of sharpness and clarity maybe.

And, yes, I'm totally in agreement with the comments about only working on the areas where it is useful - the background is fine, I like it just the way it is.
 
I have learned one thing from this thread, plug ins are not the be all to end all when it comes to quick fixes (but i already knew that), like most things in life they have limitations, everyone as offered great advice and images with some improvements added/deleted, but as you can see still not that good.
Great work guys with the efforts and knowledgeable replies, JohnD offered what i see as the best quick effect result with your poor image supplied.
Old photoshop adige: if you can't fix it - fake it:mrgreen:
 
Superb advice from JohnD in this thread, especially, in message #8. His comments about painting in or painting out efx deserve repeating. I would also add that often a simple reduction of the opacity of an effect layer is will produce much better results than leaving the effect at 100%.

Also, his comment that haste is the enemy of good retouching is also right on the mark. That sentiment should be taped above all of our monitors. Unfortunately, however, when doing freebie demos in response to forum questions, often, one simply doesn't have the time to do everything that one knows is necessary, especially when you realize that in many cases, the OP often never even bothers to reappear after asking his question.

Tom M
 
Cripes, I hope none of that is directed at me, is it? I reappeared a couple of posts back. Since then I've been trying things suggested by these posts..

I have experienced the same thing myself, though, I admit. I've posted many times to threads where the OP never reappears. But I've usually found the thread to be interesting, at least, nevertheless, even without the OP (or perhaps because of he's not there?).

The way I look at it a forum becomes a repository of questions and answers (amongst other things) and when you dial up your question on google and find yourself at that thread where the OP never returned you don't really give a damn - your answer is there.

You don't care who put it up and whether they came back or not.

That sort of approach might be some sort of consolation for those who feel personally slighted or somesuch by non reappearance of OP's.

and what's that: " doesn't feel wasted if the OP doesn't reappear " ?

Well that's exactly like I'm talking about. Don't worry about them. You've performed this good action: put up an answer to one of the myriad questions being asked...

It's a bit like making a Wikipedia entry I think....

I'll go back to trying out things....

thanks again...

:)
 
Last edited:
I will indeed. I've been looking at JohnD's .gif. I like the pic but of the two frames it is the lighter one I prefer. Not only the lighter background but the lighter features. This lady is Asian but the darker cast makes her look African or somesuch.

I wonder what you did, John, to get that frame? It is certainly not the image I supplied as I supplied it, is it? Or is it?
 
Nope, don't worry, my comment most certainly wasn't directed at you. It was a general statement meant to explain why responders to such threads might decide only to spend 5 or 10 minutes adding a visual example to a text-based answer, not the 20 or more minutes that it might take to perform the work needed to generate an image for the example at the level one would give a paying customer. Of course, this varies from one responder to the next, and from one situation to the next, how much time the responder has available when the question comes in, etc.

Also, I couldn't agree more with your comment that all answers remain on-line for anyone else who might come along with the same question. Unfortunately, experience has taught me that an astonishing number of people with simple, non-specific questions find it easier to simply post their question instead of Googling it themselves, even when you know that dozens of beautiful constructed video tutorials exist on exactly the same topic and it would have been almost impossible for the person with the question to have missed these using any reasonable search terms.

Anyway, as Paul said, do stay around, show us what you came up with, and definitely post more questions.

Cheers,

Tom M
 
Last edited:
I'll 2nd the use of the clone tool, along with any of the selection tools. Also the brush tool together with selections, or some freehand with a very fine brush size. Unfortunately, you are not going to fix the lack of skin texture by firming up the outlines, but yo can have a stab at it with some noise. There are some amazing results in this thread considering how bad the original image was, so kudos to you all.
 
pretty bad image , thought id have a crack , bit of contrasting , blurring and sharpening but at the end of the day its a blurry image and impossible too get right
the blown highlites in the backround are shocking , clone them out id think
 

Attachments

  • juantoga2 copy.jpg
    juantoga2 copy.jpg
    351.7 KB · Views: 18
Last edited:

Back
Top