What's new
Photoshop Gurus Forum

Welcome to Photoshop Gurus forum. Register a free account today to become a member! It's completely free. Once signed in, you'll enjoy an ad-free experience and be able to participate on this site by adding your own topics and posts, as well as connect with other members through your own private inbox!

Make Clock Face Translucent/Transparent for the Mac


RickinWaSt

Member
Messages
6
Likes
1
Goal: Make Clock Face Translucent or Transparent

My original request was on June 2nd: "Make Clock Face See Through". Went through the steps offered up by Rich54, JeffK, & ex_teacher. However, once the image was saved as .png to the Mac desktop {MacOS Monterey v12.4} the clock face image had not changed. It had the same white background and was not translucent/transparent.

According to Rich54 the clock face transparent image work just fine on his PC.

Question: So, is there a differing process to make the clock face translucent/transparent on the Mac vs PC? ~ Much Thanks ~

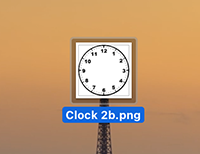
Image #1 No PS processing
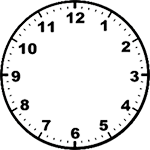
Clock 2b.png
Image #2 after PS steps applied.
Saved Closed Face Not Change.png
 
Hi @RickinWaSt
No, there should be no difference between a Mac and a PC.
It would help for you to include the PSD file you used to create this image for examination by forum members.
I would also help to know the specific commands you used to save the PNG. For PNGs, to save the transparency you have to choose that option while saving.

The PSD will determine if you created the clockface with transparency.
Assuming the transparency is there, knowing the save method will help narrow down where you lost the transparency.

Just suggestions for next steps
John Wheeler
 
With a pointer from @Rich54, I think Ithat this is a MacOS issue not a Photoshop issue and will show you the steps below on how to create the desired icon with pictures.

Note that too minimize any confusion, I initially save the transparent PNG its own folder to make the images a bit more simple.

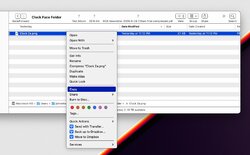
First step, find your PNG file with Finder, highlight and copy with CMD + C or right click on the file and use copy. This will copy the image to the clipboard.

Screen Shot 2022-06-08 at 6.45.24 AM.jpg


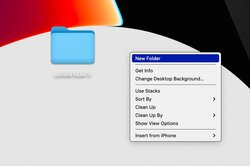
Next step is to right click on an empty desktop area and create a New Folder. You can rename the Folder later as you see fit.

Screen Shot 2022-06-08 at 6.50.48 AM.jpg

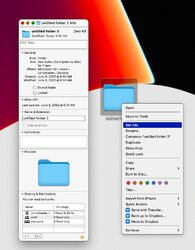
Next right click on the just created Folder and click on the Get Info option:

Screen Shot 2022-06-08 at 6.51.43 AM.jpg

The next step is to just single click the little icon in the top left corner so it shows a border around it now:

Screen Shot 2022-06-08 at 6.52.14 AM.jpg


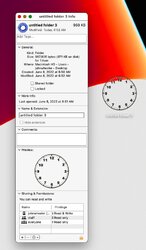
Now all you have to do is paste from the clipboard the PNG file into that little icon with either Edit > Paste or more simply CMD + V:

Screen Shot 2022-06-08 at 6.53.04 AM.jpg

Now the New Folder is represented by your PNG file on the desktop and you can move it around and the desktop and other icons will show through the transparent area.

Now you can rename you folder to the name you want and your are don.

Hope that was your issue and that this helps
John Wheeler
 
Good morning....

John, I ended up with a clock face looking folder, easy-peazy :). However, I still getting a non-see through clock face with the white background. So, clearly I'm missing something in the PS process {Duh}!

There are two suggestions on how to achieve a see through clock face.

1) "Use your magic eraser tool and click on the white area: (*the magic eraser is part of the eraser tool set - just choose the one with the three dots as below). You can add a colored layer underneath just to check you erased al the white".
Step 1 No Action.png
Magic Eraser Applied.png
At this point, what am I missing in the process? I need to "flatten" the layer. Saved it via "Save As..." and tried "Export" > "Export as..." ensuring "transparency" was checked.

2) "On the left, the clock layer has a Normal blend mode. On the right, I changed it to Multiply."
Normal blend mode. Layer changed to Multiply.png
Save as .png and still the white background appears and clock face is not transparent.

~ Thanks for the help ~
 
There are two suggestions on how to achieve a see through clock face.

For what you are trying to do, you should completely ignore the "Multiply" approach. That only works within Photoshop—in combination with another image—and will never work for your desktop project. (When I first suggested Multiply, I thought the final output was a Photoshop edit, but I was mistaken.)

The approach you want is to delete all the white using the magic eraser, which you have already done. That will result in one Photoshop layer consisting of the black clock markings with blank transparency surrounding it. Once you've got that done in Photoshop, this is the file to save as a PNG. (You inadvertently switched my earlier instructions and tried to save the Multiply approach as PNG, which will never work.)

After you've saved the PNG, then follow John's instructions to get it onto your desktop.
 
Hi @RickinWaSt

Here is a simple debug step you can take to make sure of the location of the issue.

After creating and saving the PNG to your computer from PS, close that document in PS and then load the one you just saved into PS. It should show up as transparent.
If it does not, then it is the creation / save process is the source of the problem.
If the reloaded image does show transparency, then for sure it is how you are creating the icon within the Mac system.

Just having the image file saved to the desktop folder will not let the transparency survive. When the icon is created using that approach, a white background is inserted with the icon as well.

John Wheeler
 
I'm sure I'm trying folks patience with my inability to get the job done. It seems I'm following everyone's directions, but not getting the final results.

1) The approach you want is to delete all the white using the magic eraser, which you have already done.

2) That will result in one Photoshop layer consisting of the black clock markings with blank transparency surrounding it.
Should the image look like this as "...blank transparency surrounding it."
Magic Eraser Applied.png


3) Once you've got that done in Photoshop, this is the file to save as a PNG.
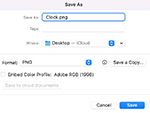
Save As.png

4) Just having the image file saved to the desktop folder will not let the transparency survive. When the icon is created using that approach, a white background is inserted with the icon as well.

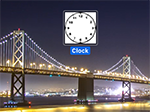
Following the instructions to create a clock icon {I'm pretty sure, but...}, I get this which is not transparent.
Clock Face Desktop Icon.png


My current state :)
Homer.png
 
I know absolutely nothing about Macs, so this is just a complete guess. Your post above is too small to read, but it looks like—in your Save As step—you saved the PNG directly to your desktop. I wonder if this is jumping the gun because we already know that your desktop won't support transparency. Try doing the Save As step again, but this time save the PNG file to a normal folder on your hard drive, not to the desktop. Then, from there, follow the steps that John specified about creating a new folder, etc.
 
I've been following this and the more I read about it, the more I find frustrate Mac users who can't solve the issue. It seems to be a Mac problem so it's not as if the OP is doing anything wrong.

My thought is - if saving a transparent png is an issue, why not just open the image, erase the background, and then place it into the document you're working on without saving it. Transparency should be preserved. The only issue is if you want to reuse it on another document, you have to go thru the background erasure process again.

Just for the try, I opened the clock image in a separate document and then erased the background, Then I copied (Command+C) the layer and pasted (Command+V) it into another document:

1654795552361.png

From here you can manipulate the clock any way you wish.
 
Hi @RickinWaSt
Note that the image in your step 3 is not readable.

There is another possibility. There is a version of Photoshop that has a problem with saving transparent PNGs. The link below describes specifics and it is resolved by updating

PS.https://community.adobe.com/t5/phot...ransparent-when-exported-as-png/td-p/11738579

if this is not the issue an easy debugging step is called divide and conquer and the focus on a more narrow problem.
I suggest for the second time that after saving your PNG, then close the document in PS and open the PNG file back into PS to determine if transparency survived the save process.

With that information we will then separate out if this is a PS problem or a problem with assigning the PNG to an icon.
This step will help us help you.

John Wheeler
 
Ok, we have liftoff! I now have the clock face icon as transparent on the desktop :) Oh boy, want a journey and thank you all! Now, I need to learn how take the anchored clock icon and be able to move it around the desktop on my Mac.

My issue was not saving the image to a new folder, but the desktop ;-/

~> Try doing the Save As step again, but this time save the PNG file to a normal folder on your hard drive, not to the desktop. Then, from there, follow the steps that John specified about creating a new folder, etc.

Homer Thanks You.png
 
Last edited:
Hooray! I learned something too as had to learn how to make a custom icon with transparency before writing the step by step instructions.
John Wheeler
PS - I bet you have to grab a black pixel area of the clock to move it.
 

Back
Top