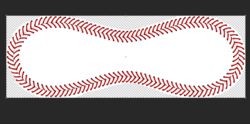
Hi, first time poster and new member. Running Photoshop 2018. I'm pretty comfortable with photoshop, but I can admit I've spent next to no time in the 3d module. So, in trying to change that, I'm working on some things to get the hang of it. I got a rectangular image of a baseball "texture" that I figured I would wrap as a mesh or something for a sphere. No idea if this was the way to approach it. When I say baseball "texture", I mean imagine if you cut off the outside layer of the ball including the stitching, and laid it out flat. I've seen a baseball like this, and the pattern shape on the stitches is correct. So I've tried numerous approaches to using this in photoshop with the end result goal to have created a 3d object baseball ball. When I try to use mesh from preset-->sphere, it will convert the texture image to a perfect sphere. And it will look almost perfect as a baseball for most of it. But then as you rotate the sphere, suddenly you realize that for some reason, both sides have a section of stitching that looks like it's liquified inwards when it should be straight. The original shape was a rectangle. A fairly wide rectangle. So I figured I would try to cut out the extra white space from the rectangle so the shape was just outside the red stitches. Basically the same result. The other thing noticed, is that the stitches on each end go right to the edge of the image, no blank space. However, after wrapping it to the sphere, there is a large section of white space in between the two ends of the stitches where the wrap around and are supposed to come close to each other. Can't figure out how I could reduce this space, because the ends of the texture are supposed to be wrapped. I am imagining the answer to the first issue with the skewed/liquified stitches, is that it is stretching that section to come together and close off a section of the sphere that didn't have enough material. However, I have no idea how I would modify this. The other technique I've read about is creating the 3d spehere, then trying to apply the texture, but I haven't had great success with that either. Give me a logo, some text, some objects to "3d-ify", extrude, light, bevel etc.... No problem. But trying to deal with a shape that doesn't really have a defined breakdown of inflation (ie: front inflation, extrusion material, back inflation etc...) Sorry for the post if it's hard to understand. See images below p
p
p