
rhstanley3
Well-Known Member
- Messages
- 58
- Likes
- 8
Hello fellow photoshop gurus. I was reading a request for a tutorial in the forum tutorials (where this is) asking about how to take quality photos. Me, having a particular love for photography decided to address photography right down to the knitty gritty (of course, I'm going to leave out most of the gritty). I personally feel that knowledge of photography is a definite must for any photoshoper. Note ahead of time that this tutorial will feature no actual photos taken by me, as I don't have a digital camera. Anyways, lets get the ball rolling, shall we?
First, before we get to the actual basics of photography, lets quickly discuss the different types of camera. (As a side note, at no point in this tutorial will I address video cameras or video features on cameras, as I feel that is more cinematography and doesn't have as much to do with photoshop as still photos do.) Anyways, there are a few different kinds of camera. The first type is perhaps the most common of all cameras, and that is a point-and-shoot camera, such as the one below.

This type of camera is small, portable and convenient for quick snapshots on a vacation or at a birthday party. The next type of camera is the DSLR, which means Digital Single-Lens Reflex Camera. These cameras are much more professional-looking than a point-and-shoot, and also take higher quality photos (that is, if you know what it is you're doing.) DSLR's have a digital screen and look like the camera below.
View attachment 1494
The least common type of camera is the SLR camera, which is a Single Lens Reflex Camera. This camera uses film instead of digital technology. These cameras aren't the same as the kodak cameras you buy from albertsons for your 4rth grader's trip to the zoo, but rather were in the same boat as the DSLR is now until digital cameras came out. Newer versions of these cameras look similar to DSLR's but without the digital screen. In the picture below is a considerably older camera.
View attachment 1495
Now that we've established the different types of camera, I'm going to completely skip over the point-and-shoot camera altogether, and I'm going to cut straight to the DSLR's, as they give you more control than a point-and-shoot, as well as better quality photos. DSLR's and SLR's are very different from point-and-shoots in the sense that you can't just point and shoot, things won't work out very well for you if you do. When taking photos with a DSLR or an SLR, there are three settings that one must take into account whenever taking a photo. These are your ISO, your shutter speed, and your f-stop (or your aperture). In the next three paragraphs, I'm going to talk about each individually.
ISO
ISO (the meaning of the acronym has nil to do with this subject, besides knowing that it's an international standard in photography.) is a very important aspect in photography. ISO, to put it simply, is how sensitive the camera is to light. What's important to know about your ISO is that it is measured in hundreds, starting at 100 and doubling per stop. (i.e. 100, 200, 400, 800, 1600, 3200) *NOTE: A stop is each level of setting. Stops are used for all three types of setting* 100 is one stop, while 400 is two stops up from 100, and 200 is a stop below 400. Still following me? Higher quality cameras will have 1/3 of a stop for ISO (i.e. ISO400 1/3, ISO 400 2/3, ISO800). The lower the stop is (the closer it is to 0, the lowest you can use being 100) the longer it takes for the film to devhelop. The higher the ISO, the faster the film develops. knowing how to use ISO will help when shooting at night or shooting in very bright areas. One might question why one would every want a lower ISO when taking pictures if a higher ISO develops at a faster rate, when one can just increase shutter speed (which will be addressed in the next paragraph) to get the same effect. The main reason is because of the difference in quality between a picture with a higher ISO and a lower ISO. Although a lower ISO photo takes longer to develop, the photo will always be of higher quality than a high-ISO photo. The higher the photo's ISO, the grainier the photo will be. So you either sacrifice quality for speed of exposure, or you sacrifice speed of exposure for quality. Which to use depends on your situation and the object you're shooting. When shooting a picture of an orange that's sitting on a table, a lower ISO might be preferred, as you won't have to worry about the object moving. Higher ISO would be much better for a night-time shot or a dark shot. Lets continue onto the next setting, shall we?
Shutter Speed
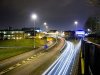
Shutter speed is how long your shutter stays open, which in essence is how long the shutter allows the 'film' (in quotations for a DSLR, take out quotations for an SLR) to expose. For example, lets say you want to take a picture of an African swallow migrating to England carrying a coconut, because it can't be a European swallow, as the average European swallow is 5oz. and the average coconut is 1lbs., and a 5oz. bird can't carry a 1lbs. coconut. The bird flies so fast, that a slow shutter speed won't be able to capture the sight in focus, but the bird and it's coconut would actually be blurry. However, with a faster shutter speed, you will be able to capture the swallow in clarity, able to see that it is in fact carrying a coconut. Shutter speed starts at the stop 1, then goes to 1/2 and then doubles up, just like ISO. However, it doesn't double up for all of the numbers, particularly 3 in a row, then it jumps to a different number (i.e. 1/2, 1/4, 1/8, 1/15, 1/30, 1/60 etc.) The reason this happens is because it has been standardized on most cameras to have 1/3's of a stop for the different stops. (1/4 is 1/3 of a stop up from 1/2, and 1/8 is 2/3 of a stop up from 1/2, and 1/15 is one stop above 1/2.) Most camera models are different with the highest and lowest shutter speeds. Furthermore, these shutter speeds aren't just numbers made out of thin air. They are fractions of a second (1/2 is a half a second, and so on and so forth.) The lowest constant stop is 1, which leaves the shutter open for 1 second. When I say constant stop, I am referring to the custom shutter speed settings. There are two different settings, the first keeping the shutter open as long as you keep your finger on the shutter button (the button you press to actually take the picture). The last setting is called bulb, and it is similar to the last feature mentioned, but you don't need to hold the shutter button. When you press the shutter button once, the shutter remains open until the button is pressed a second time later. Using the method mentioned, you can create photos often referred to as light paintings, such as this photo.

You can also use this method to blur movement, like in this picture.

Now that we have established the basics of shutter speed, lets move on to Aperture.
Aperture
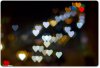
Aperture means "The diameter of such an opening, often expressed as an f-number." In photography, aperture is how wide or narrow the blades of the lens will open. Aperture is referred to as f-stop. The lower the f-stop, the wider the diameter that light enters through. A lower aperture number allows more light to enter the camera, while a higher aperture number allows less light to enter the lens. Aperture effects two things in a picture besides light allowed into a photo. Aperture effects the plane of focus, as well as Bokeh. Lets adress Bokeh first. Bokeh is a camera effect caused by light when it enters the camera lens. The light is stopped in a shape by the blades of the lens, which causes the effect bellow.

The effect is often seen in movies when the camera passes the sun. An interesting fact is that before a certain point, in movies, directors of cinematography did whatever they could to get rid of the bokeh. After a movie that I can't remember the name of used it effectively, it has been wanted and is sought after in both cinematography and photography. Currently, the new craze is to make your own bokeh that wouldn't be possible with a normal lens, such as a heart shaped bokeh like the one below.

This bokeh can be achieved easily without the use of photoshop, but I won't address how unless asked. Focus, unlike bokeh, is slightly more complicated. First of all, a smaller aperture number will make a narrower plane of focus than a larger aperture number.
Unfortunately I have run out of time, but part 2 will be up soon. Enjoy what there is!
*NOTE: I know the first three pictures aren't appearing. I'll correct this later.*
First, before we get to the actual basics of photography, lets quickly discuss the different types of camera. (As a side note, at no point in this tutorial will I address video cameras or video features on cameras, as I feel that is more cinematography and doesn't have as much to do with photoshop as still photos do.) Anyways, there are a few different kinds of camera. The first type is perhaps the most common of all cameras, and that is a point-and-shoot camera, such as the one below.
This type of camera is small, portable and convenient for quick snapshots on a vacation or at a birthday party. The next type of camera is the DSLR, which means Digital Single-Lens Reflex Camera. These cameras are much more professional-looking than a point-and-shoot, and also take higher quality photos (that is, if you know what it is you're doing.) DSLR's have a digital screen and look like the camera below.
View attachment 1494
The least common type of camera is the SLR camera, which is a Single Lens Reflex Camera. This camera uses film instead of digital technology. These cameras aren't the same as the kodak cameras you buy from albertsons for your 4rth grader's trip to the zoo, but rather were in the same boat as the DSLR is now until digital cameras came out. Newer versions of these cameras look similar to DSLR's but without the digital screen. In the picture below is a considerably older camera.
View attachment 1495
Now that we've established the different types of camera, I'm going to completely skip over the point-and-shoot camera altogether, and I'm going to cut straight to the DSLR's, as they give you more control than a point-and-shoot, as well as better quality photos. DSLR's and SLR's are very different from point-and-shoots in the sense that you can't just point and shoot, things won't work out very well for you if you do. When taking photos with a DSLR or an SLR, there are three settings that one must take into account whenever taking a photo. These are your ISO, your shutter speed, and your f-stop (or your aperture). In the next three paragraphs, I'm going to talk about each individually.
ISO
ISO (the meaning of the acronym has nil to do with this subject, besides knowing that it's an international standard in photography.) is a very important aspect in photography. ISO, to put it simply, is how sensitive the camera is to light. What's important to know about your ISO is that it is measured in hundreds, starting at 100 and doubling per stop. (i.e. 100, 200, 400, 800, 1600, 3200) *NOTE: A stop is each level of setting. Stops are used for all three types of setting* 100 is one stop, while 400 is two stops up from 100, and 200 is a stop below 400. Still following me? Higher quality cameras will have 1/3 of a stop for ISO (i.e. ISO400 1/3, ISO 400 2/3, ISO800). The lower the stop is (the closer it is to 0, the lowest you can use being 100) the longer it takes for the film to devhelop. The higher the ISO, the faster the film develops. knowing how to use ISO will help when shooting at night or shooting in very bright areas. One might question why one would every want a lower ISO when taking pictures if a higher ISO develops at a faster rate, when one can just increase shutter speed (which will be addressed in the next paragraph) to get the same effect. The main reason is because of the difference in quality between a picture with a higher ISO and a lower ISO. Although a lower ISO photo takes longer to develop, the photo will always be of higher quality than a high-ISO photo. The higher the photo's ISO, the grainier the photo will be. So you either sacrifice quality for speed of exposure, or you sacrifice speed of exposure for quality. Which to use depends on your situation and the object you're shooting. When shooting a picture of an orange that's sitting on a table, a lower ISO might be preferred, as you won't have to worry about the object moving. Higher ISO would be much better for a night-time shot or a dark shot. Lets continue onto the next setting, shall we?
Shutter Speed
Shutter speed is how long your shutter stays open, which in essence is how long the shutter allows the 'film' (in quotations for a DSLR, take out quotations for an SLR) to expose. For example, lets say you want to take a picture of an African swallow migrating to England carrying a coconut, because it can't be a European swallow, as the average European swallow is 5oz. and the average coconut is 1lbs., and a 5oz. bird can't carry a 1lbs. coconut. The bird flies so fast, that a slow shutter speed won't be able to capture the sight in focus, but the bird and it's coconut would actually be blurry. However, with a faster shutter speed, you will be able to capture the swallow in clarity, able to see that it is in fact carrying a coconut. Shutter speed starts at the stop 1, then goes to 1/2 and then doubles up, just like ISO. However, it doesn't double up for all of the numbers, particularly 3 in a row, then it jumps to a different number (i.e. 1/2, 1/4, 1/8, 1/15, 1/30, 1/60 etc.) The reason this happens is because it has been standardized on most cameras to have 1/3's of a stop for the different stops. (1/4 is 1/3 of a stop up from 1/2, and 1/8 is 2/3 of a stop up from 1/2, and 1/15 is one stop above 1/2.) Most camera models are different with the highest and lowest shutter speeds. Furthermore, these shutter speeds aren't just numbers made out of thin air. They are fractions of a second (1/2 is a half a second, and so on and so forth.) The lowest constant stop is 1, which leaves the shutter open for 1 second. When I say constant stop, I am referring to the custom shutter speed settings. There are two different settings, the first keeping the shutter open as long as you keep your finger on the shutter button (the button you press to actually take the picture). The last setting is called bulb, and it is similar to the last feature mentioned, but you don't need to hold the shutter button. When you press the shutter button once, the shutter remains open until the button is pressed a second time later. Using the method mentioned, you can create photos often referred to as light paintings, such as this photo.
You can also use this method to blur movement, like in this picture.
Now that we have established the basics of shutter speed, lets move on to Aperture.
Aperture
Aperture means "The diameter of such an opening, often expressed as an f-number." In photography, aperture is how wide or narrow the blades of the lens will open. Aperture is referred to as f-stop. The lower the f-stop, the wider the diameter that light enters through. A lower aperture number allows more light to enter the camera, while a higher aperture number allows less light to enter the lens. Aperture effects two things in a picture besides light allowed into a photo. Aperture effects the plane of focus, as well as Bokeh. Lets adress Bokeh first. Bokeh is a camera effect caused by light when it enters the camera lens. The light is stopped in a shape by the blades of the lens, which causes the effect bellow.
The effect is often seen in movies when the camera passes the sun. An interesting fact is that before a certain point, in movies, directors of cinematography did whatever they could to get rid of the bokeh. After a movie that I can't remember the name of used it effectively, it has been wanted and is sought after in both cinematography and photography. Currently, the new craze is to make your own bokeh that wouldn't be possible with a normal lens, such as a heart shaped bokeh like the one below.
This bokeh can be achieved easily without the use of photoshop, but I won't address how unless asked. Focus, unlike bokeh, is slightly more complicated. First of all, a smaller aperture number will make a narrower plane of focus than a larger aperture number.
Unfortunately I have run out of time, but part 2 will be up soon. Enjoy what there is!
*NOTE: I know the first three pictures aren't appearing. I'll correct this later.*
Attachments


Last edited:


")
