What's new
Photoshop Gurus Forum

Welcome to Photoshop Gurus forum. Register a free account today to become a member! It's completely free. Once signed in, you'll enjoy an ad-free experience and be able to participate on this site by adding your own topics and posts, as well as connect with other members through your own private inbox!

Replacing colour on texture


pson

New Member
Messages
4
Likes
0
Hi!

I have an image where I have large areas that look like this
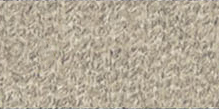
Untitled-1.png
that I want to match to other parts of the image that looks like this
Untitled-2.png

The first thought was to use the clone stamp but since the usable blue area is so tiny compared to the area I want to modify the pattern begin to either repeat itself or just look weird so I switched to the colour replacement tool but that just gave me an artificial colour.

So to Google I went and ended up here.

And after trying some solutions posted earlier, colour and multiply layer or Vibrance and Hue/Saturation adjustment layers, with disappointing results I have now more or less given up and come close to accept the subpar result with the clone tool.

But at the same time I think it should be possible to do and it's not the first time I run into an issue with changing colours so it would be fun to know how to at least come close to know how to do it.

So how would the pros at this place solve this?

And please have in mind that I'm a user borderlining the training wheels if that wasn't already clear with the post itself ;)
 

thebestcpu

Guru
Messages
2,989
Likes
2,750
I would check on the Content Aware Fill tool.
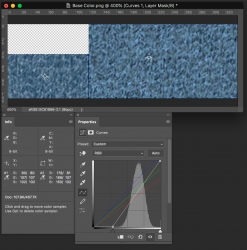
I put your two images side by side, selected the light sample and let the tool select from the blue sample on the left.
Thought it got pretty close.
John Wheeler

Screen Shot 2020-11-11 at 4.47.06 PM.png
 

pson

New Member
Messages
4
Likes
0
Thanks but forget to say that I tried that already and just as the clone tool it doesn't work that well when I use it on the larger area, the texture becomes weird. But maybe a little less weird than with the clone tool though so perhaps it will be the way I'll go if someone doesn't have any other ideas.
 

thebestcpu

Guru
Messages
2,989
Likes
2,750
OK well here is another approach.
Select the area you want to change and add a Curves Adjustment Layer (which applies the selection as a mask)
With the info panel open, place a color sampler tool in both the desired color area as well as the are you want to change
Now adjust the curves adjustment Layer one color at a time until the colors match on the info panel (I just move the white point of each color)
Here is the result I got
John Wheeler
ADDED EDIT - you may have particular requirements and you can always post your image or a sample which will allow forum members to better target their recommendations

Screen Shot 2020-11-11 at 5.42.16 PM.png
 

pson

New Member
Messages
4
Likes
0
Yes, that's excellent and exactly what I was after, thanks.
Even though I can replicate the outcome by looking at the image of the properties window I don't understand how you get there.

This function is completely new to me but you say you only move the white point of each colour and that confuses me while looking at the adobe help page. Because according to that it's the black points (H) you've moved for each colour and the white point (J) for RGB, or am I mixing things up?

When I play around with the different adjustments it seems that the only way to get to the right place is to first set the white point of the RBG cause with that at the wrong place everything else will never get right. But how do you know where to place that since the colour sampler is to no help? Or is it?

Feels like I'm missing something in you workflow, can you maybe add a few details?
 

pson

New Member
Messages
4
Likes
0
Much appreciated.
No rush though since I solved it this time thanks to your post but it's a thing that will be good to know how to do in the future.
 

JeffK

Guru
Messages
2,486
Likes
2,890
I don't know if this simplifies things or makes it more complicated - but I played with this a bit myself.

Created a document with the two swatches provided at top - beige and blue.
Then with the dropper tool, took a sample from the darker part of the blue sample.
The created a Color Fill layer, clipped it to the beige layer, and changed the blend mode to Color.
Adjusted that layer with Levels and Hue/Saturation Adjustment Layers.
This is the the result (I dragged the original blue swatch over the now new blue swatch):

blue beige texture edited combined.jpg

Here's what my layers look like:

1606176708002.png

I ended up just about where @thebestcpu did. Some differences may be the result of the low resolution.
Just a try on my part.

- Jeff
 

Top