What's new
Photoshop Gurus Forum

Welcome to Photoshop Gurus forum. Register a free account today to become a member! It's completely free. Once signed in, you'll enjoy an ad-free experience and be able to participate on this site by adding your own topics and posts, as well as connect with other members through your own private inbox!

Sketch - Black and White to Colour


Maris

Member
Messages
18
Likes
0
Good day,

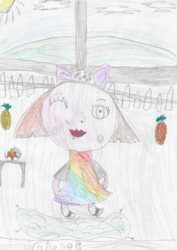
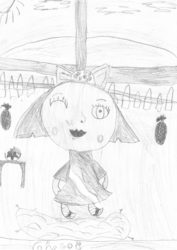
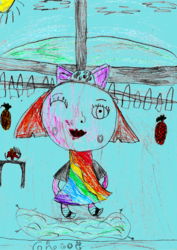
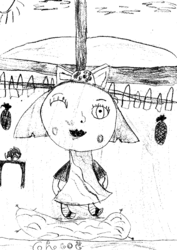
My first question, I am new to photoshop and need some help please. I work with children drawings, and they come in all shapes and sizes, I have a coloured hand sketch, that I made black and white, to clean it up and delete the white back ground.

Is there a way I can have the original coloured sketch come through on the new black and white sketch to basically change the colours back? I hope I am explaining this ok. Not sure if this can be done with layers, or what is the best way to do this.

Many thanks
Maris
 

JeffK

Guru
Messages
2,486
Likes
2,890
Do you have a sample original image you can show us?
Sometimes the solution for one image will not work with another....
 

nurgle

Well-Known Member
Messages
181
Likes
39
Hi, one method
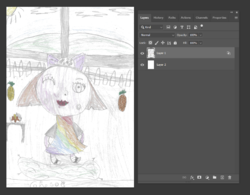
1. overlay color image in a layer above the B&W.
2. convert that color layer blending mode to Color.
3. adjust the Blend if slightly, so that anything near white in the color layer drops out. leaving only the densities just down from the highest to show their color.

regards, Sandy
 

Maris

Member
Messages
18
Likes
0
Please see attached, I am struggling.
I need to delete the white background, enhance the colours a bit. That is what I am trying to do.
I tried to get rid of then white with Layer styles, blending options, but it still leave a white back ground, see attached. I probably not doing it right. Not sure what is the easiest way to get this done?
Should I rather try making it black and white, then try and delete the white, will this be a better option?

I would like to print this on a shirt, so cant have a white back ground

Thank you very much for your time
Maris

Picture 2.png

Picture 2.png
 

Rich54

Guru
Messages
1,733
Likes
3,417
When you say it can't have a white background, does that mean you want a transparent background—wherever the white currently exists—so that the underlying T-shirt color shows through?
 

Rich54

Guru
Messages
1,733
Likes
3,417
When you say it can't have a white background, does that mean you want a transparent background—wherever the white currently exists—so that the underlying T-shirt color shows through?

I'm going to assume that this is what you want: a transparent background wherever there is presently white.
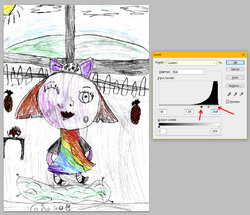
  • First, you need to greatly enhance the contrast of the image.
  • Use a Levels adjustment layer and move the black slider far to the right, then the white slider a bit to the left (where red arrows are pointing, below).
  • As an optional step, if you like, add a Vibrance adjustment layer and increase the saturation of the colors so that they jump out.
  • You should now have something like this:
Step1.jpg


  • Copy the entire image to a new layer using Stamp Visible (Shift+Ctrl+Alt+E).
  • Turn off the visibility of all the layers below this one.
  • On your top layer, activate the Magic Wand tool. Set the Tolerance to 20 and make sure the box labeled "contiguous" is un-checked.
  • Click the magic wand on an area of white. It will then select everything it sees as white. With that selection active, press the Delete key.
  • You are now left with the image where anything previously white is now transparent. To test this, create a new layer immediately below your transparency layer and fill that layer with any color. You should now see your drawing superimposed on this new background color—presumably the color of the T-shirt.
  • Save your final transparent image as a PNG file, which preserves the transparency. Then you're done.
  • Here's what mine looks like on a light blue background.
Step2.jpg
 

JeffK

Guru
Messages
2,486
Likes
2,890
@Rich54 gave an option.A s in all things Photoshop, there are several ways to accomplish the same task.

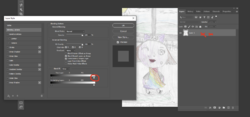
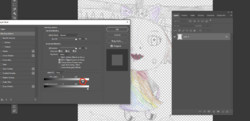
Staying with the color image, double click on the layer to open the Layer Styles dialog box:

1652406842817.png

Start moving the circles arrow (it's actually two connected triangles) to the left to start erasing the white:

1652407036581.png
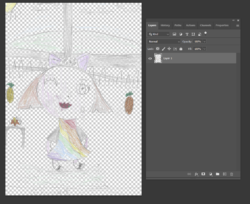
The checkerboard pattern you see is the transparent background.

If need be, you can split the arrow by holding down the ALT (Option on Mac) to split the arrow and make the transition smoother.

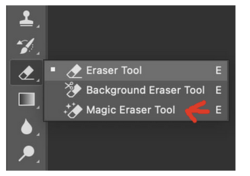
You can also use the magic eraser tool and click on the white - set the tolerance (in the top menu for the tool) to about 10:

1652407625624.png
1652407785275.png

Make sure you click on a pure white area:

1652407925997.png

Here's what the finished drawing looks like using the magic eraser with a white background under it to show what's been removed:

1652408357684.png

You can also change the tolerance based upon how the background is removed - more tolerance to remove more, less tolerance to hold the safety of the colored image.

You may also want to go with Rich's suggestion of increasing the saturation...
 

Maris

Member
Messages
18
Likes
0
Thank you all so much, I am going to give it a try now, and see if I can get it to work. I tried before with the blending option, but could not get a full transparent without losing my whole sketch. I will try again. Will keep you posted, thank you
 

Maris

Member
Messages
18
Likes
0
Jeff and Rich, thank you both, I have done both ways, and managed to get it right. Need to practice the skill a bit, but this is awesome. Please see attached the one I did. You wont know how this helps me.
May please ask another question,
I use this methods to delete other colours as well then right. If I just want to have an outline of the sketch for instance, would I delete one colour at a time. or is there a better method to delete all the colours and just keep the outlines?

Thank you
Maris

Chloe 2 Blue  1 PNG.png
 

Rich54

Guru
Messages
1,733
Likes
3,417
I use this methods to delete other colours as well then right. If I just want to have an outline of the sketch for instance, would I delete one colour at a time. or is there a better method to delete all the colours and just keep the outlines?

My method will mostly work to delete all the colors.
  • When I described my method above, everything is identical until you get to the Magic Wand.
  • At this point, instead of clicking on an area of white with the magic wand, click on an area of black.
  • The magic wand will highlight everything it sees as black. You want to keep the black, so you must now invert the selection (go to Select>Inverse).
  • Press the Delete key and everything except black will be deleted.
  • As a final step, create a Threshold adjustment layer above all other layers. Play with the slider in the Threshold setting to fine-tune your results.
You may need to experiment with the Tolerance setting of the magic wand. A low tolerance number means that the magic wand will only select what it thinks is black within a narrow tonal range. A higher tolerance number means that it will be an more expansive selection that includes shades of dark gray. Given the uneven line quality of the drawing, this setting will be tricky.

Another problem is that the young artist has shaded-in several areas with black. Any Photoshop technique will have a hard time distinguishing a black outline vs. black shading. Here's what I get using my method. Clearly not perfect.


1652466406246.png
 

Maris

Member
Messages
18
Likes
0
My method will mostly work to delete all the colors.
  • When I described my method above, everything is identical until you get to the Magic Wand.
  • At this point, instead of clicking on an area of white with the magic wand, click on an area of black.
  • The magic wand will highlight everything it sees as black. You want to keep the black, so you must now invert the selection (go to Select>Inverse).
  • Press the Delete key and everything except black will be deleted.
  • As a final step, create a Threshold adjustment layer above all other layers. Play with the slider in the Threshold setting to fine-tune your results.
You may need to experiment with the Tolerance setting of the magic wand. A low tolerance number means that the magic wand will only select what it thinks is black within a narrow tonal range. A higher tolerance number means that it will be an more expansive selection that includes shades of dark gray. Given the uneven line quality of the drawing, this setting will be tricky.

Another problem is that the young artist has shaded-in several areas with black. Any Photoshop technique will have a hard time distinguishing a black outline vs. black shading. Here's what I get using my method. Clearly not perfect.


View attachment 129555
Thank you Rich, I will do as you suggest and see how I go, I suppose the last bit I can just use the eraser. when I have deleted most of the colours with your method
Maris
 

JeffK

Guru
Messages
2,486
Likes
2,890
As @Rich54 mentioned, because of the black "shading" in this particular image, it's really tough just to get outlines. May be that this sketch is the only one that will be problematic for you.
I played with this although I can't beat Rich's experience. But here's a method I tried:

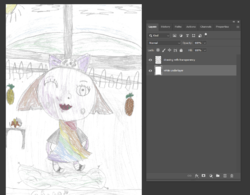
As in the first instructions, remove the white background you can place a separate white background underneath like I did just so you can see what you're doing:

1652623156339.png
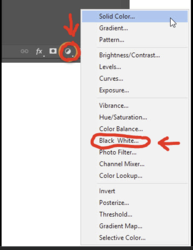
Now go down to the bottom of the layers panel and click on the half-moon symbol to bring up the adjustment layers -
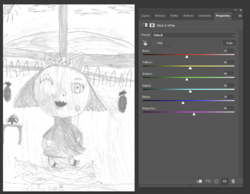
Then click on the black and white option:

1652623506740.png

You'll get a new tab dialog box like this:
1652623600464.png

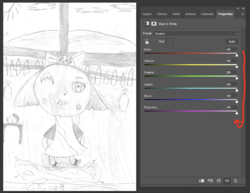
Now pull all those sliders to the right:

1652623739892.png

So you've pretty much got an outline - but to strengthen the lines, go back to the half-moon icon at the bottom and now
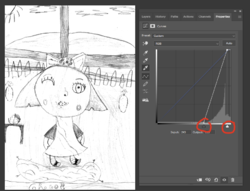
choose a curves adjustment layer. Now you'll get a curves adjustment tab dialog. At the bottom of the graph,
pull the left slider to the right to increase the black lines, and pull the right slider slightly in to get rid of the gray-ish
pencil marks. You can play with these as you wish. You'll end up here:

1652624095042.png

The spotty lips are a little weird but you can mask or erase those out.

Each of your images may have to be treated a bit differently from the beginnin.

BTW - I always wondered why the left eye was missing and thought maybe the artist was interrupted. But just realized, the character is winking at us! :cheesygrin:

Good luck with this - come back with any additonal questions. It's a fun project!

- Jeff
 

Maris

Member
Messages
18
Likes
0
As @Rich54 mentioned, because of the black "shading" in this particular image, it's really tough just to get outlines. May be that this sketch is the only one that will be problematic for you.
I played with this although I can't beat Rich's experience. But here's a method I tried:

As in the first instructions, remove the white background you can place a separate white background underneath like I did just so you can see what you're doing:

View attachment 129575
Now go down to the bottom of the layers panel and click on the half-moon symbol to bring up the adjustment layers -
Then click on the black and white option:

View attachment 129577

You'll get a new tab dialog box like this:
View attachment 129578

Now pull all those sliders to the right:

View attachment 129579

So you've pretty much got an outline - but to strengthen the lines, go back to the half-moon icon at the bottom and now
choose a curves adjustment layer. Now you'll get a curves adjustment tab dialog. At the bottom of the graph,
pull the left slider to the right to increase the black lines, and pull the right slider slightly in to get rid of the gray-ish
pencil marks. You can play with these as you wish. You'll end up here:

View attachment 129580

The spotty lips are a little weird but you can mask or erase those out.

Each of your images may have to be treated a bit differently from the beginning.

BTW - I always wondered why the left eye was missing and thought maybe the artist was interrupted. But just realized, the character is winking at us! :cheesygrin:

Good luck with this - come back with any additional questions. It's a fun project!

- Jeff
Thank you Jeff, I have been practicing, I am astonished with what can be done in photoshop every time you guys do something. And yes each drawing will be different I am working and learning with this one, as it is a bit messy. I need to see which way will be better for the print. Thank you for the advice and support on this.
 

Maris

Member
Messages
18
Likes
0
Thank you Rich, I will do as you suggest and see how I go, I suppose the last bit I can just use the eraser. when I have deleted most of the colours with your method
Maris
Yes I understand, I will definitely try and see how I go. This is a bit of a difficult one for me, because of the background colouring. Thank you once again fort he time spent .I am using these methods on some of my other drawings.
 

IamSam

Administrator
Staff member
Administrator
Messages
22,722
Likes
13,258
Did you vectorize it in Photoshop?
Not vectorized since I used the Brush Tool to stroke paths. A stroked path would only contain rastor content.

can you please help me with the steps.
Sure.

Open the image you wish to trace.
Create a new layer above the image layer.

Choose your Brush Tool.
Make your brush 100% opacity, flow, and hardness.
Choose black as your foreground color.
Select the brush size for the eventual stroke.

Choose your Pen Tool.
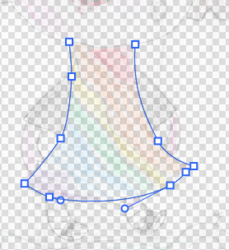
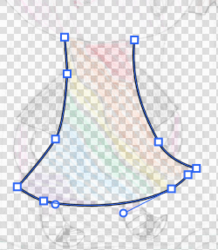
Create a path.
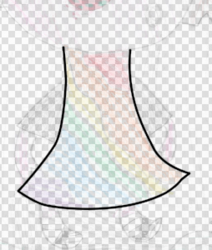
Screen Shot 2022-05-16 at 10.14.39 AM.png

While the path is selected, right click and choose,"Stroke Path"
From the stroke path window choose "Brush" and deselect "Simulate Pressure"
Screen Shot 2022-05-16 at 10.09.30 AM.png

Hit OK. This will add the stroke.
Screen Shot 2022-05-16 at 10.05.16 AM.png

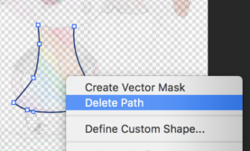
With the Pen Tool, hit and hold the command/control key and re-select the path by clicking on it.
Right click and choose, "delete path"
Note: You can save all the paths, you will just have to manually create new path layers for each in the "Paths" Panel, otherwise you will have one long continued path.
Screen Shot 2022-05-16 at 10.16.44 AM.png
Screen Shot 2022-05-16 at 10.14.12 AM.png

Repeat until you have stroked the entire drawing.
 

Maris

Member
Messages
18
Likes
0
Not vectorized since I used the Brush Tool to stroke paths. A stroked path would only contain rastor content.


Sure.

Open the image you wish to trace.
Create a new layer above the image layer.

Choose your Brush Tool.
Make your brush 100% opacity, flow, and hardness.
Choose black as your foreground color.
Select the brush size for the eventual stroke.

Choose your Pen Tool.
Create a path.
View attachment 129611

While the path is selected, right click and choose,"Stroke Path"
From the stroke path window choose "Brush" and deselect "Simulate Pressure"
View attachment 129609

Hit OK. This will add the stroke.
View attachment 129610

With the Pen Tool, hit and hold the command/control key and re-select the path by clicking on it.
Right click and choose, "delete path"
Note: You can save all the paths, you will just have to manually create new path layers for each in the "Paths" Panel, otherwise you will have one long continued path.
View attachment 129612
View attachment 129613

Repeat until you have stroked the entire drawing.
Thank you Sam, the pen tool will be a new learning curve for me, but I love it. I just cant seem to get my new created layer to show what is underneath it, to trace it. First I have my image layer, then I create new layer, which will now be on top, but it only shows transparent background, even if I change opacity? I am doing something wrong. Everything else I mange to do, but did it on the original, to see I can do it.
 

Top