What's new
Photoshop Gurus Forum

Welcome to Photoshop Gurus forum. Register a free account today to become a member! It's completely free. Once signed in, you'll enjoy an ad-free experience and be able to participate on this site by adding your own topics and posts, as well as connect with other members through your own private inbox!

Instructions on how to replace a solid color with a pattern


What the Heck

Well-Known Member
Messages
46
Likes
3
Hello, Everyone. Thanks for allowing me to be a part of this Forum. I haven't been here in a while, but you are always so helpful. Thanks in advance for your expertise and assistance.

I am a PS novice but am learning quickly and not afraid of hard work. For this question, it would probably be best for someone to post a link to a vid or instructions online.

Below is the logo for my company.

BBBBB albert shamrock.jpg

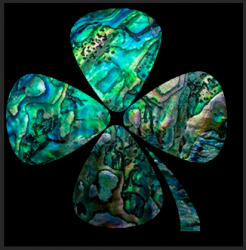
I want to replace the entire green Shamrock, including the stem, with photos of mother-of-pearl, as pictured below. I assume this is fairly easily done, by sampling the m-o-p and then plunking it into a layer, but at this point that is still above my PS skillset.

4 mother of pearl.jpg
Again, thank you in advance for your help.

WTH
 

What the Heck

Well-Known Member
Messages
46
Likes
3
Sam, wow! That's exactly what I wanted.

I'm going to bed but will look for a response in the morn. Can't thank you enough.

WTH
 

IamSam

Administrator
Staff member
Administrator
Messages
22,721
Likes
13,258
You're very welcome. If you have any further questions, don't hesitate to ask.
 

What the Heck

Well-Known Member
Messages
46
Likes
3
Sam, hi again. I appreciate your concern about the quality of the image, pixels, resolution, etc., but this is not an issue for us. Time is. You see, the image of the Shamrock with the mother-of-pearl is not a photo that is going to be posted on our website or seen by the public. It is only going to be overlaid onto the image of the pick and then sent to the inlay house as a guide or mockup for what we're thinking of. They just want to see the general design we have in mind so that they can work with the materials and begin creating some samples for me to look at. Does this make sense? So the image above is more than adequate for that purpose.

I did have one problem. I took the image of the m-o-p Shamrock and opened it in PS. Then I tried the standard way to remove the black background and make it transparent, so that when I lay it on top of the pick face the background won't show. When I did this using the magic wand and/or the quick select feature, it removed most of the stem and some spots inside the petals.

Below is one I did a while back with a transparent background already in place. I tried to do the mask thing, but I couldn't pull it off.

So to reiterate, the image above is perfect for my purposes except I can't figure out how to remove the black background and make it transparent.

Thanks Once Again,
WTH

optimized for vistaprint shamrock.jpg
 

polarwoc

Guru
Messages
1,576
Likes
1,421
Then I tried the standard way to remove the black background and make it transparent, so that when I lay it on top of the pick face the background won't show. When I did this using the magic wand and/or the quick select feature, it removed most of the stem and some spots inside the petals.
When I see your image, it seems to me that you have managed to make a rough selection on the Shamrock image, selecting the petals and stem and deleting the black background. I must note that the selection is rough, but you indicated that this is good enough for your purpose.
At this stage, if you expect a transparent background, you should save the image as a PNG rather than as a JPG.

In the methods Sam explained above (layer mask or clipping mask), you are not required to remove the black background. It is sufficient if you are able to make a selection of the 4 petals and the stem. Please ask if I am unclear.
 

IamSam

Administrator
Staff member
Administrator
Messages
22,721
Likes
13,258
I did have one problem. I took the image of the m-o-p Shamrock and opened it in PS. Then I tried the standard way to remove the black background and make it transparent, so that when I lay it on top of the pick face the background won't show. When I did this using the magic wand and/or the quick select feature, it removed most of the stem and some spots inside the petals.
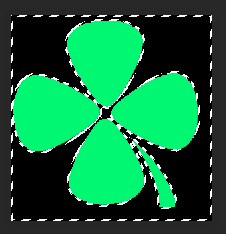
You see the secret of using Photoshop is in knowing when and how to use it's many different methods of making selections. The Quick Selection Tool is almost never the the right way to make decent and accurate selections. I used channels in this case because of the green color of the shamrock image. Bright green on a black background would be almost too easy!!!

I first opened the shamrock image and duplicated it using Cmd/Cntrl + J.
Turn off the original layer and select/highlight the duplicated layer.
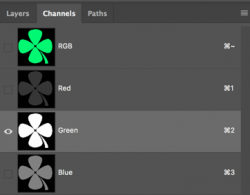
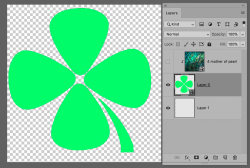
Go to the channels panel and select the green channel layer. In the bottom of the channels panel there is a dotted circle Icon, click this to make a selection.
In the channels panel, click back on the RGB layer. Go back to your layers panel.

(note: Black and white is the goal when making selections with channels, in this case, the green channel leaves a perfect black and white example from which to make a selection)
Screen Shot 2020-06-13 at 7.58.57 AM.png
Screen Shot 2020-06-13 at 8.03.31 AM.png

Note that the selection is of the green area and not the black. You must invert the selection with Shift + Cmd/Cntrl + I

Screen Shot 2020-06-13 at 8.06.04 AM.png

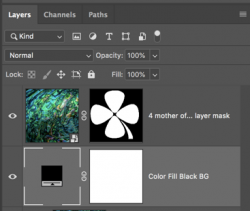
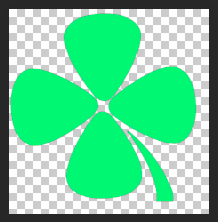
At this point you can either add a layer mask or you can delete the black background. You can also use the selection to create the layer mask for the second technique I describe above.

Screen Shot 2020-06-13 at 8.12.00 AM.png

Normally I never delete.....it's destructive. But since I made a duplicate layer of the original image layer, I'm not worried about deleting the BG in this case.......and it was (what I thought) easier to explain. It's hard to tell what people already know about Ps techniques.

Another excellent method for making a selection in this case would be in using Color Range.
 

What the Heck

Well-Known Member
Messages
46
Likes
3
When I see your image, it seems to me that you have managed to make a rough selection on the Shamrock image, selecting the petals and stem and deleting the black background. I must note that the selection is rough, but you indicated that this is good enough for your purpose.
At this stage, if you expect a transparent background, you should save the image as a PNG rather than as a JPG.

In the methods Sam explained above (layer mask or clipping mask), you are not required to remove the black background. It is sufficient if you are able to make a selection of the 4 petals and the stem. Please ask if I am unclear.

Polar, thanks for explaining. I'm clearly a novice and learning -- slowly, painfully -- as I go. As a sole proprietory, I wear so many hats, so sweat equity, at least so far, has allowed us to be profitable. I'm also grateful that we have taken no loans or advances from retirement or anything like that, so we're in a good, strong cash situation.

To answer your post, I looked at some masking vids on YT last night, but I'm still left with my main concern. How do I take the image above, with a transparent background, and add the mother-of-pearl design to replace the lime green. Perhaps the better question is: How do I take the Shamrock with the mother-of-pearl and black background and remove that black background and make it transparent.

I'm not embarrassed by my lack of knowledge; I'm only concerned that it's frustrating on your end to deal with someone at my low skill level. I think part of it for me is also my learning style and aptitude. I'm an English professor, so I'm very text-driven, and I suspect I have trouble with understanding spatial and image-driven learning, if that makes sense.

Thanks So Much,
WTH
 

What the Heck

Well-Known Member
Messages
46
Likes
3
You see the secret of using Photoshop is in knowing when and how to use it's many different methods of making selections. The Quick Selection Tool is almost never the the right way to make decent and accurate selections. I used channels in this case because of the green color of the shamrock image. Bright green on a black background would be almost too easy!!!

I first opened the shamrock image and duplicated it using Cmd/Cntrl + J.
Turn off the original layer and select/highlight the duplicated layer.
Go to the channels panel and select the green channel layer. In the bottom of the channels panel there is a dotted circle Icon, click this to make a selection.
In the channels panel, click back on the RGB layer. Go back to your layers panel.

(note: Black and white is the goal when making selections with channels, in this case, the green channel leaves a perfect black and white example from which to make a selection)
View attachment 113075
View attachment 113076

Note that the selection is of the green area and not the black. You must invert the selection with Shift + Cmd/Cntrl + I

View attachment 113077

At this point you can either add a layer mask or you can delete the black background. You can also use the selection to create the layer mask for the second technique I describe above.

View attachment 113078

Normally I never delete.....it's destructive. But since I made a duplicate layer of the original image layer, I'm not worried about deleting the BG in this case.......and it was (what I thought) easier to explain. It's hard to tell what people already know about Ps techniques.

Another excellent method for making a selection in this case would be in using Color Range.
Sam, thanks for all this valuable info.

Excuse my lack of knowledge, but is that an easy way for me to take the image you created with the mother of pearl design on the Shamrock that looks so cool, and merely change the black background to transparent?

Rather than just doing it for me, I'd prefer to learn on my own. And videos are fine too, for learning. I get a little frantic because I have so many things I do for the business. Right now, in the middle of this COVID thing, our orders have exploded. There must be a million guitar players sitting at home with nothing to do. A good problem to have, but it creates a real time crunch.

Thanks Again, Sam,
WTH
 

polarwoc

Guru
Messages
1,576
Likes
1,421
Rather than just doing it for me, I'd prefer to learn on my own.
That is a great attitude to have. A necessary one to learn PS or anything.
I'm only concerned that it's frustrating on your end to deal with someone at my low skill level. I think part of it for me is also my learning style and aptitude.
Please do not worry about us. We love to assist anyone interested in learning PS.

If you find Post 8 by Sam difficult to follow please let us know what you were unable to follow and we can guide you from there.
 

thebestcpu

Guru
Messages
2,988
Likes
2,747
I agree with @IamSam and @polarwoc
You have a great attitude and forum members are more than willing to help.

I will second IamSam's comments about many ways of getting things done and just choosing the one that appears easiest given the situation. Here is an similar approach yet one that creates the transparency without a selection. With your time crunch with your business and to minimze learning curve, IamSam's approach would be the way to go. When you have time to learn more, and have more Photoshop tools in your toolbox from which to choose, you could consider the approach given below.

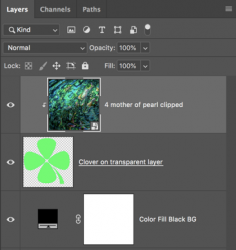
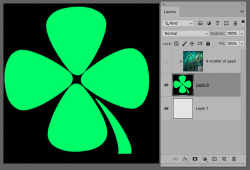
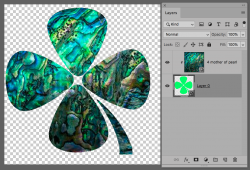
First Start with the Layer Stack as IamSam indicated with a Clipping Mask with the Mother of Pearl image on top. Turn off the visibility of that image and add a blank Layer at the bottom of the stack as shown below:
Screen Shot 2020-06-13 at 2.12.12 PM.png


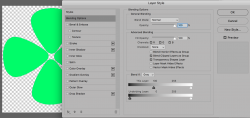
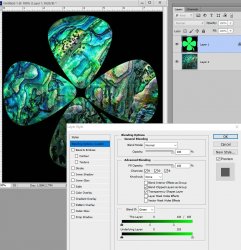
The double click on the right side of the Layer Panel to open Layer Styles and slide the top Blend If slider to the right until the black disappears to transparency and you have a good crisp boundary around the cloverleaf. That was around 100 yet is fun to play with the slider to see what happens:
Screen Shot 2020-06-13 at 2.15.36 PM.png


Close Layer Styles (the Layer Panel will show a symbol that shows you have a Layer Style applied, and then right click on the right side of this Layer in the Layer Panel and choose turning this image into a Smart Object. The Thumbnail in the Layer Panel will change to show a small symbol showing it that is a Smart Object:

Screen Shot 2020-06-13 at 2.17.06 PM.png


For the next step, I just turned on the visibility of the mother of pearl Layer deleted the Transparency Layer 1 (that last step is optional yet with the transparency incorporated into the Smart Object Layer 1 is not longer needed. Your end up with the result you desire and you just need to save in a format (e.g. PNG) to save the image with the transparency intact:

Screen Shot 2020-06-13 at 2.17.37 PM.png

Done
Hope this is of some help when you have more time to go up the Photoshop learning curve.
John Wheeler
 

What the Heck

Well-Known Member
Messages
46
Likes
3
You're a naughty boy, John; I REALLY wanted to do this myself. LOL.

Okay, I will accept your largess and patience with me. The instructions are fab. I'm going to print them out and save them.

I must say, I have belonged to several dozen forums over the years and you folks are right up there with some of the friendliest and most generous people I've ever encountered. Thanks for taking pity on me.

And as for you, John -- don't ever do that again!

Have a great weekend, all. wth
 

thebestcpu

Guru
Messages
2,988
Likes
2,747
....... The instructions are fab. I'm going to print them out and save them. I must say, I have belonged to several dozen forums over the years and you folks are right up there with some of the friendliest and most generous people I've ever encountered. Thanks for taking pity on me.......
Have a great weekend, all. wth

Your welcome WTH. I too have experienced many forums and definitely agree with your assessment about Photoshop Gurus forums.
You enjoy your weekend too
John Wheeler
 

Top