What's new
Photoshop Gurus Forum

Welcome to Photoshop Gurus forum. Register a free account today to become a member! It's completely free. Once signed in, you'll enjoy an ad-free experience and be able to participate on this site by adding your own topics and posts, as well as connect with other members through your own private inbox!

Grass Text Shadow, So Confused!


vevankova

Member
Messages
10
Likes
0
I'm teaching a graphic design class and to get the students ready to do design work I am having them do the grass tutorial that you can find online, it was used a lot under CS3. We are using CS5.

Okay so on this tutorial we get to the Step 16, using Macs btw, and we are stumped. Putting a shadow, I've tried this myself, thing is the shadow needs to have the same bumpy edge that the grass image does. Anywho, if anyone is familiar with this tutorial could you help me out?

Thanks!
 
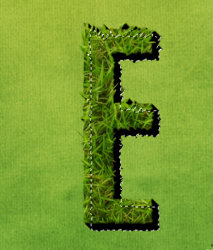
Is this what you mean
Capture.PNG

If so mac translation is command and click the layer preview button on the grass layer

cntrl.PNG

This will select the grass used in that layer
Press command and new layer icon this will create a new layer under neath the grass layer

Use the paintbucket tool and fill with black on the new layer inside the selection of marching ants

This will effectively give you a Black E shape

select the move tool and using the arrow keys on your keyboard nudge the black letter E down and across slightly to give the illusion of Depth
 
Hi, still not work, when I try to feel the copied layer of grass, the paint bucket is filling up small bits of areas and not the whole thing.

So I'm still confused.
 
Very helpful, Hoogle!

Cheers - Amanda
mad2.gif
 
How big is your psd?
2 options.
1)"Save as" and rename it, add an underscore_small or something. Then halve or more the size of it. Then load it.
2) you have enough posts for a link, so you can load it to a file sharing site then post the link.
 
Merge all your letters to a single layer by hiding everything else and hold Cntrl+shift+option then press E. After you have done this, control click the new layer then create a new layer under merged layer and fill with black. Then apply a small amount of blur and set your desired opacity and location. Should look something like this when finished.

1.jpg
 
I would revert it back to the behinning of step 16 do that step as explained in my first post command and click the layer and either go to edit> fill and select black. or select a black brush and paint over it. Dont worryt it will only paint in the marching ants selection. And see if that solves the issue
 
Hi,

Yes we did try this but if you will notice your shadow has a smooth edged and it doesn't have the jagged edge of the letters like the grass, that's the problem. I'll post another tutorial which actually shows you the jagged edge of the grass shadow I'm referring to.

So here is Step 16, notice the jagged edge in the shadow.

[h=2]"Step 16[/h] So this was all just experimental, and it kinda looks OK, but obviously has a long way to go. Now we’ll add some shadow. For that we’ll use a technique that I demonstrated in a previous tutorial, Using Light and Shade to Bring Text to Life

The idea is to make a three dimensional look. So Ctrl-click the grass layer and then in a new layer below, fill it with black. Then press the down arrow once and the right arrow once and fill it again, then repeat over and over until you get an effect like that shown. I think that was about 15 steps of filling."


16.jpg
 
Ok selext all your individual letter layers by clicking the 1st 1 holding down shift key and then clicking the last 1 that should select the h lettered layers press control + alt +E this will merge them all to there own new layer and keep the original layers.

add a levels adjust ment layer or go to image >adjustment > levels and darken the merged layer and move it below the individual text letters and you will get something like this.
Capture.PNG


Here is the PSD however I have merged all the lower layes so I dint have to upload a 29 MB psd instead it is now 6 MBS
View attachment Earth_Graphic_Smallest merged.psd
 
Vevankova, Copy merge the letters so you will only have to do the next part once. Just turn off the separate letters for now. You don't need them. Or if you are more comfortable, do it one letter at a time. To copy-merge, se;ect all the letter layers, hold down ctl+alt and press the "e" key.

Next: Ctl click on the thumbnail, the square with the representation of the E. Make sure you see the marching ants (selection border) around the E. Create that layer below, be sure it is selected, then press alt + backspace to fill the selection.

Earth_Graphic_Smallest.jpg

it will work.
 
Last edited:

Back
Top