What's new
Photoshop Gurus Forum

Welcome to Photoshop Gurus forum. Register a free account today to become a member! It's completely free. Once signed in, you'll enjoy an ad-free experience and be able to participate on this site by adding your own topics and posts, as well as connect with other members through your own private inbox!

How do you create this style?


Prestonxx

New Member
Messages
3
Likes
1
Hi everyone,

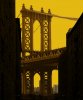
I've been trying everything I can think of to create the minimalist / art deco effect of the bridge in the image below but nothing I use seems to get the same result. I've used 'cut out' and other effects in the Filter Gallery on a photo of the same subject but none seem to simplify the image whilst keeping the clean lines and bold appearance. I don't know if it's possible or if I'd need to draw it from scratch as a vector?. Any help or suggestions of where to start would be massively appreciated as I've completely run out of ideas.

Thanks!


Bridge.jpg
 
It looks like this image is a composite with 2 layers.
One for the dark buildings in the foreground and one for the bridge and sky in the background.

My impression is that the original composite is done in a much smaller size, and enlarged to the final posted size. (Fuzzy edges).

I tried to replicate this look.

1. To both my images I added Gaussian blur. (1 pixel)
2. Treatment with TOPAZ Clean filters.
3. Added noise 2pixel.
4. Curves for reducing contrast.
5. Hue /Saturation for desaturating colors.
6. I reduced the size of the final composite to 50% . Then enlarged it back to 200 %.

Brooklyn-Bridge chrisdesign.jpg
 
Gedstar / Chrisdesign - thanks very much for taking the time to reply, I really appreciate it. I'll give both methods a try and see if I can replicate what you've done.

It's not something I've tried before so I've found it hard going but again I really am grateful for the suggestions.

Thanks again,

All the best.
 
@Prestonxx

Here's how I achieved my result
Made a selection of the bridge and copied it to a new layer, then applied a Threshold Adjustment layer with clipping mask
BridgeThreshold.jpg

Then I added a Color Fill adjustment layer again with clipping mask and set the Blend Mode to Lighten
BridgeFillColor.jpg

Next made a selection of the building, copied it to a new layer and again applied Threshold Adjustment with clipping mask
BuildingThreshold.jpg

To this I also applied Color Fill layer with clipping mask this time I set the Blend Mode to Darken
BuildingFillColor.jpg

After that i isolated the background and added a Color Fill Adjustment layer, there was some further work done on the bridge little bit of painting etc

Hope this helps

Regards
Ged
 
Last edited:
If the OP is still around and is interested in the approach I used to get the attached version, I'll be more than happy to write it up.

Tom M
 

Attachments

  • 124325-acr0-ps02a_sRGB_16bpc-crop-01.jpg
    124325-acr0-ps02a_sRGB_16bpc-crop-01.jpg
    1.6 MB · Views: 3
Thanks for all the replies, they're really helpful and have given some new methods I hadn't considered previously.

Again it's much appreciated.
 
Thanks for the kind words in your Private Message, Preston. I appreciate your concerns, but we keep all tutorials in the forum so that everyone can learn from them, so that they are indexed by the search engines, and so that anyone searching for the topic in the future will be able to see what has been discussed.

Anyway, we are in the middle of the holidays here, so I'll try to write up the description tomorrow.

Best regards,

Tom M
 
Here's the approach I used:

1) The example you posted was very low resolution and had absolutely horrible JPG artifacts, so my first chore was to look for a similar shot, but of much higher quality.


00-orig.jpg

2) Next, I created a mask for just the sky.

01-mask_for_sky.jpg

3) Then, starting with the mask for the sky, I created a mask for the bridge.

02-mask_for_bridge.jpg

4) Finally, I created a mask for the buildings.

03-mask_for_buildings.jpg


Note - I used several different techniques to create each of the above masks. If you want the final result to look good, these masks must be done correctly and be of high quality. Discussing the masking techniques require a whole separate tutorial, but fortunately, there are *many* tutorials on masking available on the web. (PS - after posting this tutorial, I realized that I made some very small changes to the above masks, correcting stray pixels, feathering the edge of the masks at the bottom of the bridge, etc. This probably wouldn't even be noticed, but I thought I would just mention it.)

5) With the above masks in hand, using nothing more than color adjustment layers and levels adjustment layers, I could then selectively color and adjust the tonality of each of the areas in the image.

04-layer_stack.jpg

6) I wasn't happy with the highlights that were still left on places like the windows, the fire escape on the building to the right, etc. I fixed these highlights by a combination of cloning and patching either using the tool itself, or setting the layer blend mode to "darken" mode. The 3 major steps in the evolution of the image can be seen in the attached animated GIF.

05-124325-acr0-ps01c_sRGB_16bpc-FOR_TUT-partial_crop-for_GIF.gif

7) At this point, I realized that I had forgotten to correct the slight perspective distortion in the original before I made any other changes, and there still were some bright areas to be dealt with (eg, the vertical cables hanging down from the main bridge cables), so I did these two things as my final step. The result is attached below.


HTH. If you have any questions, don't hesitate to ask.

Cheers,

Tom M
 

Attachments

  • 06-Final_result-124325-acr0-ps02a_sRGB_16bpc-crop.jpg
    06-Final_result-124325-acr0-ps02a_sRGB_16bpc-crop.jpg
    677.6 KB · Views: 1

Back
Top