Good advice Sam.
I would also like to add something on this subject, that may also be of interest/help in this matter.
Concerning patterns...
Pattern fills can also be done "old school" too imagemaker.
This is especially useful if you have a small pattern image that isn't large enough to fill your larger background, and in particular, one that is seamless -- i.e. all sides are continuations of each other -- so a small image can fill a larger space without any lines/seams showing.
To do this, open the pattern in PS.
Then under the EDIT menu, choose DEFINE PATTERN. Give the pattern any name you want and press OK.
(
by-the-way, your pattern can be ANYTHING, even a photo. And there's not limit to the size.
As well, you can also create custom vector shapes this way too. Below the "Define Pattern" it says "Define Shape".)
Open or switch to your much larger document/image, and choose the PAINT BUCKET tool from the tools palette (
shortcut is SHIFT+G. Watch the tool palette for the paint bucket to show up. There are 3 tools in that submenu. )
Now at the top left side of the program window is a menu. By default it should say FOREGROUND. Change that to be PATTERN. Then beside that menu is a small preview window. Click the arrow beside that to open it, and when you do, choose the patten you just saved to there, by double-clicking on it.
Now simply click the Paint Bucket tool anywhere in your canvas/image to fill it with the pattern.
If the patten is not seamless, you'll know right away from the lines/seams you'll see.
NOTE: Applying your pattern in this way is now outdated. I simply wanted to show you that Photoshop has more than one way to do things, AND, that there are secrets about PS that are still in the code from the old days.
 WHAT SAM MENTIONED: But there's a quicker/simpler method now
 and it's within the
Layer Filters Menu found at the bottom of the Layers Palette. The "Pattern" filter will fill your layer with the pattern of your choice. And if you create a selection, it will add a layer mask to the layer so that the pattern only appears in the selection you created.
Another cool reason to use this newer method is that, if you were to rezise your document/layer, the pattern image will rescale and tile to fit the new size perfectly.
GURUS TIP: I don't if this is still well known or not but...( i posted this info in 2003 in this forum (
https://www.photoshopgurus.com/forum/archive/index.php/t-589.html ) )
When using the Clouds filter, and a few of the other PS native filters to create textures, you'll find that if you create your textures using a document size whose proportions are squared, your pattern will tile seamlessly (98% of the time). But the sizes that this works with are very specific:
2x2
4x4
8x8
16x16
32x32
64x64
128x128
256x256
512x512
1024x1024
etc...
See the pattern?  I don't recall exactly WHY only this number sequence works, it's been a long time since this was discovered. But i do know that this number chain is computer based. That might be the reason it works.
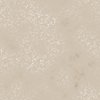
I created this attached pattern using the clouds filter and then aplying the Colored Pencil filter to it. Keep in mind that not all FX filters will leave your clouds pattern looking seamless. In fact most will ruin the seamless effect. You have to be selective and experiment. Small doses may be useable with certain filters and still leave the seamless effect intact.
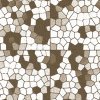
The 2nd image here was created using Clouds (hold the ALT/OPTION key down before using the filter to create a more high contrast clouds effect), then Difference Clouds repeatedly, about 4-5 times; until i liked the patter i saw.
I applied Gallery FX filters to the clouds - Reticulation plus Stained Glass. Reticulation on top. Now this is an instance when i KNEW that my seamless effect would be lost. But that was OK because i wanted to create a floor tile pattern. How did i get the line cross in the middle? Simple... under the FILTER menu choose OTHER, then OFFSET. Offset the image by half its size in both directions.
(
this by-the-way is how you can check your image to see whether it's lost it's seamlessness by using filters on it ) NOTE: i shrunk these images down by half for the forum so the edges may have gotten messed up from that.


Hope this was interesting and helpful for someone.
If anyone has questions, please ask. And let me know if i screwed anything up too. It's been a long while since i gave a tute.

Have fun, and experiment.
Mark (aka theKeeper)...