
Photoshop Gurus Forum
Welcome to Photoshop Gurus forum. Register a free account today to become a member! It's completely free. Once signed in, you'll enjoy an ad-free experience and be able to participate on this site by adding your own topics and posts, as well as connect with other members through your own private inbox!
You are using an out of date browser. It may not display this or other websites correctly.
You should upgrade or use an alternative browser.
You should upgrade or use an alternative browser.
How to make a texturized image with distressed look
- Thread starter LCN
- Start date

gedstar
Guru
- Messages
- 4,362
- Likes
- 4,530
Hi and welcome to PSG
It's really hard to say what effect where applied to the images, I could be completely wrong here but the first image looks like it has some kinda negative effect applied and maybe a grunge texture added, the second looks like maybe another grunge texture was used.
Maybe someone else will come along to shed some light on it
- Messages
- 4,273
- Likes
- 6,334
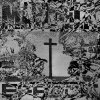
1. The effect you see is called 'solarization', a very 'old school' technique that had been achieved by experimenting in the 'darkroom', while developing a print. Must have been back in 1960.
During this process you could switch on the light for a few seconds, then switch it off again and watch the solarisation effect to appear.
When the desired effect was visually ok for you, put the print into the stop bath and after that in the fixer bath. After another few minutes you rinse the print in flowing water.
Only now was the time to switch on the light and hopefully admire your work. The typical effect is a combination of negative and positive elements in the same image.
2. Your posted image shows this solarization effect, but only if you invert the image with Photoshop.
The pattern you see must be from a old printed brochure or a old book. The typical screen dots are visible from those old printing machines.
That being said, i'll post the inverted image. Maybe later I'll give it a try to do it in PS.
Or maybe another member of the forum will try it.
+.jpg")
During this process you could switch on the light for a few seconds, then switch it off again and watch the solarisation effect to appear.
When the desired effect was visually ok for you, put the print into the stop bath and after that in the fixer bath. After another few minutes you rinse the print in flowing water.
Only now was the time to switch on the light and hopefully admire your work. The typical effect is a combination of negative and positive elements in the same image.
2. Your posted image shows this solarization effect, but only if you invert the image with Photoshop.
The pattern you see must be from a old printed brochure or a old book. The typical screen dots are visible from those old printing machines.
That being said, i'll post the inverted image. Maybe later I'll give it a try to do it in PS.
Or maybe another member of the forum will try it.
JustLearning
New Member
- Messages
- 2
- Likes
- 0
I'm fairly new to Photoshop and sometimes do things a little more difficult than I should. Although, this is how I would do it: to mimic this design in Photoshop look up how to do B&W solarization in photoshop and then add a layer and play around with adding different shades of blue jean textures. Just erase and adjust the opacity of the texture until you get the achieved look you would like.
agentmoeller
Guru
- Messages
- 1,349
- Likes
- 1,014
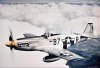
Here's a quick and easy example.
With your select photo, go to Image>Adjustments>invert.
Then duplicate the layer. Turn off the top layer. On the bottom layer, go to Filter>Pixelate>Color Halftone.
Mess with the settings to get the right size and color and look for your dots.
My dots are too big 'cause I pulled a really small photo off Google.
But, you get the idea.
Attachments
- Messages
- 4,273
- Likes
- 6,334
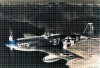
Here is my attempt.

before

after
before
after
agentmoeller
Guru
- Messages
- 1,349
- Likes
- 1,014
I totally forgot the last step on mine - reduce the opacity of your top layer so the halftone layer shows through!!!
- Messages
- 4,273
- Likes
- 6,334
The OP didn't get back for 7 days. Maybe it's time to close this thread?
