What's new
Photoshop Gurus Forum

Welcome to Photoshop Gurus forum. Register a free account today to become a member! It's completely free. Once signed in, you'll enjoy an ad-free experience and be able to participate on this site by adding your own topics and posts, as well as connect with other members through your own private inbox!

How to make this image, looks like a sun


lizzader

Member
Messages
20
Likes
1
Hey everyone,

I was wondering if anyone could help me with ideas of how to make the sun shape from this image I attached. I have made one of the squiggly tails (lets call them tails for now lol) and transformed it by 15 degrees, then did the duplicate+transform again. I came out with the squiggly tails looking correct, but now I want to seamlessly mesh them together. Do you see how inbetween each tail there is a "U" shape that looks like they used the pen tool to blend it together? How could I do that more easily rather than going to each gap and using the pen tool? I hope that I explained it well enough. It's tough to get this across! Thank you so much.
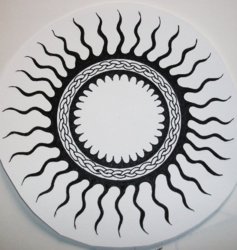
sun_type_thing_tattoo_by_kisses_of_night-d3dyg2b.jpg
 

ALB68

Dear Departed Guru and PSG Staff Member
Messages
3,020
Likes
1,332
Are you sure that was done in Photoshop? I would suspect that to be done in Ai . What are you wanting to do? Duplicate this?
 

lizzader

Member
Messages
20
Likes
1
Are you sure that was done in Photoshop? I would suspect that to be done in Ai . What are you wanting to do? Duplicate this?

It is actually a drawn picture. I wanted to digitalize it without tracing it out with the pen tool. I just was wondering if there was an easy way to do it! Thanks ;)
 

dv8_fx

Retired Administrator
Messages
13,761
Likes
4,789
@lizzader....


I've done something like this before. You and I may differ in how the ray was created and how to come about with the complete sun shape.

But in my case..... after creating the ray, I added a base on a new layer and used the eraser tool with hard edges and deleted parts of the base like so. This I merge with the ray.

You can also use the Pen Tool to create/reshape the rectangular base to suit.

Ray1.jpg

From here onwards, our procedures may differ on how to use it to complete the sun. But I think you can use this as it sounds you've managed to create the completed array.

Ray2.jpg

Incidentally, you can achieve the uneven curved gaps and ray shapes by individually distort transforming the individual rays after you've completed the whole.

Hope this helps you.
 

dv8_fx

Retired Administrator
Messages
13,761
Likes
4,789
As for the chain, I can suggest a trace from your drawing to create a single link without a background using the pen tool. Then create an ellipse shape to serve as a guide and copy paste/rotate the chainlink (with slight erasing to clean it up) along the shape border to form the circular chain array.

For the inner most ring.... create the ring shape and use that to create a workpath which you can edit with the pen tool with the inner shape to correspond and opposite in direction to each sun ray.. When done, convert the path into a selection and fill black on a new layer....

innerray1.jpg

innerray2.jpg


Note.... I followed your procedure of copy paste and rotate 15 degrees which I suppose you used to create the ray formation.


Quite about covers it, I think..... hope you can manage to figure this part out..... Just ask if you need more clarification.


I share ALB68's tjhoughts that this should be created in AI or any vector application. But we have to assume you don't use Illustrator and would rather prefer doing this in PS.

But if you prefer a much, much quicker solution to your need and would still want to do it yourself, follow Larry's advice to trace the drawing in Illustrator. Even better still, there's the gif and vector conversion courtesy of Sam and Larry........
 

lizzader

Member
Messages
20
Likes
1
As for the chain, I can suggest a trace from your drawing to create a single link without a background using the pen tool. Then create an ellipse shape to serve as a guide and copy paste/rotate the chainlink (with slight erasing to clean it up) along the shape border to form the circular chain array.

For the inner most ring.... create the ring shape and use that to create a workpath which you can edit with the pen tool with the inner shape to correspond and opposite in direction to each sun ray.. When done, convert the path into a selection and fill black on a new layer....

View attachment 52640

View attachment 52641


Note.... I followed your procedure of copy paste and rotate 15 degrees which I suppose you used to create the ray formation.


Quite about covers it, I think..... hope you can manage to figure this part out..... Just ask if you need more clarification.


I share ALB68's tjhoughts that this should be created in AI or any vector application. But we have to assume you don't use Illustrator and would rather prefer doing this in PS.

But if you prefer a much, much quicker solution to your need and would still want to do it yourself, follow Larry's advice to trace the drawing in Illustrator. Even better still, there's the gif and vector conversion courtesy of Sam and Larry........

Awesome, yeah.. I really just wanted to learn how to do this so that I can apply it to other projects. I actually came up with an idea that I am going to try out.. It involves me making the negative space and then deleting it from a premade circle. Still quite confusing, and I don't really know if it will work yet but I will let you all know!
 

dv8_fx

Retired Administrator
Messages
13,761
Likes
4,789
I feel like you have something going with this too... If I were to make a long line of these, then merge them, could I somehow transform that to a circular path?

It's not the way I did it with that old project as it stretches the width of the ray and adds extra distortion to the curves. But you can give it a try with the Polar Coordinates.

You need to have the number of rays needed in a line. Follow these steps outlined by chrisdesign - https://www.photoshopgurus.com/foru...cumference-post1533703920.html#post1533703920 .

It may take a bit of adaptation to get the look you need. For instance trying out different line thickness to get the desired circular path thickness. And most probably, you may need to experiment with different sizes of the image and canvass to compensate for the stretched result of the filter.

Knowing the effects of this filter, you may need to stretch the line lengthwise and increase the canvass size to accommodate it.


edit .... Here's what I mean.... I had to reshape the ray to try lessen the distortion but still came up too much.... :banghead: . It can be done but you need a ray with slight bends and with none towards the tip.

Sun.gif
 

lizzader

Member
Messages
20
Likes
1
It's not the way I did it with that old project as it stretches the width of the ray and adds extra distortion to the curves. But you can give it a try with the Polar Coordinates.

You need to have the number of rays needed in a line. Follow these steps outlined by chrisdesign - https://www.photoshopgurus.com/foru...cumference-post1533703920.html#post1533703920 .

It may take a bit of adaptation to get the look you need. For instance trying out different line thickness to get the desired circular path thickness. And most probably, you may need to experiment with different sizes of the image and canvass to compensate for the stretched result of the filter.

Knowing the effects of this filter, you may need to stretch the line lengthwise and increase the canvass size to accommodate it.


edit .... Here's what I mean.... I had to reshape the ray to try lessen the distortion but still came up too much.... :banghead: . It can be done but you need a ray with slight bends and with none towards the tip.

View attachment 52679

Yesss! That looks awesome. That's close enough for me! Who would have thought that that shape would be so hard to reproduce?? Thanks so much for your time everyone.

I am starting to love this site :)
 

Top