What's new
Photoshop Gurus Forum

Welcome to Photoshop Gurus forum. Register a free account today to become a member! It's completely free. Once signed in, you'll enjoy an ad-free experience and be able to participate on this site by adding your own topics and posts, as well as connect with other members through your own private inbox!

Picture Resolution, wash outs, etc.


britanknee

Member
Messages
5
Likes
1
Today is my first week using the program and I'm getting pretty frustrated.

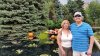
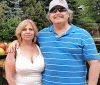
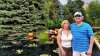
I've spent two days trying to edit a photo for my parents and have a canvas printed. The printing website is telling me my photo's resolution is low and the photo may be blurry when printed. I changed the pixel size to 1700 x 1400 as per the print website's instructions (it said the resolution should be 1700 x 1400). It also says the size should be at least 6MB.

My issues-

I have the pixel dimensions but every tutorial I've read online has given me different answers as to the document size, resolution, and resample image. The canvas I'm having printed is 11 x 14.

There is one spot on the photo that is washed out and being the beginner that I am, I can't find a way to get just that spot fixed rather than the entire image.

There are a lot of what should be bright colors in the photo and I'd like those to stand out. Can I do that without messing up the integrity of the photo?

Thank you in advance for any guidance you can provide Gurus!
 
As far as your printing goes you just need to do some basic maths and then adjust the image to suit.

The Maths:

You want a PRINT 11 x 14 (I'm going to assume these values are in INCHES)
Your 'website' people probably want an image with a resolution of at least 240-300ppi. If not, lets say that they do for simplicity.

The dimensions of your image, using 300ppi, would therefore be calculated thus:
11" x 300ppi = 3300 PIXELS
14" x 300ppi = 4200 PIXELS

Now....ideally your image will be of, or greater than, those dimensions...ideally.
If they are then you only need to set the resolution to give you the size of print you want.

If not, then you will need to re-sample the image to those dimensions first....then set the resolution.

Re-sampling has several 'algorithms' associated with it and which one you use will depend on the image.

Speaking of which, it would be useful to see the image, (by posting it here on the forum), so that members can suggest more specific solutions for you rather than a 'general' reply...especially when it comes to image content.

Regards.
MrToM.
 
Thank you MrToM!

I think I followed you on the sizing and resolution. I changed the pixels, resampled, and then changed the resolution to 300 pixels per inch and it automatically changed the document size to 11x14.

I have attached the photo for your perusal. The washed out part is my mom's body as you can probably see.
 

Attachments

  • 20140704_140551.jpg
    20140704_140551.jpg
    1.3 MB · Views: 4
No worries.

I didn't go into too much detail to save any further confusion but it sounds like you've coped with it OK. :thumbsup:

Just for added info....any image can be printed at any size, but the 'quality' of the print depends on the amount of pixels within it.

The physical, real-world, linear 'size' of the printed image is calculated from that simple formula of image width divided by the resolution. The resolution is always the same for both width and height.

With that in mind it should be reasonably obvious that in order to change the PRINT size you only need to change the 'resolution' setting of the image....which is done via the IMAGE > Image Size... menu option.

With 'RE-SAMPLE' turned OFF, ANY resolution can be assigned to the image....that calculation is done by PS and the 'resulting' PRINT size is displayed.

If you want a SMALLER print then you INCREASE the resolution, and vice versa.

The two most important things to have is enough pixels in the image to give you the print size at the resolution required, and that the ratio of the image matches that of the print.

Anyway....enough waffle...time to take a look at your image.

Regards.
MrToM.
 
OK....wasn't too sure which 'bit' you think is washed out so this is pure guesswork...

Washed_Out_MT_01.jpg

...am I in the right ballpark?

The image as a whole looks fine to me...clear, sharp and not too over-saturated.

Regards.
MrToM.
 
That looks perfect! If I'm not already taking up too much of your time, can you tell me how you did that please?
 
That looks perfect! If I'm not already taking up too much of your time, can you tell me how you did that please?
No worries.

1. I first added a new blank layer above the image.

01_New_Layer_MT_01.png


2. I then selected the 'Brush' tool and whilst holding down the 'ALT' key sampled a suitable colour.
3. I then painted over the area in question without being too over cautious about being precise.
4. I then set the 'Blend Mode', in this instance, to 'Linear Burn'. (This is trial and error)
5. Once I found a suitable 'Blend Mode' I then added a Layer Mask and masked those areas I didn't need. I was precise where there is a 'hard' edge (EG the clothes) but not so elsewhere....I got as close as possible without removing too much.

02_Paint_MT_01.png


6. At this point I also lowered the layer opacity.

03_Mask_&_Opacity_MT_01.png


7. With that done I then 'Stamped' the image....Ctrl + Alt + Shift + E

04_Stamp_Visible_MT_01.png


8. On the 'stamped' layer I then used the 'Healing Brush' tool to iron out the differences between the original and my painting. This time I was more careful to only 'Heal' what was necessary.

05_Healing_Brush_MT_01.png
(This is about half-way through)


That's about it I think.

Regards.
MrToM.
 
Here's the problem: The camera in your phone, a Samsung Galaxy s5 (sm-g900v), is capable of producing images that are 5312 pixels in the long direction by 2988 pixels in the short direction. As MrToM calculated, there are more than enough pixels in such an image to fill an 11x14" print at 300ppi. This is good.

However, the dimensions of the image that the OP posted is only 2048 x 1152 pixels. In other words, it contains only 15% of the pixels that the camera is capable of. This is MUCH less information than the original.

This is why, if you zoom in to 100% magnification, the subjects' skin have no pores or hairs, the man's shirt has no texture, etc. I would certainly not consider the posted version "sharp" for an 11x14" because the effective ppi would only be ~150. This may be adequate for a coarse-textured canvas print, and if viewers don't get too close to the image. IMHO, this file is only barely adequate for its intended purpose.

This huge loss of pixels (ie, smaller pixel dimensions) could have happened in either of two ways:

(a) The camera was set to produce only low resolution (ie, low pixel dimensions) images and no higher resolution (pixel dimensions) version exists; or,

(b) Someone processed the original high resolution image in software, and, in doing so, either intentionally or inadvertently reduced the pixel dimensions of the image. In this case, a version of the image with larger pixel dimensions might exist, and if it does, I strongly suggest the OP uses it, not the version posted in this thread.

Finally, I have to *strenuously* disagree with MrToM's suggestion: "If not, then you will need to re-sample the image to those dimensions first....then set the resolution."

There is no need to do this for 99.9% of all commercial printing firms, especially those dealing with non-pro photographers. Up-rez'ing a small image does not increase the information content of image. If anything, each resampling operation decreases the information content -- a lot if you are down-rez'ing, and by a more modest amount if you are up-rez'ing it. This operation is also superfluous because any commercial printing firm that I know about disregards the ppi field in the file, and simply lets his RIP (Raster Image Processor) perform whatever resampling operation is needed to have the data fed to his printer at its native (ie, optimal) ppi. 99.9% of commercial firms only make use of the print size (in inches) requested by the customer, nothing else. The last thing you want is having two re-sampling operations performed on the same image.

So, my suggestion to the OP is to see if a version with larger pixel dimensions exists, and if it does, use it. You can crop it, but under no circumstances, re-sample it. Make all adjustments (eg, fixing white skin) on that higher rez version, if it exists.

If you want one of us here at PSG to fix the white skin or make any other adjustments, just post the higher rez version. There is one procedural detail in doing this: The forum software won't accept images larger than 3500 px in the long dimension, however there is an easy way around this. Just zip the file and post the zipped version, ignoring any complaints from the uploader that it doesn't recognize a zip file.

HTH,

Tom M


PS - To make obvious the lack of sharpness, skin texture, hairs, etc. in the image being discussed, I have attached an image that I took in which the subjects occupy roughly even a smaller fraction of the frame than the photo under discussion, but which was taken with 4000 pixels in the long direction. Notice that the hairs on the man's arm, the texture of his pants (at the knee), the leather texture are all quite visible in my shot but not in the version under discussion. Your cell phone camera with a native resolution of more than 5000 pixels will contain even more information and has the potential to be even sharper and contain more detail than my shot.
 

Attachments

  • Example_of_sharpness_4256x2832px.zip
    4.8 MB · Views: 3
Last edited:
This is the original downloaded directly from my phone. I appreciate all the information you guys are providing.
 

Attachments

  • 20140704_140551.jpg
    20140704_140551.jpg
    1.3 MB · Views: 1
OK, so I guess that means that either the phone camera was set to produce a smaller, lower rez version or during the process of transferring a full rez image from the phone to your computer the image was down-rez'ed. The bottom line is that this is all we have to work with.

There are some techniques one can use to try to fake some skin texture and sharpness that don't really exist in the version we have to work from. These include very carefully adding a bit of sharpening, up-rez'ing using a fractal based method, and adding a bit of film grain to give the viewer's eye something sharp to focus on. Also, one should slightly increase the contrast and saturation because canvas prints tend to soak up ink more than regular prints. This is certainly not a good final version (the FX are a bit too gritty & over the top - I only spent about 10 minutes on it), but it illustrates the direction I would take this image to minimize the overly smooth "plastic skin" look of the original.

Note: Because the forum uploading software won't accept images larger than 3500 px, I had to slightly downrez the main image below from 4096 px to 3499px in the long direction to get the forum to accept it. To view this image, don't rely on the little in-thread preview version - it's full of compression artifacts. Rather, download and save it, and then view it with Photoshop or other real image viewing software. If you want the full version, let me know and we'll figure out a way to get it to you.

Tom M
 

Attachments

  • 20140704_140551-02_says_is_directly_fm_phone-acr-ps07a_surface_sharpened-x2-crop-698px-for_GIF.gif
    20140704_140551-02_says_is_directly_fm_phone-acr-ps07a_surface_sharpened-x2-crop-698px-for_GIF.gif
    552.5 KB · Views: 21
  • 20140704_140551-02_says_is_directly_fm_phone-acr-ps06a_surface_sharpened-x2-02_3499px_wide.jpg
    20140704_140551-02_says_is_directly_fm_phone-acr-ps06a_surface_sharpened-x2-02_3499px_wide.jpg
    6.5 MB · Views: 3
Thank you very much for the help! I think there might be something wrong with the website afterall. Now I'm trying to create a canvas on another site. Again, thank you for teaching me so much!
 

Back
Top