What's new
Photoshop Gurus Forum

Welcome to Photoshop Gurus forum. Register a free account today to become a member! It's completely free. Once signed in, you'll enjoy an ad-free experience and be able to participate on this site by adding your own topics and posts, as well as connect with other members through your own private inbox!

Star trails help


nelgnostrebor

New Member
Messages
2
Likes
0
Hello!

I have a stacked image of star trails and there are gaps that I would like to fill in with photoshop. I am aware that reshooting with a different interval would be the easiest/best option but I'm unable to return to this location.

If the north celestial pole was in the frame, I could use that as the axis of rotation to duplicate the image and rotate it to fill the gaps will not work.

Below is zoomed into a part of the image to emphasize the gaps.

1650396579263.png

Any ideas?

Thanks!
Glen
 
Why not simply draw a circle shape which fit one of the star trails to get the point of the rotation?

Now you can add 2 guide lines to get the center of the circle, duplicate the image layer, select the transform tool (Strg+T) and move the reference point to the center of the circle and rotate the duplicated image...

Or if you prefer a more mathmatical solution to find the point of rotation...

 
Last edited:
Hi, here are two methods.
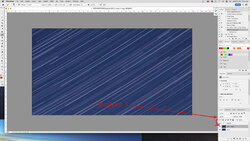
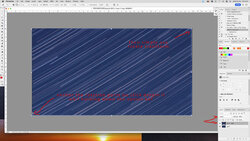
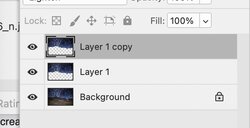
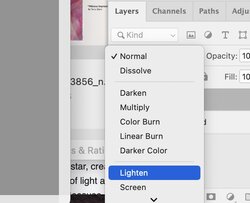
1. duplicate the layer, change the blending mode on the upper layers to 'Lighten' (so that only the lightest parts of that layer will show) and then simply use the transform move, Common V, and use the down and side arrows to move the trails till the look appropriate. see image 1.
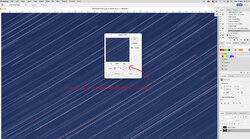
2. simpler use Motion blur to move the light streaks, as in image 2. (this in only good if the light streets a linear and not curved. and could not be used if there is other details such as foreground or non moving objects like the moon or what ever does not move out there)
3. duplicate the layer as in 1. and change to 'lighten' blending and then apply motion blur to that layer only and it will give a similar effect but only show the light trails.
4. if the trails are very curved, then again make a copy layer and lighten, and then use the Command T to transform and then Rotate. but that would mean either locating the centre of the axis of rotation, OR anchoring one corner and then free rotating the other end of the image till they line up... this one can't take some fiddling to align but has the added option on non linear grid distortion bu that is a real rabbit hold of fun to align...

sorry my examples are not great as they wrongly quickies for purpose of illustrating the answer.

again photoshop offers so many ways to do things, these are my quick methods. no doubt other members will have other ideas.

regards, Sandy

Screen Shot 2022-04-20 at 16.55.20pm.jpgScreen Shot 2022-04-20 at 16.43.46pm.jpgScreen Shot 2022-04-20 at 16.54.03pm.jpg
 
forgot to say about method 2. the motion blur. reduce the blur distance to only the number of pixels of the gaps in the lines you have. I set mine at 15 but probably in hindsight should have gone with 2 to 5 pixels on the image you supplies.
regards, Sandy
 
given it more though, an re-read your letter. (I do have cataracts, which makes my dyslexia hard, but strangle help with my retouching)

forgot to do articles the problems of rotation. so here goes. (others may disagree with me, fine.. to photoshop users 5 opinions)

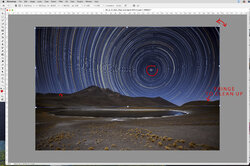
if any central location like a pole star or axis is in the photo or juts outside it. you can use this method. (having never done any star photography please excuse any mistake I may make in terms. but I doe use rotate distortion man times a day) bored a google image for the purpose of illustration only

copy the sky area to a new layer, twice as I will show the problem, and the solution I would do, next change the layer blending mode to "Lighten", the select that layers bt pressing command T (sorry I am on a Mac, never used a windows computer) then move the central axis rotation point for that layer over the 'pole" by click drawing it while holding the option key, and be precise while entering it, then rotate the first layer. the problem is photoshop does not allow rotation by pixels only by degrees.. and it would only be a very low angle try 1 degree or even a half degree, in one direction. then hide that layer by poking the eye in the layers column.

Illusions method above of adding guide lines in one thing that is also great advise (and I forgot.. getting alsheimers I think)

next, repeat the above, but rotate that second layer in the opposite rotation...

this is because there will be a slight fringe only a few pixels wide between the sky and land., pointed out by my arrows that may be very hard to see (that is why I used a large image that you may try and open to look at the border between the sky and land. use the magnifier in the upper right of this BB viewer) that will need to be cleaned yp with the eraser tool. only after flattening those two rotated layers into one, but not into the lowest layer..

again this is a quickie method. for quality a far more detailed method based on the above is the way I would go. but if anyone out there with astronomical experience what a method, please chime in..
regards, Sandy
LAYERS.jpgLIGHTEN.jpgROTATION.jpg
 
Last edited:
Thank you so much for the suggestions, Illusion and Sandy!

I ended up copying the star trails to a couple of layers and using lighten/motion blur while moving the layers slightly to fill in the gaps. Not perfect since the star trails aren't straight but you have to zoom in quite a bit to notice.

Thanks again!
 

Back
Top