What's new
Photoshop Gurus Forum

Welcome to Photoshop Gurus forum. Register a free account today to become a member! It's completely free. Once signed in, you'll enjoy an ad-free experience and be able to participate on this site by adding your own topics and posts, as well as connect with other members through your own private inbox!

Taking part of an image away


00jwhittle

Active Member
Messages
26
Likes
0
Hi,

i am a newb to photoshop and am struggling todo somthing.

I have this picture here.

colinfirth.jpg

i am trying to get the black and white stencil out of it. I don't want the rest of it. i just want a solid black stencil shape of the character in the middle.

If somebody could guide me on how to-do this i would be soo grateful!

Thanks
 
Hi 00jwhittle

Just by using the quick selection tool will give you a fair clean selection of the object to be extracted, you can adjust your actual selection by clicking and draging + CRTL to add to the current selection, or substract from it by holding and draging ALT.

Once you've created your selection, doesn't have to be perfect since is just an stencil, create a new layer from it, by CRTL+J, and whit the selection still active on the new layer, just fill it whit black, you will get something like this.

stencil.png

Hope this helps.
 
Thats can be complicated because you have black outside stencil shape.
First with Levels (CTRL+L) set upper 0 to lets say 75.
Then Magic Wand (w) set tolerance about 20, antialias and contiguous should be checked.
Press on hair, shoulders etx which parts you want to be there. Probably will select more that need, that you'll have to correct (substract) with lasso tool.
 
Here's what I did: (and again, Sir Maximus, thanks for the handy 8-step tutorial on isolating lines)

1) Lasso or otherwise select the large areas you don't want, like the flowers and much of the background; go to edit>clear
PS: you need to have a transparent BG for this to work well. It's also good so you can put any BG with it or superimpose it on any other image you like. If you need tips on that, let us know.
2) Go to image>adjust>levels
3) Bring the rightmost, white slider, over till teh image goes very bright and white
4) bring the leftmost, black slider, right till it meets up to the white one. Now you will see the black stand out and the middle grey tones will be gone
5) control/command click on the rgb channel (if this pallette is not open, go to windows>channels and open it)
6) this will make a selection; go to selcet>inverse; make a new layer and fill in the selection
6a) you could also use the selection you laready made and go to edit>clear. Try it both ways to see which one works best
7) deselect and get rid of the marching ants
8) you should probably zoom in and check your edges and clean them up, depending on how precise an outline you need

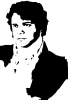
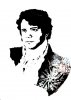
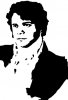
Obviously this jpeg I uploaded needs more work. I could have made a cleaner selection on his shoulder and shirt area, but you can be more precise. You'll have to make a selection and fill in black where it's missing or paint it in. And I would zoom in and use the eraser. if you wanted Otherwise, it should be OK.
Let me know if this helps . . . or doesn't!
Cheers, Clare
 

Attachments

  • black_bust.jpg
    black_bust.jpg
    60.3 KB · Views: 28
Last edited:
Actually, I need to amend the above. Don't do the select inverse, fill. Just use the selection you made and clear. You'll be left with the black that way.

OK, I see there have been a couple other responses. I haven't tried SeniorS's but SirM's looks easy. Sometimes I have trouble with the quick selection tool (I almost always have to zoom in and reselect, deselect) but with this image it's probably not too complex: edges pretty well defined.
 
Last edited:
You could always make a vector of the above also?
 

Attachments

  • vector.jpg
    vector.jpg
    24.5 KB · Views: 24
My bad clares correct:)
 

Attachments

  • vectorpng.png
    vectorpng.png
    22.9 KB · Views: 18

Back
Top