What's new
Photoshop Gurus Forum

Welcome to Photoshop Gurus forum. Register a free account today to become a member! It's completely free. Once signed in, you'll enjoy an ad-free experience and be able to participate on this site by adding your own topics and posts, as well as connect with other members through your own private inbox!

Trouble making buttons for website


Gobrock

New Member
Messages
2
Likes
0
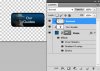
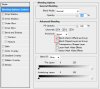
I am looking for assistance on how to create this button, in particular how do i get the guys head to appear in the image. This button would be the over state attachment "our-guideover.jpg". I have also attached "our-guidedown.jpg" this will be the down state button. all suggestions welcomed.
 

Attachments

  • our-guidesover.jpg
    our-guidesover.jpg
    2.8 KB · Views: 11
  • our-guidesdown.jpg
    our-guidesdown.jpg
    2.8 KB · Views: 11
This is what Photoshop CS5 helps says:

After creating a rollover image set in Photoshop, use Dreamweaver to place the images on a web page and automatically add the JavaScript code for the rollover action.


It was possible as far as I can remember, to use ImageReady to create the rollover script. ImageReady however was dumped by Adobe and since they refer to Dreamweaver in this document, I'm assuming that Photoshop is unable to create this script.

Mind you, you don't need Dreamweaver to do this, when you know the code you could even do this with Notepad. Personally I prefer Dreamweaver, but that's just because I've been using it for 13 years.

If you own Dreamweaver, then follow this link:

Adobe Dreamweaver CS5 & CS5.5 * Create a rollover image
 
Furio thanks for your response!

I should have explained better, my apologies, I know dreamweaver, I am just having trouble with the whole layers thing in photoshop on how you create the images that will be used as buttons. I think it might be a layer mask but i must have the layer order or something mixed up.

If one could give some instructions like new layer, apply gradient, new layer now what next to create the image it would be much appreciated.
 
Sorry, my mistake.

There are lots of ways to do this, I'm just showing you one:

- create the basic button with the shape tool
- apply the necessary layer style effects
- double click on the word Effects in your layers palette to change the blending options as shown in the second screenshot: Blend Clipped Layers as Group should be unchecked, Blend Interior Effects as Group should be checked. This is necessary to avoid that the effects of our layer style will also affect the clipped layers in our next steps
- add a clipping layer for the text
- add a clipping layer for the image

A layer can be turned into a clipping layer by right clicking on it and selecting Create clipping mask.

This clipping mask will now the restrain the pixels to the layer its clipped to, meaning that the guys head or neck which would normally extend beyond the borders of our button, are now hidden. It's not necessary to clip the text, I just did that to make it look more organized.

If you have more buttons, just add a new text layer and/or image. Use the eye icon in front of the layers to select the text/images that you want to use for a specific button that you want to save.
 

Attachments

  • bt3.jpg
    bt3.jpg
    29.8 KB · Views: 8
  • bt2.jpg
    bt2.jpg
    61.5 KB · Views: 6
Last edited:

Back
Top