What's new
Photoshop Gurus Forum

Welcome to Photoshop Gurus forum. Register a free account today to become a member! It's completely free. Once signed in, you'll enjoy an ad-free experience and be able to participate on this site by adding your own topics and posts, as well as connect with other members through your own private inbox!

Trying to remove greyscale image background


Cory Dvorak

New Member
Messages
1
Likes
0
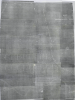
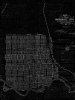
I'm very new and still trying to find my way around photoshop (Only know basics that I've taught myself)... I have a series of greyscale maps that I've pieced together from microfilm images. The color is very poor, but I'm trying to remove the background of the images so only the original drawn lines remain (I want just the drawn lines/words from the map so I can overlay them onto current maps). I've tried a few things, like inverting the image, selecting certain colors to remove, the magnet select tool, and even just manually erasing, but because some of the greys are so close, the quality of the microfilm I copied the images from, and because of the handwritten parts of the maps, I'm finding it very difficult to try and remove the background!

If anyone has an idea of the best way to do this, or what I can try to accomplish this, it would be very appreciated!

Thank you so much for any help, I'm lost!
 

Attachments

  • Screen Shot 2015-09-22 at 4.24.08 PM.png
    Screen Shot 2015-09-22 at 4.24.08 PM.png
    2.9 MB · Views: 21
Messages
1,376
Likes
1,026
I would start with a LEVELS adjustment layer, and see if you can get those drawn lines to really stand out.
 

Rich54

Guru
Messages
1,733
Likes
3,415
I had the same thought as AgentMoeller. Below is a screen shot of a Levels adjustment, which basically forces the whites to be very white and the grays to be as close to black as possible. Unfortunately, there is a lot of "noise" in your original image (and it's blurry, to boot) so not all of the background easily transforms to pure black.

Once you've set the levels as best you can, merge the levels adjustment with the map layer below it to get the final adjusted image onto one layer, and then change the layer blend mode to Screen. You can then copy this layer into another Photoshop file that contains your more current maps. Your "Screen" layer needs to sit on top of the current maps. The blend mode of Screen makes anything black disappear and allows the underlying layer to show through the black, leaving only the white. But if your underlying layer is also white, then you will have white-on-white and it will be unreadable.

PrintScreen.jpg
 
Last edited by a moderator:

Tom Mann

Guru
Messages
7,223
Likes
4,343
How's this? It took about 15 min to get this far.

The problem with immediately starting with a threshold or levels adjustment layer is that the level of the illumination and the depth of the supposed black areas of the starting image varies substantially from one area of the image to another, so, effectively, the optimal threshold needs to be continually adjusted as one moves around the image.

Or, one can do as I did and begin the process by making the starting image more uniform. This is a common image analysis problem in microscopy and other scientific areas. There is open literature on this subject, but unfortunately, because the specific method I used is proprietary, this is one of the rare cases I can't describe exactly what I did publicly, except to say that it was all done in PS -- I didn't have to use ImageJ or Matlab's Image Processing pack for this.

Tom M
 

Attachments

  • Old_blueprint-tjm01-ps01a_16bpc-01_sRGB_8bpc-01.jpg
    Old_blueprint-tjm01-ps01a_16bpc-01_sRGB_8bpc-01.jpg
    1.3 MB · Views: 3

Tom Mann

Guru
Messages
7,223
Likes
4,343
PS - because the hand written additions were done in black ink, instead of being in white (like everything else of importance on the map), they have to be handled in a separate step. I made no attempt to do that for this little demo.

T
 

Top