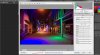
Immediately, we can say quite a bit about what went on. For example, below are the RGB histograms for your two screen shots. For each of your two screenshots, two sets of RGB histograms are shown below: One is for the entire image, and the second is for just the affected area. You can tell which is which by rolling over them and looking at the file names. You can see that there is almost no structure, no color variation, etc. in the affected area in your Screenshot1, but there is in your Screenshot2.


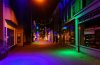
The reason for the difference in that area between your two shots is obvious -- in the "bad" area, the blue channel is almost completely blown (ie, max'ed out) in your "Screenshot1", whereas some process or setting in your workflow has valiantly attempted to restore texture to that area by the time you took "Screenshot2".
---
By far, the quickest way to figure out what caused this difference is if you post both your RAW file, as well as your PSD file for thIs image.
Also, as
ALB68 said, we need to know your ^EXACT^ work flow. Specifically:
a) You said that you shot in RAW, but did you have the camera set to save both the RAW file PLUS an in-camera JPG?
b) If you did, could you post that as well.
c) If you did, are you absolutely sure that your processing was done on the RAW file, not the JPG?
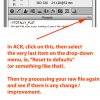
d) You said that you "looked at" the image in both PS and LR. When you open a RAW image in PS, it actually opens first in ACR, Adobe's raw converter. Is this what happened? If so, were ALL the sliders zero'ed (yes, in ALL the panels)? Go to the camera calibration tab (2nd from the rightmost tab). Tell me what it says in the "Process" and the "Camera Profile / Name" boxes.
----
Shooting highly saturated colors like these always presents a problem. The same problem almost always occurs when photographing theatre and live music performances, as well as with some flower photography. The way around it is not, as we are doing now, to worry about exactly what process tried to restore detail to the areas with blown channels, but rather, to prevent blown channels in the first place. To do this, you need to set your camera to display color histograms, if possible. After a first test shot, you then need to carefully examine the histograms on the back of your camera and then reduce the exposure to the point where no channel is blown. Typically, this will be at least 1 or 2 stops less than the exposure suggested by your meter. You can then restore the image to maximum brightness in post processing.
With static subject matter, like this, another approach is to put your camera on a tripod, shoot a series of bracketed exposures, and re-combine them in an HDR program. When the subject matter permits, this can work wonders.
We look forward to hearing from you.
Tom M


") , I am really new to shooting with a dslr and I'm a bit of a noob with the settings and stuff
, I am really new to shooting with a dslr and I'm a bit of a noob with the settings and stuff