You're right, Claydees -- studios with pitch black walls, ceiling and floor can seem incredibly odd when one first walks in. However, they usually are not completely black most of the time because the subject / object being photographed is usually being illuminated either by the photographer's modeling lights (
http://strobist.blogspot.com/2006/04/lighting-101-be-flash.html) or by banks of conventional room lights that have been turned on so that people can walk around and do work in the space. However, even with a gentle introduction to the situation, some models occasionally will freak out when the ambient lights are turned off to take the shot. Also, at least in conventional portraiture, one rarely wants completely black shadows (they are too harsh for all but the most severe styles of portraiture), but the black room provides this option when it is needed.
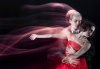
With respect to your question about the blur around the subject in the example you posted, to be honest, I only noticed that question just at the last moment as I was about to send my message, so I didn't look at the image very carefully (...and I was using my cell phone...). Now that I look at it more carefully, I realize that I was wrong and the blur surrounding this subject was not spill light, but, as AgentM and Sam pointed out, was almost certainly added in post. The exact structure of these blurs are a lot easier to see if one brightens up the shadows (see attached, below).
A similar, blurred edges effect occurs when one "drags the shutter" (ie, the camera combines a sharp image registered by the flash with an image blurred by subject or camera movement registered by weak continuous (ie, non-flash) ambient lighting). This doesn't look like that, but because it is such a common effect, I've included a couple of examples below, together with the brightened version of your image.
Finally, I would like to support Sam's comments about the extreme difficulty of using Photoshop to simulate high contrast lighting. The fundamental reason it is so difficult is that if you attempt to simulate the look in post-production, to have the results look at all realistic, you have to manually add shadows (in exactly the right amount and position) corresponding to every indentation and protuberance of the subject, ranging in size from pores and hairs to large scale facial sculpting arising from underlying bone structure. I've never seen anyone wanting to spend enough time doing this, unless they were devoting their art and their lives into doing so (eg, the hyper-photo-realistic digital painters).
HTH,
Tom M