Photoshop Gurus Forum
Welcome to Photoshop Gurus forum. Register a free account today to become a member! It's completely free. Once signed in, you'll enjoy an ad-free experience and be able to participate on this site by adding your own topics and posts, as well as connect with other members through your own private inbox!
You are using an out of date browser. It may not display this or other websites correctly.
You should upgrade or use an alternative browser.
You should upgrade or use an alternative browser.
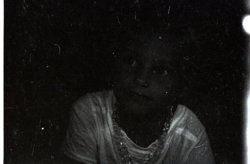
Restoration Lighten photo and remove spots
- Thread starter Logan3028
- Start date
- Messages
- 3,354
- Likes
- 3,092
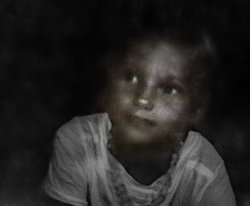
I am afraid that is quite the challenge because of the unbelievable amount of noise when lightened up. Used my best judgement so you can get the feeling from the image yet far from an original picture. Hope this helps
John Wheeler
PS - BTW - sometimes there are techniques in capturing better digital data from an original if this was not already in digital form.

John Wheeler
PS - BTW - sometimes there are techniques in capturing better digital data from an original if this was not already in digital form.

- Messages
- 3,354
- Likes
- 3,092
I am afraid that is quite the challenge because of the unbelievable amount of noise when lightened up. Used my best judgement so you can get the feeling from the image yet far from an original picture. Hope this helps
John Wheeler
PS - BTW - sometimes there are techniques in capturing better digital data from an original if this was not already in digital form.
View attachment 99769
I love it thank you so much
I’m using an epson scanner to scan negatives
For these black and white ones I am using Gimp to invert the colors
Any tips or tricks you can give me would be appreciated
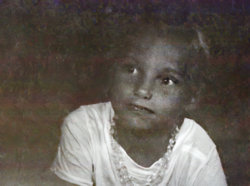
And here is another try using a totally different approach. Tough picture to enhance
Hope you like it
John Wheeler
View attachment 99770
Could you try and explain the approach you took on the second one? I really like it and I want to try to learn how to do it myself
- Messages
- 3,354
- Likes
- 3,092
Hi Logan
btw, very cute picture of your mom.
Always staring with the best possible image is an very important first step.
Extracting out all the possible detail with minimum noise.
Scanning is a whole major topic area and you could search the web for details and/or for very special scans take it to a service provider that can do excellent scans
1) Negatives can be cleaned with the right cleaner (and good ventilation). Care also has to be taken to only use a cleaner that will not damage the negative (depends on the negative material)
2) Scan to 16 bit TIFF file and highest reasonable resolution in color for a color negative or if B&W negative has discoloration (this allows special post processing to remove color damage). 16 bit scans with a good scanner will allow extracting more details with less digital noise and/or posterization.
3) Best to have a higher end scanner and/or software that will do actual exposure adjustments that is not just some scanner software post processing (most often controlled by scanning speed). Your particular image was dramatically overexposed to get such a black image when inverted (negative was probably very clear)
4) If the negative is highly scratched, certain scanners allow immersing the negative in a special fluid to make most of the scratches transparent or at least greatly diminished.
5) Some higher end scanners/software support an IR (infrared) reading of the negative which can help identify scratches and dust on the surface which can be used with their software to remove those defects without softening the image.
The above are some basics and there are many resources online and in books on tuning up the scanning process.
As far as the image processing. It was trial and error on what approach would work best. Here are the basics of the steps I took
1) Convert the image to 16bit in Photoshop (this can help with when extreme processing is involved)
2) Adjust exposure and other tone parameters to bring the image histogram so it is much more balances (yes noise and all the dust and scratches)
3) I saved and ran this image through Topaz DeNoise AI primarily to get rid of the skin and clothing noise (did nothing or little for the dust and scratches). I saved as a 16 bit TIFF image from the Topaz application
4) reopened in Photoshop and made a Smart Object.
5) I first applied the Dust and Scratches Filter to the Smart Object and adjusted for best result (always view at 100% magnification when doing this)
6) Next I applied the Camera Raw Filter and worked with in the following adjustments
6a) If needed (which I did not) basic panel tone options could be fine tuned for the image
6b) I did go into the detail filter and applied more noise reduction and selective sharpening (hint - after using the sharpening slider, hold down the Option Key (Alt key on PCs) and slide the masking slider which will show you where to apply the sharpening - best to only apply along luminosity transitions instead of the whole picture)
6c) I used the spot healing brush generously on the background to make it more uniform and remove distractions. I also used the healing brush to try and address a horizontal scracth or scanning defect in the middle of the picture
7c) After finishing with the camera raw filter, I wanted to restore the catch-light in the eyes that were removed by the use of the Dust and Scratches filter. I duplicated this Smart Ojbect and turned off the Dust and Scratches Filter (yes they all come back). Then I added a Layer Mask filled with black to hide everything. Then, I activated the Layer mask and painted white just where the catch-light for the eyes were and a better looking eye was restored.
Now for professional restoration a lot more would be done. There was all sorts of "Krsipy Kritter" stuff on the shirt from all the post processing (among a number of other items) that could be addressed. Yet thought this was enough to get the essence of the feeling of the original image shared and address the major problems of a very overexposed negative with extreme noise.
Again this took some trail and error and trying a few approaches to see what would give a better result
Hope that helps
John Wheeler


