What's new
Photoshop Gurus Forum

Welcome to Photoshop Gurus forum. Register a free account today to become a member! It's completely free. Once signed in, you'll enjoy an ad-free experience and be able to participate on this site by adding your own topics and posts, as well as connect with other members through your own private inbox!

My introduction (and some help?)


James Lamont

New Member
Messages
1
Likes
0
Hi everyone

My name is James. I'm a keen amateur photographer and mountaineer from Scotland.

I've always played around with photoshop and watched some youtube videos but recently I've been trying to get more into it. My non-arty brain struggles sometimes when I see some of the amazing pictures that people have created/edited.

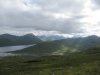
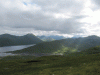
I've been playing around all morning with a photograph I took and I can't seem to stop it looking 'fake' :(

I was really wanting to highlight the light shaft and darken the sky to make the light shaft pop out.

I've attached a copy of the photograph and was wondering if maybe any photoshop gurus out there could have a quick "edit" of the picture and see what you could come up with and then maybe I could spend the rest of the day trying to copy it!

A bit unusual I know but I prefer to learn 'hands on' rather than watching youtube videos!

Thanks
 

Attachments

  • IMG_1605 Resized.jpg
    IMG_1605 Resized.jpg
    1.2 MB · Views: 2
Hi James and welcome to the forum.
Try his.

1.png 2.png IMG_1605 Resized chrisdesign.jpg
Make a selection and fill it with white on a new layer. Change the Layer mode to Overlay, reduce the opacity to 80%, and add Gaussian blur 30.
Then add a vignette layer. Make an oval selection, invert this selection, fill it with black. Change the layer mode to multiply. Reduce opacity to 40%. Add Gaussian blur 50 pixel.

4.png
 
Last edited:
Personally, I think that the photo would benefit from several changes. For example, the sky is considerably brighter than the land, and this pulls the viewer's eye away from the main area of interest. I believe the completely blown out area of the sky (ie, 255,255,255 in the upper RH of the frame) will be extremely unattractive to many viewers. In addition, the flat light on that day means that the local contrast is very low throughout the image, so I worked on increasing that using a variety of techniques including large radius USM. Once these things are taken care of, the shafts of light that were the original object of concern almost automatically increase in prominence. I did brighten them a bit (and slightly darken the surrounding areas), but much less than one might think is necessary looking at the original.

To make my changes clear, I exaggerated them. Everyone has their own preferences, and I'm sure you remember the scene as not having this much clarity / contrast / drama. So, if the changes are too much / too "unrealistic" but you like the general direction they took your image, obviously, it's easy to dial them back - just blend back in some of the original.

Tom M
 

Attachments

  • IMG_1605-Resized-tjm01-acrX2-ps02a-sRGB_698px_8bpc-for_GIF-02.gif
    IMG_1605-Resized-tjm01-acrX2-ps02a-sRGB_698px_8bpc-for_GIF-02.gif
    343.3 KB · Views: 17
I went for a more natural look. The lighted areas on the ground are caused by individual light rays.

Like chris, I made a selection with the Pen Tool.
Screen Shot 2016-01-30 at 8.23.50 AM.png

I feathered the selection....
Screen Shot 2016-01-30 at 8.24.32 AM.png

Filled it with white.
Screen Shot 2016-01-30 at 7.31.52 PM.png

I then turned the layer into a Smart Object.
I did this so I could add the Gaussian blur which I could re-adjust if needed.
I set the layers Blending Mode to Overlay.
I lowered the layers opacity to 10%.

Then it's a matter of repeating the same technique for each light spot.
Screen Shot 2016-01-30 at 8.34.12 AM.png

LightThruCloud_02.jpg
 
Last edited:

Back
Top