What's new
Photoshop Gurus Forum

Welcome to Photoshop Gurus forum. Register a free account today to become a member! It's completely free. Once signed in, you'll enjoy an ad-free experience and be able to participate on this site by adding your own topics and posts, as well as connect with other members through your own private inbox!

new & with questions!


bella

New Member
Messages
4
Likes
0
hi everyone

i'm new to photoshop gurus, but not new to photoshop.
i joined because i have one question that so far, the interwebs deem unanswerable..

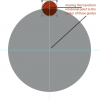
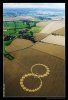
i'd imagine we'll be using the "transform again" tool to recreate an image of a crop circle i've attached here. i've seen this pattern many times in different geometric art pieces, so i know it can be done.

i want to create a circle who's path is made of circles which are decreasing in size (as in one side of the figure 8 in the crop circle pic)

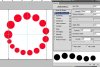
i've figured out how to "transform again" to create a giant circle of same size circles, by hitting cmd+J to duplicate the layer of my small circle to be repeated, moving its center rotational point to the center of the Main Big Circle, and rotating it to sit next to the first small circle along the path of the big one. then hit cmd+J then cmd+shift+T, over and over again to "transform again". see picture with the same sized circles.

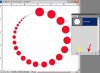
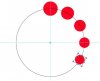
then, doing the same steps, and including a size decrease by 90% of the circle to be repeated, yields a spiral of diminishing sized circles. see other picture.

how do we create it so that the end result is a 360 degree formation {not a spiral} of decreasing-sized circles?
thank you so much in advance, and good luck on the challenge!!

:: shine on ~ bella
// MBP 4g ram, 2.2 ghz i7 | 10.7.3 | CS 5 Extended v 12.0x64
 

Attachments

  • e20080808milkhill02.jpg
    e20080808milkhill02.jpg
    91.2 KB · Views: 21
  • Screen Shot 2012-04-19 at 9.34.10 AM.png
    Screen Shot 2012-04-19 at 9.34.10 AM.png
    48.9 KB · Views: 21
  • Screen Shot 2012-04-19 at 9.35.52 AM.png
    Screen Shot 2012-04-19 at 9.35.52 AM.png
    35.2 KB · Views: 21
Welcome to the forum , bella.

This is quite a interesting challenge. Let's see what the members will come up with.

I see you have an earlier post with regards to this. I'll retain this post and delete the other.

Enjoy your time and just wait for the others to pick up on this.
 
Obviously you have moved the center rotation point to the center of the larger circle. The problem the center point is calculated from the original circle to the center, as the circles get smaller the center point moves thin the same ratio (not to the center point) and the circle turns into a spiral.

One way to do it, although it will take longer is to set the center point with guides, then move it manually for each circle. The order in which you do it is important, change the size first (I used 90%) then set the center point and do the rotation.

I added a circle background to show it does follow the center line of the circle.
 

Attachments

  • ScreenShot001.jpg
    ScreenShot001.jpg
    16.8 KB · Views: 17
Last edited:
Obviously you have moved the center rotation point to the center of the larger circle. The problem the center point is calculated from the original circle to the center, as the circles get smaller the center point moves thin the same ratio (not to the center point) and the circle turns into a spiral.

One way to do it, although it will take longer is to set the center point with guides, then move it manually for each circle. The order in which you do it is important, change the size first (I used 90%) then set the center point and do the rotation.

I added a circle background to show it does follow the center line of the circle.

hawkeye ~ thanks for the rad work around, i hadn't thought of that :)

that leads me to question 2. how do i get the rotational center point precisely snapped to a guide's intersection, the grid, a point, etc?

see pic for graphical representation - seems like when i put the rotation point on the intersection guides, it seems "perfect", then i zoom in, and it's still not really in the middle. i can't zoom in any further in photoshop than the 3rd pic, but i know that my drag and drop method is not truly in the center, it doesn't even look like it...

any ideas?
 

Attachments

  • transform-point.png
    transform-point.png
    35.9 KB · Views: 15
  • transform-point-guides.png
    transform-point-guides.png
    8.5 KB · Views: 15
  • transfom-point-guides-zoom.png
    transfom-point-guides-zoom.png
    9.1 KB · Views: 15
also, this makes for mathematically imperfect spacing between each circle, if i'm to guestimate the location of the next circle... the point of the project is to create a fractal {later down the road once i figure out a solution to this challenge} ~ in my opinion, the the appeal of a fractal is its natural, physical, and mathematical flawlessness...
 
There are certainly problems and the solutions are more manual then automatic. Here is another method that might work better for you.

Make a circle with the pen tool and stroke it with a brush set the size jitter control to fade and spacing as needed to get the effect you want. I did this very quickly and it looks pretty good, but could be tweaked to get it just right.


Attachments

  • ScreenShot002.jpg
    ScreenShot002.jpg
    57.9 KB · Views: 0
Last edited:
hawkeye:

my apologies, i am not familiar with creating a circle with the pen tool, or stroking it, for that matter. that's an illustrator thing in my books - can you please expand?


also, does anyone know about the center point snapping to grid or guides? i'll reiterate:

I want to lock the center point, OUTSIDE of the shape-to-be-transformed (NOT one of the reference points), on a specific point in the document which is specified by the intersection of a horizontal and vertical guide in the dead center of the document. Seems to me that there should be a "snap" option, so that the "center" rotational point of a shape can snap precisely to another point outside of the shape.


Right now, I have to drag and drop the rotational point from the shape to the point where the guides intersect, as close as I can get it, then zoom in. When I zoom in, it's obvious that I was WAY off, because the rotation point is an inch away from the intersection point. Now I zoom in ALL the way to the pixels, and then move the center point again, but still, because it does not snap, I know that it's an imperfect placement. If it was possible to zoom in more, this would be apparent. This is tedious and imprecise. This means that the rotation I will complete of my shape will not be mathematically perfect, and will throw off the algorithm that I want to graphically represent.


Am I missing something crucial here, and this feature already exists? Please let me know! Thanks :)
 
Just draw a circle (hold shift) with the eliptical marque tool. Go to the paths palette and click the make path icon (red arrow) then stroke (yellow arrow).

There is no way to get the reference point to snap that I know of.
 

Attachments

  • ScreenShot001.jpg
    ScreenShot001.jpg
    46.1 KB · Views: 0

Back
Top