
Photoshop Gurus Forum
Welcome to Photoshop Gurus forum. Register a free account today to become a member! It's completely free. Once signed in, you'll enjoy an ad-free experience and be able to participate on this site by adding your own topics and posts, as well as connect with other members through your own private inbox!
You are using an out of date browser. It may not display this or other websites correctly.
You should upgrade or use an alternative browser.
You should upgrade or use an alternative browser.
Remove flare from night shots


- Messages
- 4,273
- Likes
- 6,334
I've done this with the stamp tool with a big soft brush (80 pixel) and 50% opacity.
It only takes a few minutes.

It only takes a few minutes.
Tom Mann
Guru
- Messages
- 7,125
- Likes
- 4,312
I don't want to speak for Sam, but there are many ways one could make the effect of the gradient sky seem more realistic. Probably the most obvious are to simply reduce the opacity of that layer, and/or locally paint in and out the strength of gradient layer using a layer mask. I'm sure Sam will have other suggestions.
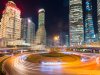
However, my real question is what in the world are the artifacts in the area I outlined in red. I have owned the same lens as you used to take this image ever since it came out, and have taken a lot of night shots in my life, and have never once seen artifacts shaped like that either with that lens or any other of my lenses. By any chance do you have any idea what they are? I'm really curious about them.
Cheers,
Tom M
Attachments
Thank you all for your suggestions!! Much appreciated.
Tom, I had the same thoughts while reviewing this pic taken in downtown Shanghai a few weeks ago. I had the hood mounted on the lens but seriously can't understand what are those patterns. Aperture is 11 and shutter 13 seconds with ISO 100. Below you will find a zoomed section.
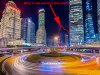
As you see, the artifact is too strong along with the other round flares. I would really appreciate if someone may assist me with some steps. Sorry for bothering you guys. Thank you")

Tom, I had the same thoughts while reviewing this pic taken in downtown Shanghai a few weeks ago. I had the hood mounted on the lens but seriously can't understand what are those patterns. Aperture is 11 and shutter 13 seconds with ISO 100. Below you will find a zoomed section.
As you see, the artifact is too strong along with the other round flares. I would really appreciate if someone may assist me with some steps. Sorry for bothering you guys. Thank you
- Messages
- 24,248
- Likes
- 13,718
Like Chris, my first choice for this would be the Clone Stamp Tool along with the Brush Tool. I only suggested removing the BG since you said you had no luck with cloning.
This is my technique.
When cloning, use low settings and work within selections so you can get close to objects within the image.


You have to use the Brush Tool as well for blending. Again, use low settings and sample from the image.


This is my technique.
When cloning, use low settings and work within selections so you can get close to objects within the image.
You have to use the Brush Tool as well for blending. Again, use low settings and sample from the image.
Last edited:
As you may see in the attached pic, there is a slight difference between the cloned/brushed part (right section) and the normal original sky (left section).
Is there a way to avoid that? I'm using the same brushes and properties. I added a bit of sharpening in that area and still they do not match 100%.
Thanks a lot!!

Is there a way to avoid that? I'm using the same brushes and properties. I added a bit of sharpening in that area and still they do not match 100%.
Thanks a lot!!
Attachments

- Messages
- 24,248
- Likes
- 13,718
Try this technique. If the cloned area still does not match, you can always add some noise.
If you are not cloning on a new and separate layer, then start.
If you look at the image, you can see that the BG goes from dark to light.
If you sample in the darker area and clone in the lighter area, your colors will not match.

Sample from the color you wish to clone.
Work up and down so your sample point remains inline with the brush.
The correct color and gradient will be cloned as you move right to left.
Work slowly and sample often.
Re-sample further away or closer to your brush accordingly.
Always in line with the sample origin.

If you are not cloning on a new and separate layer, then start.
If you look at the image, you can see that the BG goes from dark to light.
If you sample in the darker area and clone in the lighter area, your colors will not match.
Sample from the color you wish to clone.
Work up and down so your sample point remains inline with the brush.
The correct color and gradient will be cloned as you move right to left.
Work slowly and sample often.
Re-sample further away or closer to your brush accordingly.
Always in line with the sample origin.