What's new
Photoshop Gurus Forum

Welcome to Photoshop Gurus forum. Register a free account today to become a member! It's completely free. Once signed in, you'll enjoy an ad-free experience and be able to participate on this site by adding your own topics and posts, as well as connect with other members through your own private inbox!

Remove red ink remnants from a colour photo


Messages
62
Likes
4
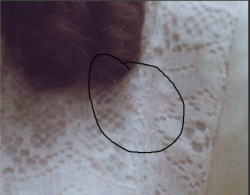
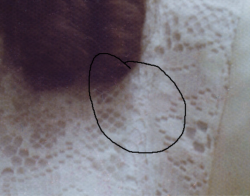
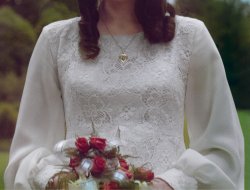
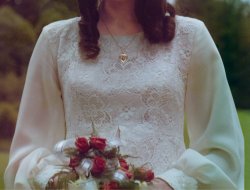
have a colour photo with red ink drawn on it, on a white wedding dress. 98% ink removed using baby wipes & shaving foam, but still some remnants, only visible when zoomed. I was hoping for a colour replacement option to replace the red with white, HELP Please
 

thebestcpu

Guru
Messages
2,988
Likes
2,747
Hi @Reddwarf4ever
Any chance you could share the image or a portion of the image with the problem.
There are many approaches that could work from simple to more involved yet a more directed suggestion could be given with the image shared
Just a suggestion
John Wheeler
 
Messages
62
Likes
4
hope this JPEG is suitable, saved as High not Maximum quality, not sure of Flickr file size limit, if limit is high could upload the Tif file I am working on

can only see when zoomed, but still would like to clean it up, someone suggested the colour replacement tool, but not sure if the eye dropper would be able to select the red pieces or not, hope there’s another way......on a previous attempt I tried a selection with desaturate and it seemed to work well, left only the white dress, but when I tried the next time the selection turned to an ivory colour ????

51157059754_27637d8b73_k.jpg
 

thebestcpu

Guru
Messages
2,988
Likes
2,747
Hi @Reddwarf4ever
I suggest the following steps and see how it works for you
- Add a new blank Layer above your image and set the blend mode to Color
- For the areas that need recoloring, use the eyedropper tool and sample an area nearby that is correct
- Change to the Brush tool and paint on the new Layer at the areas that need to be repaired. The color should be replaced with the sampled color.

See how that works for you and best of skill on your project
John Wheeler
 
Messages
62
Likes
4
I approached the problem in a different way.
I desaturated the wedding dress and repaired some spots.
With curves I lightened it a little, and added some unsharp masking.


View attachment 120801
I tried desaturate previously and it did go to white, as your image, but when I tried this process again yesterday the result had an Ivory look, Any thoughts why ? As the desaturate etc. looks the cleanest easiest route.....thank you

P.S. When you applied lighting and unsharp mask was it to a selection or the whole image ?
 
Messages
4,139
Likes
6,062
Sorry for the misunderstanding. English is not my native language.
I should have written: With curves I brightened it a little.

Desaturation, curves and unsharp masking are only applied on the selection of the wedding dress.
 

Rich54

Guru
Messages
1,732
Likes
3,412
I tried desaturate previously and it did go to white, as your image, but when I tried this process again yesterday the result had an Ivory look, Any thoughts why ? As the desaturate etc. looks the cleanest easiest route.....thank you

Here's a variation on desaturation you might want to try. Add a Hue/Saturation adjustment layer above the image. Select the Red channel of the Hue/Saturation layer and then apply the desaturation, which will only affect the reds and may do a better job of preserving the underlying color of the dress.
 
Messages
62
Likes
4
I approached the problem in a different way.
I desaturated the wedding dress and repaired some spots.
With curves I lightened it a little, and added some unsharp masking.

View attachment 120801

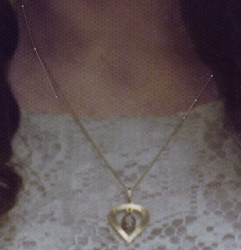
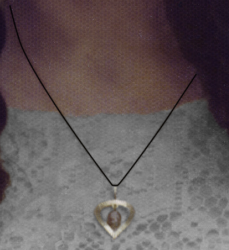
With the wedding dress selected using the quick selection tool, I used the Hue saturation adjustment layer, wound all colours down to zero, the dress is now perfectly white, unfortunately my Wife had a gold chain and cameo, which is now Silver......how can I get this back to gold ? The chain is so fine, think that’s going to be the biggest problem.....thanks in advance would adjustment layer colour balance been a better option ? And maybe try and mask out the chain after ???
 

Rich54

Guru
Messages
1,732
Likes
3,412
You can mask the chain using the Pen tool. First create a path of the chain as shown here.

1620171763184.png


Next, open a new, blank layer. This layer will be temporary.
Activate the brush tool and set it to a soft, 3-pixel brush with the color set to black.
Go into the Paths palette and click the icon for "stroke path with brush".
You will now have this:

1620172217438.png

Make a selection of the black stroke and then turn off the visibility of the temporary layer.
Now use that selection on your Black & White desaturation layer to mask-out the chain. The pendant itself is easily masked by hand.
 
Messages
62
Likes
4
You can mask the chain using the Pen tool. First create a path of the chain as shown here.

View attachment 120813


Next, open a new, blank layer. This layer will be temporary.
Activate the brush tool and set it to a soft, 3-pixel brush with the color set to black.
Go into the Paths palette and click the icon for "stroke path with brush".
You will now have this:

View attachment 120814

Make a selection of the black stroke and then turn off the visibility of the temporary layer.
Now use that selection on your Black & White desaturation layer to mask-out the chain. The pendant itself is easily masked by hand.
Thanks, it makes sense, but it’s the individual steps I find difficult .....once I’ve done it a few times it will be memorable, making myself a notebook of these procedures as a memory jogger.....can I use this masking and still use desaturate, using the hue saturation adjustment panel ?
 

Rich54

Guru
Messages
1,732
Likes
3,412
can I use this masking and still use desaturate, using the hue saturation adjustment panel ?

Yes, you can. The Hue/Saturation adjustment comes with a layer mask attached to it. You already said above (post #11) that you selected the dress, so it's only the dress that is affected by the Hue/Saturation adjustment. All you need to do is to create an acurate selection of the chain and pendant, go back to your Hue/Saturation layer, and mask that out—meaning, paint black in the layer mask—so that the chain and pendant are not affected by the desaturation. Masking the pendant by hand is fairly easy. The chain is harder to do by hand, which is why I suggested the Pen tool method.
 
Messages
4,139
Likes
6,062
Hello, you did a lovely job on the dress, plus the gold chain is still gold, could you kindly detail the steps you took, so I can duplicate them.....thank you

I made a selection of the wedding dress only. This did not include the gold chain and the hearth. I softened the selection with 3 pix. Next step was desaturation.
 
Messages
62
Likes
4
I made a selection of the wedding dress only. This did not include the gold chain and the hearth. I softened the selection with 3 pix. Next step was desaturation.
So did you use the quick selection tool ? Did you manage to select the dress only ? Thought the chain was too think for the selection tool.....thank you
 
Messages
62
Likes
4
UPDATE
used hue saturation layer, dropped all colours except yellow and the dress is nice and white amd the gold chain amd locket still look gold.....did I do right ?
 

Rich54

Guru
Messages
1,732
Likes
3,412
UPDATE
used hue saturation layer, dropped all colours except yellow and the dress is nice and white amd the gold chain amd locket still look gold.....did I do right ?

There are usually many ways to achieve a certain result. If you are happy with how it looks, then you did it "right". It makes perfect sense that the gold chain can be preserved if you do not desaturate the yellows, so that was a good idea.
 
Messages
62
Likes
4
Yes, you can. The Hue/Saturation adjustment comes with a layer mask attached to it. You already said above (post #11) that you selected the dress, so it's only the dress that is affected by the Hue/Saturation adjustment. All you need to do is to create an acurate selection of the chain and pendant, go back to your Hue/Saturation layer, and mask that out—meaning, paint black in the layer mask—so that the chain and pendant are not affected by the desaturation. Masking the pendant by hand is fairly easy. The chain is harder to do by hand, which is why I suggested the Pen tool method.
thank you, do all adjustment layers come with a layer mask attached ? Also I noticed that if I open a HS layer and make some changes, then open another HS layer for different changes e.g. make other changes with clone, it doesn’t seem to work, I was told elsewhere it’s good practice to have an individual adjustment layer for each different adjustment, or is that wrong, maybe were referring to layers ??? Maybe need to flatten the image first but that closes, the adjustment layers. Thanks
 

Top