What's new
Photoshop Gurus Forum

Welcome to Photoshop Gurus forum. Register a free account today to become a member! It's completely free. Once signed in, you'll enjoy an ad-free experience and be able to participate on this site by adding your own topics and posts, as well as connect with other members through your own private inbox!

Saturation Map (Mask)


revnart

Power User
Messages
362
Likes
327
Hey, I was experimenting with saturation masks and after several tests I've found that HSL and HSB give me strange artifacts, so I've created LUT file which gives me the result I was looking for.
Here is example of base file converted to S from HSB and HSL and with the use of LUT file.

saturation_map.jpg

Do you get the same results with HSB/HSL Saturation channels?
I also attach base file if someone would like to make test also and LUT files.

base_file.jpg
 

Attachments

  • saturation_mask_LUT.zip
    348.4 KB · Views: 12

thebestcpu

Guru
Messages
2,988
Likes
2,747
Hi Revnart
Can you provide a PNG file. JPEG compression artifacts create havoc for a test image.
Just a suggestion
 

thebestcpu

Guru
Messages
2,988
Likes
2,747
Also, I have not used LUTs in Photoshop so do not know how to import the file(s) in your zip file so I use the LUT in Photoshop. Any help would be appreciated. Thanks in advance
John Wheeler

PS - I do get the same results with HSB and HSL filters as you do. The Saturation equations associated with both of those filter are different than the one you sought. PS uses Saturation pretty loosely. The version of Saturation that you desire exists in PS and is used with the Color Layer Blends. The B&W Saturation information can be teased out with blends and a couple added Layers. Can post if you are interested (it looks just like your LUT result btw)
 

thebestcpu

Guru
Messages
2,988
Likes
2,747
Hi Revnart
Looked it up on what to upload to the presets files (cube file).
The results matched bit for bit an alternate approach for Saturation Masks yet yours is much simpler -- Kudos!!!
I don't know what it took for you to put that together yet thank you very much for doing so and also for sharing.

That's a keeper for me
:thumbsup::thumbsup::thumbsup:
John Wheeler
 

revnart

Power User
Messages
362
Likes
327
Thank you for your response, glad you found it useful.
Maybe you could post your HSB and HSL results for comparison?
And if you have different approach share it, always nice to learn new way to achieve same result :)

Here goes PNG file:
base_file_2.png
 

thebestcpu

Guru
Messages
2,988
Likes
2,747
Hi Revnart

I will share my approach in this post yet it takes three incremental Layers compare to your one Layer and that is why your approach is my new standard.
I will post my results of the Saturation from the HSB / HSL filter in another post.

First, here is the approach where I created a B&W saturation pixel mask.

The B&W saturation image of both of our approaches is the same as the Saturation equations used in the Layer Blend mode of "Saturation"

The math for that version of saturation is pretty simple

If Cmax = Max(R,G,B) for each pixel and
if Cmin = Min (R,G,B) for each pixel

then the Saturation number is just Sat = Cmax - Cmin for all bits in all color channels


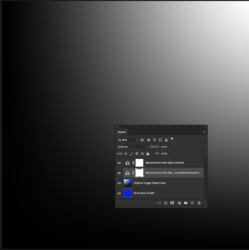
The approach I use requires 3 added Layers as shown in the image below.

1) Right below the original image, place the solid color of Blue B=255
2) On the original image one Layer up set blend to Saturation.

Blue is so Luminosity does not take precedence over Saturation in the blend mode. Resulting image is Hue=Blue, Luminosity=.3, Saturation of the original image. Green and Red channels are equal and the blend adjusts these to meet the luminosity requirement

3) First color mixer channel creates a monochrome image based on just Red channel (could also be done with Green) to subtract of the lower levels. This creates and image where Cmin=0 and Cmax is Saturation value in just the Blue Channel

4) Last color mixer channel creates monochrome of the last combined image from the Blue channel. This layer Grey value now represents the Saturation = Cmax - Cmin
-------

I used your provided test image and did a difference from your approach and my approach and they matched except for a few random bits that were off by 1 bit in one or two color channels. Though this might be rounding error

Yet the issue was that for me, in the Color Lookup Table of your approach, there is a checkbox to add dither (usually on by default). When I turned the dither off, our two approaches matched bit for bit exactly.

Your approach is now my baseline approach because it achieves the same result with one additional Layer instead of three.

Do you have any pointers to how to create LUTs? Looks real useful for many reasons.
Thanks again for sharing
John Wheeler

Screen Shot 2019-05-22 at 1.13.47 PM.png
 

thebestcpu

Guru
Messages
2,988
Likes
2,747
Hi Revnart and others

Using your test image and using the HSB and HSL filters to pull out the Saturation for each (in the Green Channel) - I do get the exact same results as you.

The pixelated look are not actually artifacts or anomalies yet solely due to the math involved and quantization effects. In those areas there are small value pixels (with only 8 bit resolution) being divided also by small pixel values (also of 8 bit resolution). Makes a pretty design.

If the image were in 16 bit mode and the gradients were also 16 bit resolution gradients when built, you would most likely not see this issue so prominently. Not too different from extreme adjustments of 8 bit images causing banding issues.

However, interpretation of the different Saturation models has always been a challenge for me yet I have some examples below that might help explain some of the differences and also show why when creating a Saturation mask, one may be better than others.

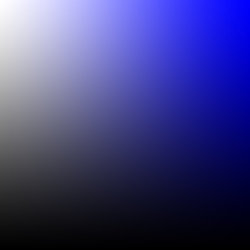
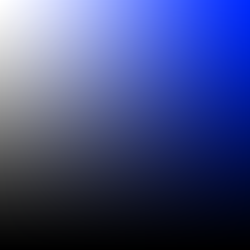
The base image I am going to use has a Hue of pure Blue and horizontally increasing the Blue channel from the black left area to maximum Blue in the middle (R=0, G=0, B=255) and then from the middle to the right increasing Red and Green channels linearly until you to full white on the right:
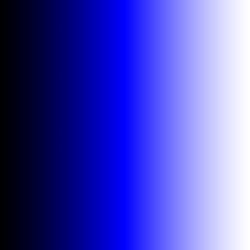
Gradient-Blue.jpg

Repeating the math from a prior post for reference

Cmax = Max (R,G,B)
Cmin = Min (R,G,B)

Saturation (as used in the Saturation Blend and Revnarts Lookup Table) is:

SATsat = Cmax-Cmin

The grayscale image of this version of Saturation follows:
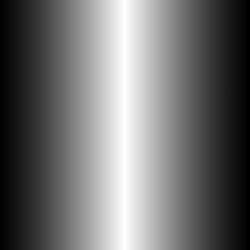
Cmax-Cmin-or-Saturation-Blend.jpg


Now the Saturation model from HSB model has slight different math. I won't give the math yet it starts the same as Cmax-Cmin as before yet is uplifted by dividing by Cmax. Cmax is the same as the B or brightness level in the HSB model.

So applying this to the base image above, you will see pure white on the left because the heavy uplifting for dark areas on the image yet on the right, Cmax is the same while Cmax-Cmin is decreasing.
So you see a decrease in Satuartion in light areas This does not match my intuition for saturation overall yet that is how the HSB model works:
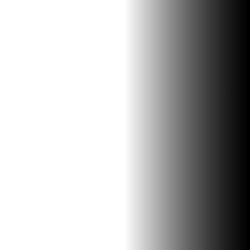
Saturation-from-HSB.jpg

The HSL model for Saturation (SAThsl) is another level of difference. You start with the same Saturation amount of Cmax-Cmin or SATsat and it is uplifted both for lower and higher luminosity portions of the image. It effectively is displaying how the Saturation numbers relative to luminosity.

So when using the HSL version of Saturation using the HSL Photoshop filter to the same base image above, you end up with pure white over the full image. This too does not match my intuition for a Saturation mask (NOTE: I added a border so you could see it:

Saturation-from-HSL.jpg

This was not a deep dive into the different models yet hopefully enough to show how they display differently. The example I contrived was to show the extreme difference among the models and why you might want to choose the first version vs the HSB or HSB versions of Saturation. Just my opinion of course.

Sorry if I lost you on the way, sometimes I am so left brained my head hangs over that way and makes me walk with a limp :D
 

revnart

Power User
Messages
362
Likes
327
Thank you for your time and knowledge :)
Tested it and your approach gives me exactly same results on the test file, but I just tested it on photo and get different result. This may be my fault of missing something but your explanation seems very clear to me ;) The nice part with your approach is that I will be able to make saturation map of each channel separately - which is very nice benefit ;) Will dig dipper, because of info you shared.

About creating LUT's - there are different softwares for creating them, but why look somewhere else while you can create it with photoshop :)

1. Open your image in Photoshop
2. Use adjustment layers
3. File > Export > Color Lookup Tables
4. Set to your needs
5. done :)
 

thebestcpu

Guru
Messages
2,988
Likes
2,747
Hi revnart
Thanks for the quick tutorial on LUTs and much appreciated. Between that and your Cube file I now have two new tools in my toolbox :)

I am sure that your technique and my technique match exactly over all combinations of pixel RGB values. Including your technique, I have four ways to create the exact same Saturation Layer (the two extra ones were more complex Actions) and I tested all four of them Over 1 million randomized RGB pixels over the full 0 to 255 value range for each channel separately and doing Difference Blends, they all match exactly to every last bit. So the issue when you tired on another image is probably just one of the settings in that Layer Stack. To that end, I have attached that PSD file with those exact Layers and the test image your provided. All you have to do is substitute your own image in the second from the bottom Layer (set to Blend =Sat) and make sure the bottom blue layer covers the entire canvas if the image you put in is larger than the test image.

BTW - On the creation of masks per color channel, I may not quite understand how that is done yet I am sure it can easily be done (and with fewer Layers) with your approach using Channel Mixer Adjustment Layers

Thanks again
John Wheeler
 

Attachments

  • B&W Satsat creation layers.psd
    1.4 MB · Views: 6

revnart

Power User
Messages
362
Likes
327
Thank you John once again ;) After some tests I've created LUTs for saturation map on R,G,B,C,M and Y separately ;) Your psd file was very helpful, and gave me a lot of new ideas to test ;) And yes I was doing something different that's why I was getting different results ;)
I'm posting LUT files here so maybe someone will find it useful.

Thanks again
Witek Eysymontt
 

Attachments

  • Separate_Saturation_Maps.zip
    40.3 KB · Views: 7

thebestcpu

Guru
Messages
2,988
Likes
2,747
Glad the PSD file helped and thanks for sharing the LUTs for all the color channels as well. I will download those and give them a try.
 

thebestcpu

Guru
Messages
2,988
Likes
2,747
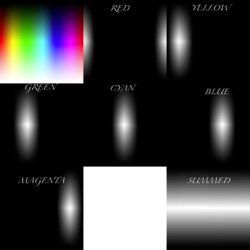
Very nice work Witek. Just had the chance to download the Sat Mask Luts by color channel and give them a try. I used a spectrum of colors with a gradient from white to black. I tried each LUT with the Color Lookup adjustment Layer and the results are show in the image below.

Very nice separation and overlap among the 6 channels. As a test, I did a linear add of all 6 masks and they matched exactly just taking a full non-channel specific saturation mask. This makes it very simple to create a mask of a subset of combinations of those color channel masks just by using a linear add (Linear Dodge Blend) among the masks you want for adjustments.

Very Well Done and thanks again for sharing.

John Wheeler

SAT-MASK-BY-CHANNEL.jpg
 

Top