What's new
Photoshop Gurus Forum

Welcome to Photoshop Gurus forum. Register a free account today to become a member! It's completely free. Once signed in, you'll enjoy an ad-free experience and be able to participate on this site by adding your own topics and posts, as well as connect with other members through your own private inbox!

Surface homogenization


Gzser

Member
Messages
7
Likes
0
Hi everyone, I mostly take architectural photographs and I regularly stumble upon one problem when I have to deal with with wall surfaces that are not uniform due to aging, tags, moisture, cracks...

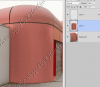
On the picture below you can see what I am talking about on the red surface, old tags, new tags, moisture, dog pee. Usually I deal with native Photoshop tools as healing brush, patch but here, and particularly on the "washed out white surface", it is difficult to obtain a nice result with those tools.

I also tried to apply a red layer and I have tested different fusion modes but still with no success.

Any idea on how to deal with this kind of situation and how to uniformise the surface and at the same time to conserve the "grain" of the material and the original lighting ?

Thanks a lot !

447299DSC9102.jpg
 
Last edited by a moderator:

IamSam

Administrator
Staff member
Administrator
Messages
22,721
Likes
13,258
EDIT: Just use the Clone stamp Tool on a new layer.
 

Eggy

Retired Moderator
Messages
5,313
Likes
5,085
Maybe to clean up a bit before cloning, using the patch tool?
 

IamSam

Administrator
Staff member
Administrator
Messages
22,721
Likes
13,258
The Spot Healing Tool as well.
 

Gzser

Member
Messages
7
Likes
0
Ok thanks, I'll try the clone stamp tool and spot healing, I haven't try that on a new layer.

I have tried the patch tool after a bit of cleaning but the result is still too hard...
 

hawkeye

Guru
Messages
2,378
Likes
1,113
Solid color to fill the area, add noise, dodge and burn.
 

Attachments

  • MaxthonSnap20161007082448.png
    MaxthonSnap20161007082448.png
    542.8 KB · Views: 0

fredfish

Guru
Messages
887
Likes
1,247
Ok thanks, I'll try the clone stamp tool and spot healing, I haven't try that on a new layer.

I have tried the patch tool after a bit of cleaning but the result is still too hard...

Just in case you aren't aware when using the clone stamp tool on a new layer you have to make sure that you change the setting in the menu bar from "Current Layer" to "Current Layer & Below". Also this setting will stick! so when you come bact to the tool in a couple of weeks time and it isn't behaving how you expect make sure you have switched the setting back! (Been there ! :cheesygrin:)

Cheers

John
 

Gzser

Member
Messages
7
Likes
0
Hawkeye > That's the kind of result I am looking for, thanks a lot !


Funny thing is that I was looking yesterday some portraiture retouching tutorials in order to extrapolate the results and adapt them on my building retouch. And I bookmarked one tutorial about Dodge & burn technic.


I know what I am going to do this weekend, I will search PSG website for tutorials !


Thanks again.
 

Gzser

Member
Messages
7
Likes
0
Thank you Inkpad.T, I want to be as clean as I can while conserving a "natural" aspect for lighting and wall material. I will try that too :)
 

TonyCooper

Well-Known Member
Messages
93
Likes
42
Ok thanks, I'll try the clone stamp tool and spot healing, I haven't try that on a new layer.

It's always best to use the clone stamp on a blank layer (set to Sample Current and Below) above your working layer. This allows you erase cloning in
a particular area if it doesn't look right, but keeping the cloning that does work right in the rest of the layer.

Same with the spot healing brush if you use it in multiple places, content aware fill, and brushing in color.

Using a blank layer instead of a new layer that is a copy of the working layer puts those edits on a layer
where there is nothing else. You can turn off the eyes of the layers below and see just the results of the clone
stamp or whatever, and edit that cloning with the eraser. You can adjust the opacity of that layer or blur it.

When done, or you think you're done, merge the visible layers (control+alt+shift+e on a Windows PC) and
view the results. You may want to keep those changes and add a new blank layer and add a few more.
 

Gzser

Member
Messages
7
Likes
0
Yep, thank you, I need to do this automatically now, I never use blank layers and I know I should do this more often !
 

Top